Basic Skills, Breakfast, Brenda's Kitchen Hacks, How To, Pork, Savory Brenda Drake + Chelsea Kasen Basic Skills, Breakfast, Brenda's Kitchen Hacks, How To, Pork, Savory Brenda Drake + Chelsea Kasen

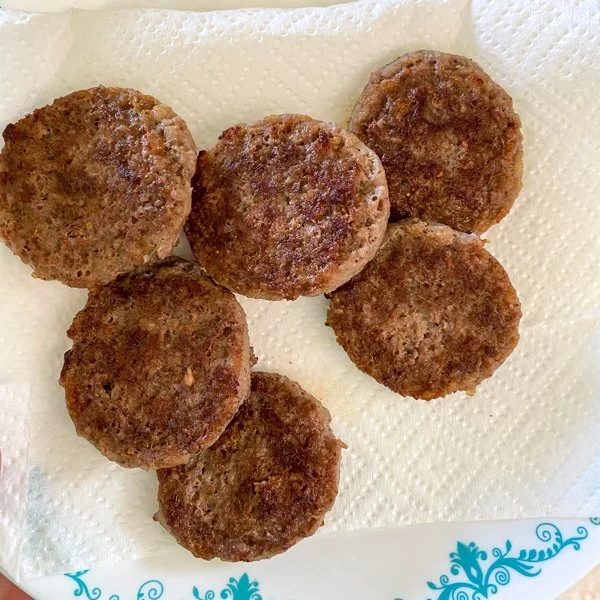
HOW TO: Perfect Sausage Patties

Prep & cook perfect sausage patties

HOW TO: Perfect Sausage Patties

Perfect Slices

  1. Select your favorite brand & flavor:

    1 - 16 oz pkg Pork Sausage Roll

    • Must not be frozen, defrost in the refrigerator overnight for perfect texture

    • Should be refrigerator temperature for precise slicing

  2. Remove plastic packaging, keeping the roll intact

    • Use a sharp knife to slice the full length of the plastic sleeve and cut the plastic ends to remove the metal ring, then peal back the plastic

  3. Use a sharp knife and mark where it will be sliced

    • For 1 oz slices, mark half (2), half each (4), then half again (8) and a final half (16)

    • 10 slices is much easier, allowing for patties that are about 1.5 oz

  4. Use non-flavored dental floss (or a length of thread) to cut at the marks into individual slices

    • Slide the floss under the tube of sausage

    • At each mark: bring the two ends up over the top, cross, and pull tightly together, slicing through the sausage and creating a perfect disk

Pan Fry

  1. Heat a skillet over medium heat

  2. Place the patties in the hot skillet, arranging in a single layer (divide into batches if needed)

  3. Cook until browned (5-6 minutes), flip and continue cooking until the patty is cooked through (3-4 minutes)

  4. Remove fully cooked patties from skillet, placing on a paper-towel lined plate

  5. Transfer patties a serving platter


Brenda’s tips:

  • Serving size: 16 - 1 oz patties

  • These patties are ideal for homemade egg & sausage sandwiches


Window to B’s kitchen . . .

Read More
How To, Main Dish, Pasta, Savory Brenda Drake + Chelsea Kasen How To, Main Dish, Pasta, Savory Brenda Drake + Chelsea Kasen

HOW TO: Fresh Cheese Tortellini

Fresh pasta filled with garlic & cheese mixture

Homemade tortellini takes time as each one requires hand filling and shaping. It’s time well spent for those of us that enjoy the process of cooking.

It is recommended to use both a Cuisinart Food Processor and Pasta Roller Kitchenaid attachment in this recipe.


HOW TO: Fresh Cheese Tortellini

Step 1: Food Processor

To the bowl of a food processor, add:

1 1/2 cups flour

2 eggs

1/2 tsp salt

2 Tbsp water

Process until mixture appears like sand. Using your hands, press into a ball and transfer to a bowl. Cover tightly with plastic wrap.

Allow to rest ~30 minutes.

Step 2: Cheese Filling

To a small bowl, add:

4 oz cream cheese

2 Tbsp parmesan cheese

1/4 tsp garlic powder

Stir together. Set aside.

Step 3: Kitchenaid Pasta Attachment

Using the Pasta Roller Kitchenaid attachment, prepare the Tortellini squares:

  • Note: between steps, keep the pasta covered so that it doesn’t dry out.

  • Divide dough into 4 equal pieces, kneading each into a disk

  • Starting with setting 1, run each piece of pasta through

    • Repeat at each number setting, flouring sheet lightly between rolls

      • Final setting will be 6 on the Kitchenaid Pasta Roller

  • Using a sharp knife or bench scraper, cut each pasta sheet into squares (1 1/2” to 2”)

    • Lightly flour between squares to prevent sticking together

Step 4: Fill & Shape

Select a square:

  • Using a pastry brush, dab a bit of water all around the edge

  • Place ~1/2 tsp of prepared filling in the center

  • Fold one corner diagonally to the opposite, creating a triangle

  • Press around the edge to seal

  • Wrap the ends together to form a circle, pressing tightly to seal

  • Place prepared tortellini onto floured sheet pan

  • Repeat with remaining squares until all are filled & shaped

Freeze or cook immediately.


Brenda’s tips:

  • Serving size: 4 servings

  • Some serving possibilities:

  • Most basic: add to simmering beef stock, cooking for about 5 minutes, and serve

  • Use prepared pasta in Tortellini Sausage Soup

  • Cook and then serve with your favorite pasta sauce


Window to B’s kitchen . . .

Making tortellini with Vivian (:

Read More
Main Dish, Pasta, One Pot Wonders, Savory, Soup Brenda Drake + Chelsea Kasen Main Dish, Pasta, One Pot Wonders, Savory, Soup Brenda Drake + Chelsea Kasen

Creamy Tortellini Soup

A rich, creamy soup full of Italian flavors.

A rich, creamy soup full of Italian flavors. Prepare a batch of homemade Cheese Tortellini prior to making the soup or speed things up tremendously by using a pre-packaged fresh tortellini.


Creamy Tortellini Soup

To a large pot, heated to medium, add:

1 Tbsp oil

1/2 cup onion, finely diced

1 Tbsp garlic, minced

Sauté, cooking for 2-3 minutes. Add:

1 lb ground sausage

Cook until nicely browned, then season with:

1 tsp Italian seasoning

1 tsp oregano

1 tsp salt

1/4 tsp cayenne pepper

1/4 tsp ground sage

Deglaze pan with:

1 cup chicken broth

Then stir in:

4 cups chicken broth

1 (8 oz) can tomato sauce

Simmer 20 minutes. Add:

1 batch fresh cheese tortellini (prepared in advance)

  • Substitute: 1 (9 or 10 oz) package cheese tortellini

Simmer ~5 minutes. Stir in:

1/2 cup heavy cream

Cook for 2 minutes and serve hot.


Brenda’s tips:

  • Serving size: 4 servings

  • No cream on hand? In a saucepan, put together a bechamel sauce and whisk it into the simmering soup:

    • 3 Tbsp butter

    • 3 Tbsp flour

    • 1 cup milk

  • This soup can also be made with chicken or beef


Window to B’s kitchen . . .

Read More
Cookies, Desserts, Garden Produce Brenda Drake + Chelsea Kasen Cookies, Desserts, Garden Produce Brenda Drake + Chelsea Kasen

Strawberry Ice Cream

Because: fresh strawberries!

Speckled with bits of berries, fresh strawberry ice cream encapsulates the delicate flavors of summer.


Strawberry Ice Cream

Step 1: Prepare fresh strawberries

  • wash

  • dice (3/8" cubes), to make:

1 1/2 cups diced strawberries

Sprinkle with:

2 Tbsp sugar

Toss together. Refrigerate while fruit macerates, about 30-60 minutes.

Step 2: Strain fruit, retaining liquid in bowl.

  • Return strained fruit (covered) to refrigerator until time to go into ice cream machine.

  • Measure liquid. Take note for next step.

Step 3: Make ice cream mixture:

  • Recommended to use custard ice cream base, but no-cook vanilla is great too.

  • When making, replace milk with fruit liquid from Step 2, substituting 1:1.

    • Ex: 1/8 cup fruit juice, decrease milk by 1/8 cup.

  • Remember to refrigerate! 

Step 4: Churn ice cream. Review Homemade Ice Cream: Methodology for how.

Once it is thickening nicely (~15 minutes into cycle), pour in the refrigerated fruit.

  • Note: fruit will have likely continued to release juice while refrigerating. Adding up to 2 Tbsp of that liquid will not compromise the outcome of the ice cream.

Finish churning.

Step 5: Transfer frozen ice cream to . . .

  • Bowls for immediate serving

  • Slab of cookie to become ice cream sandwiches

  • Freezer-safe container for later consumption


Brenda’s tips:

  • Serving size: ~8 (1/2 cup)

  • This recipe is designed for fresh strawberries, but in place of diced fruit, substitute with 1 cup strawberry jam and it will be delicious


Window to B’s kitchen . . .

Read More
Desserts Brenda Drake + Chelsea Kasen Desserts Brenda Drake + Chelsea Kasen

Rhubarb Angel Dessert

Rhubarb custard perfectly sandwiched between a crisp shortbread crust and soft meringue liberally sprinkled with coconut

For rhubarb lovers, this dessert is a must! The tanginess of the rhubarb is maintained and perfectly sandwiched between a crisp shortbread crust and soft meringue liberally sprinkled with coconut.


Rhubarb Angel Dessert

Step 1: Shortbread crust

  • Line a 9” square baking dish with parchment paper, set aside

  • Preheat oven to 350F

Combine in a large mixing bowl:

1/4 cup flour

2 Tbsp corn starch

1 Tbsp sugar

Sift together, then cut in:

1/2 cup butter

Continue mixing while adding:

3/4 cup flour, in 2 Tbsp increments

Continue to mix until well combined. Stir with a spoon until it’s too difficult, then knead by hand for ~1 minute longer to create the shortbread.

Press shortbread dough into the prepared 9”x9” glass baking dish. Put in preheated oven and bake for 10 minutes. While baking, complete Step 2.

Step 2: Rhubarb Filling

Separate:

3 eggs

  • Whites into Bowl 1 (set aside)

  • Yolks into Bowl 2

To the egg yolks in Bowl 1, add:

1 cup sugar

2 Tbsp flour

1/4 tsp salt

Whisk together. Fold in:

1/2 cup heavy cream (sub: evaporated milk)

Add:

2 1/2 cups rhubarb (cut into 1/4” chunks)

Spoon the rhubarb custard mixture over the par-baked crust and return to oven. Bake at 350F for 45-60 minutes. Test by inserting a clean knife in the center to ensure the custard has set.

Step 3: Meringue

Just before the custard is set . . .

To the 3 egg whites in Bowl 1, add:

1/3 cup sugar

Using an electric hand mixer, whip mixture for 4 to 6 minutes or until meringue holds stiff, glossy peaks.

Spoon over baked rhubarb. Sprinkle with:

1/4 cup sweetened coconut

Return to oven and bake for 5 to 10 minutes until beautifully toasted. Allow to cool completely, serve.

BONUS TIP: Dip table knife into a glass of water before each slice to prevent the meringue from sticking to the knife. The resulting slices will be picture perfect.


Brenda’s tips:

  • Serving size: ~8 servings

  • Rhubarb is ready to harvest in the early spring. The stalks are usually ruby red and are the only edible part of the plant.


Window to B’s kitchen . . .

Read More
Breakfast, Desserts, Leftover Meals Brenda Drake + Chelsea Kasen Breakfast, Desserts, Leftover Meals Brenda Drake + Chelsea Kasen

Baked Rice Pudding

A perfect way to use up leftover rice - make this custardy rice pudding as a snack or dessert.

A perfect way to use up leftover rice - make this custardy rice pudding as a snack or dessert.


Baked Rice Pudding

  • Preheat oven to 300F.

To a medium pot, add:

1 cup milk

1 egg

Whisk smooth, then stir in:

1 tsp corn starch

1 Tbsp brown sugar

1 tsp cinnamon

1/8 tsp nutmeg

1 cup rice (pre-cooked or leftover)

Once combined, place over medium-high heat. Whisking continuously, heat until just boiling and remove from heat. Stir in:

1/2 tsp vanilla

Set aside.

  • Butter 4 (8 oz) ramekins on the sides and bottom.

  • Place prepared ramekins on a sheet pan.

  • Equally divide the rice pudding among the ramekins (about 1/2 cup each).

Bake at 300F for 18-22 minutes. Allow to rest 5 minutes before serving.


Brenda’s tips:

  • Serving size: 4 (1/2 cup) servings

  • This rice pudding can be eaten without baking, but time in the oven creates a tender creamy custard


Window to B’s kitchen . . .

Read More
Beef, Garden Produce, Main Dish, Pasta, Savory Brenda Drake + Chelsea Kasen Beef, Garden Produce, Main Dish, Pasta, Savory Brenda Drake + Chelsea Kasen

Pea and Carrot Casserole

Flavor-filled casserole, perfect for dinner tonight

There are a few casseroles that need to be added to any dinner menu rotation - this is one. It is:

  • a Saunders family favorite

  • a comfort food casserole

  • a great hamburger recipe

Make this tonight and find a new favorite.


Pea & Carrot Casserole

Step 1: Beef

To a skillet heated to medium, add:

1 lb ground beef

Brown beef, breaking it up as it cooks through. Then add:

1 (8 oz can) tomato sauce

1 tsp seasoned salt

1 tsp garlic powder

Fold together, set aside.

Step 2: Pasta & Veggies

To a large pot (6-8 qt), add:

~2 qts water

Turn heat to High. Bring to rolling boil, add:

1 cup carrots, 1/4” diced

Cook for 5 minutes. Then add:

1/2 tsp salt

8-10 oz pasta (egg noodles recommended)

Reduce heat slightly, to Med-High, retaining a rolling boil until pasta is cooked to desired texture.

  • Follow the package recommended cooking time for best results

Then stir in:

1 cup frozen petite peas

Rest 1 minute, then drain through a colander. Return to pot. Stir in:

1 (16 oz) pkg cottage cheese

1 cup milk (or cream)

Set aside.

Step 3: Assemble & Bake

Spray a 13”x9” casserole dish with non-stick spray

In the prepared casserole dish, layer:

  • 1/2 pasta & veggie mix

  • 1/2 cup grated cheese

  • 1/2 ground beef mix

Repeat. Cover tightly with aluminum foil.

Bake at 350F for 45-60 minutes. Serve hot.


Brenda’s tips:

  • Serving size: 4 to 6 servings

  • Freezer option: this casserole can be fully prepared and assembled in a metal pan. Freeze instead of baking. Two hours before dinner: remove from freezer, place in oven and bake at 350F for 90 minutes (or until heated through).


Window to B’s kitchen . . .

Read More
Beef, Garden Produce, Main Dish, Savory Brenda Drake + Chelsea Kasen Beef, Garden Produce, Main Dish, Savory Brenda Drake + Chelsea Kasen

Oven Stew

A hearty and simple dinner dish that comes together quickly.

Oven Stew

  • Spray a 13”x9” casserole dish with non-stick spray

To the prepared casserole dish, add:

~1 lb potatoes, peel and cut into 1” cubes

~1 lb carrots, peel and slice into 1” slices

1/2 lb ground beef, cooked and drained

1 (10.5 oz) can cream of mushroom soup

1 cup beef broth

1/2 tsp seasoned salt

1/2 tsp garlic salt

Fold together. Cover tightly with aluminum foil. Bake at 350F for ~90 minutes. Casserole is done when the vegetables are fork tender. Serve hot.


Brenda’s tips:

  • Serving size: 4 servings

  • Add steakhouse seasoning for alternate great flavor

  • Substitute bouillon and water for the beef broth if needed


Window to B’s kitchen . . .

Read More
Main Dish, Savory, Beef Brenda Drake + Chelsea Kasen Main Dish, Savory, Beef Brenda Drake + Chelsea Kasen

Chicken Fried Steak

Southern comfort food at its finest.

Comfort food. Chicken Fried Steak is a classic.

The star of this dish, cube steak is simply round steak that has been intensely tenderized. Ideally you’ll just want to purchase cube steak that has already gone through a blade tenderizer or knife tenderizer. But if needful, then follow the method we recommend to tenderize chicken - give the round steak a few good whacks to turn in into cube steak.


Chicken Fried Steak

Step 1: Prep Station

Select three pie tins, and fill as follows:

  1. To Tin 1 add:

    1/2 cup flour

    1 tsp garlic powder

    1 tsp seasoned salt

    Sift together.

  2. To Tin 2 add:

    1 egg

    1 Tbsp Worcestershire sauce

    Whisk together with a fork.

  3. To Tin 3, add:

    1 sleeve saltine crackers, crushed

Step 2: Bread Beef

If not pre-portioned, divide into four pieces:

1 - 2 lbs cubed steak*

Select one piece of steak:

  • Dredge in the prepared flour in the Tin 1, flip to coat other side

  • Immerse in the egg mixture in Tin 2, coating both sides

  • Remove and press into the crushed crackers in Tin 3, covering completely

  • Transfer coated cube steak to a clean plate

  • Repeat until all steaks are coated

Step 3: Sear

  • Preheat oven to 350F

  • Preheat a 10” oven-proof skillet over medium heat

To the preheated skillet, add:

1/4 cup oil

Heat to sizzling, then add:

Breaded Cube Steaks

Cook for 3-4 minutes, until the breading has browned. Flip steak and sear on the other side for 3-4 minutes.

Step 4: Finish

Transfer oven-proof skillet to the preheated oven. Roast cube steaks at 350F for ~10 minutes.

Serve hot with Mashed Potatoes and Country Gravy.


Brenda’s tips:

  • Serving size: 4 servings

  • *Cube steak: round steak that has been tenderized with a blade tenderizer. Make your own cube steak by following the method we recommend to tenderize chicken.

Read More
Beef, Main Dish, Savory Brenda Drake + Chelsea Kasen Beef, Main Dish, Savory Brenda Drake + Chelsea Kasen

Tater Tot Casserole

This casserole is a comfort classic!

A comfort food classic, Tater Tot Casserole should be a part of every childhood.


Tater Tot Casserole

  • Preheat oven to 350F

  • Prepare an 8”x8” baking dish, spritz with non-stick spray, set aside.

To a skillet, add:

1/2 lb ground beef

Cook over medium heat until browned and cooked through. Skim off rendered fat and add:

2 Tbsp onions, finely chopped

1 tsp garlic, minced

1/4 tsp seasoned salt

Continue to cook for about 5 minutes. Remove from heat and stir in:

1 (10.5 oz) can cream of mushroom condensed soup

1/2 cup sour cream

1 Tbsp Worcestershire sauce

Fold together and pour into prepared 8”x8” baking dish.

Sprinkle with:

1/2 cup cheese, shredded

In a single layer, place:

1 (32 oz) pkg tater tots

  • Most likely will not use the full bag

Bake at 350F for 35-45 minutes, until tots are golden brown. Serve hot.


Brenda’s tips:

  • Serving size: 4

  • Recommended to serve a hot vegetable as a side dish, or add 1 cup frozen veggies to the beef mixture


Read More
Beef, Main Dish, Savory, Bacon Brenda Drake + Chelsea Kasen Beef, Main Dish, Savory, Bacon Brenda Drake + Chelsea Kasen

Bacon & Blue Cheese Meatloaf

The tangy saltiness of blue cheese is magnified in this meatloaf.

The tangy saltiness of blue cheese is magnified in this meatloaf.


Bacon & Blue Cheese Meatloaf

Step 1: Sauce

  • Line a 8”x4” bread pan with aluminum foil, set aside.

For the sauce, stir together in a small bowl:

2 Tbsp tomato sauce

2 Tbsp brown sugar

1/4 tsp hot sauce

Set aside.

Step 2: Loaf

Heat a skillet to medium, add:

1 tsp oil

1/2 cup onions, finely diced

1 tsp garlic, minced

Sauté. Set aside.

To a medium mixing bowl, add:

1/4 cup bread crumbs

1 tsp seasoned salt

1 tsp dried parsley

1/4 tsp pepper

Sautéed garlic & onions

Toss together, then add:

1 lb ground beef, defrosted

1 egg

1 Tbsp Worcestershire sauce

1 tsp mustard

1/4 cup blue cheese crumbles

Use hands to mix well.

  • Form into a loaf and place in prepared pan

  • Spoon sauce over loaf

Optional - top with:

2 slices bacon (uncooked), cut into 1/4” slices

Step 3: Bake & Serve

Bake at 350F for 60 minutes, internal temperature minimum of 160F. Serve hot.


Brenda’s tips:

  • Serving size: 4 servings

  • To create a completely different and equally amazing alternative, change up the cheese. Simply cube or grate and replace the blue cheese.


Window to B’s kitchen . . .

Read More
Beef, Garden Produce, Leftover Meals, Main Dish, Savory Brenda Drake + Chelsea Kasen Beef, Garden Produce, Leftover Meals, Main Dish, Savory Brenda Drake + Chelsea Kasen

Sheet Pan Haystacks

Chili haystacks for a crowd

A great way to use leftover chili (or canned chili) for an easy weeknight dinner. This also presents beautifully as a party platter.


Sheet Pan Haystacks

Prepare each item on the list and assemble on a sheet pan, following the example in the photograph or creating your own design:

  1. Tortilla chips

  2. Cheese, shredded

    • Optional: broil cheese and chips for 1 minute to melt the cheese

  3. Chili: make or preheat as needed

  4. Lettuce, chopped

  5. Tomatoes, diced

  6. Sour cream & green onions

Serve immediately.


Brenda’s tips:

  • Serving size: 4 to 8

  • Optional additions:


Window to B’s kitchen . . .

Read More
B's Favorite Brenda Drake B's Favorite Brenda Drake

Brenda's Forty Favorites

A decade ago, Brenda wasn’t particularly excited to turn 30. Irrelevant though the reasons are now, it seemed imperative to find a way to make the birthday better. As cooking brings joy, Brenda settled on a plan and selected 30 of her favorite foods. Filling her apartment with friends to share all her favorites proved to be a perfect way to celebrate that milestone.

For this birthday, Brenda has updated the list to include her top 40 Favorites and is sharing it with you. We all know that Spaghetti is Brenda’s first favorite for dinner and no one is surprised that many of the others are desserts.

In honor of her 40th, select your favorite from this list of her favorites and get cooking!


Brenda’s tips:

Enjoy!

Read More
Beef, Garden Produce, Main Dish, Savory Brenda Drake + Chelsea Kasen Beef, Garden Produce, Main Dish, Savory Brenda Drake + Chelsea Kasen

Corned Beef & Cabbage

Start brining the beef early to enhance the flavor of this corned beef

Corned beef is basically a slab of beef that has brined in a spiced salt bath. For superb corned beef, plan to salt brine the beef for 5 days. To achieve the traditional pink hue use curing salt - but go ahead and leave it out if you’re indifferent about the color, as I am.


Corned Beef & Cabbage

5 days prior to serving, prepare brine . . .

To a large pot, add:

1 qt water

1 cup coarse salt

1/2 cup brown sugar

1 Tbsp curing salt* (optional)

1 tsp mustard seed

1 tsp black pepper corns

1/2 tsp whole cloves

1/2 tsp cinnamon

1/2 tsp nutmeg

1/2 tsp dried rosemary

1/2 tsp ground ginger

2 bay leaves

Bring to a boil, simmer for 5 minutes. Stir in:

1 qt cold water

Refrigerate brine for 1 hour.

One hour later . . .

To a 2 gallon resealable bag, add:

2 lb brisket

Chilled brine

2-4 cups cold water

Seal, being sure to remove all air, and place flat in a 13”x9” pan ensuring that the beef is completely submerged**. Refrigerate for 5 days, flipping the bag daily.

5 days later . . .

To a large pot, add:

Brined beef, thoroughly rinsed

2 cups water

2 bay leaves

Bring to a boil over high heat, reduce heat to medium-low to retain a low simmer. Cook for 2 hours. Add:

4 cups water

1 onion, quartered

4 carrots, halved

4 potatoes, quartered

1 tsp salt

Simmer for 30 minutes longer. Finally add:

1 head cabbage, cut into 8 wedges

  • When cutting, keep the core attached to all wedges so that the leaves stay together

Simmer for 30 minutes to finish. Thinly slice the beef across the grain. Serve hot.


Brenda’s tips:

  • Serving size: 4 to 8 servings

  • *Curing Salt: sometimes referred to as “pink salt” (it is NOT Himalayan salt), will create the signature pink color in the meat. As the brisket will be fully cooked, it is not essential it be cured and therefore the curing salt is optional in this recipe.

  • **The beef will float, so consider placing something heavy on top while it’s in the refrigerator to ensure that it stays completely submerged in the brine

  • This recipe makes enough brine for up to 4 lbs of brisket, so increase as desired

  • Extend the brine time up to 8 days if needed

  • Recipe works great in a slow cooker, increase cooking time to 8 hours

  • This recipe is inspired by Alton Brown’s Corned Beef


Window to B’s kitchen . . .

Read More
Desserts Brenda Drake + Chelsea Kasen Desserts Brenda Drake + Chelsea Kasen

Banana Pudding

The fresh bananas bring all the flavor to this delicious layered pudding.

The fresh bananas bring all the flavor to this delicious layered pudding.

Banana Pudding

Step 1: Pudding

To a quart jar, add:

2 cups milk

3 egg yolks

Stir with a fork to break yolks, then put the lid on the jar and shake it to combine the yolks and milk. Pour the mixture through a wire-mesh strainer into a large pot, straining out any egg imperfections. Then add:

2 cups heavy cream

1 1/8 cup sugar

3 Tbsp corn starch

Whisk together. Place pot over medium heat, stirring continuously, cook until thickened. Add:

6 Tbsp butter

2 tsp vanilla

Place a sheet of plastic wrap on the pudding, pressing directly on the surface so that the pudding doesn’t form a skin. Chill for about 30 minutes.

Step 2: Whipped Cream

30 min later . . .

To the bowl of a stand mixer, add:

2 cups heavy cream

2 Tbsp sugar

Whip on medium/high speed until cream has thickened.

Fold the prepared pudding into the whipped cream.

Step 3: Assemble Banana Pudding

Layer in a 13”x9” pan:

  • 1/3 pudding

  • Vanilla Wafers

  • 2 bananas, 1/4” slices

Repeat, then top with remaining pudding.

Serve cold.


Brenda’s tips:

  • Serving size: 8-12

Read More
B's Favorite, Breakfast, Bread, Desserts, Fan Favorite, How To Brenda Drake + Chelsea Kasen B's Favorite, Breakfast, Bread, Desserts, Fan Favorite, How To Brenda Drake + Chelsea Kasen

HOW TO: Form Cinnamon Twists

A twist on cinnamon rolls baked in caramel sauce

A Saunders family favorite, these cinnamon twists are perfect for any occasion - just ask my brothers!


HOW TO: Form Cinnamon Twists

  1. Make a batch of Brenda’s Favorite Dough Recipe, allow to rest for 40 minutes. While dough rests, continue on to next step.

  2. Prepare the baking dish (illustrated in Window to B’s Kitchen below):

    • In order to prevent the cooking caramel overflowing in the oven, it is recommended to use a sheet pan with 2” sides = 15”x10”x2” (OR both a 13”x9” and a 9”x9”).

    • To the baking dish, add:

      2 Tbsp butter, melted

      2 Tbsp corn syrup

      4 Tbsp brown sugar

    • Use a fork to mix the ingredients and then drag the fork through, pulling streaks of caramel until the entire bottom of the pan is coated. Set aside.

  3. Prepare a large, clean surface by sprinkling with flour. You can use a rolling mat. Brenda’s preference is to use a large canvas cloth mat or a large silicon mat.

  4. Using a rolling pin, roll the dough in a long rectangle shape about 1/2 inch thick and 12” wide. Keep the corners square (not rounded) so that the resulting twists will be equal in size.

  5. Melt 2 tablespoons of butter. Spread the melted butter evenly over the long rectangle of dough using a rubber spatula, being sure to get all the way to the edge.

  6. Top with a layer of brown sugar. Drop handfuls on and then sweep the sugar by hand to spread it out, resulting in a continuous layer over the full surface. Light brown sugar recommended.

  7. Sprinkle with ground cinnamon. Start at one corner and sprinkle back and forth until reaching the opposite corner, then go back and fill in any "light" spots.

    (Optional) Add chopped walnuts and/or raisins.

  8. Using your hands, lightly flip 1/3 of the dough (about 4”) up and over center (the middle 4”), continuing this motion the full length of the long rectangle. Repeat with the other 1/3, bringing it back to over the top of the previous folded 2/3.

  9. Mark the dough using a serrated knife to score the spot where it will be cut. Brenda uses a ruler for precise 1” marks.

  10. Use a stainless steel dough scraper or a sharp knife to cut the strips at the 1” marks.

  11. Carefully lift one section, keeping the dough folded in thirds. Twist your wrists in opposite directions to create the signature twist. Carefully place in the prepared pan. Repeat with all the sections, spacing evenly as the twists are added.

  12. Let rise for 40-50 minutes or until fingerprint stays.

  13. Bake at 350F for 25-30 minutes.

  14. Remove from oven, immediately invert pan over baking sheet - dumping the twists bottom-side-up. Quickly scrape any caramel stuck to the pan onto the baked twists. Serve warm or cold.


Brenda tips:

  • Serving size: One batch makes approximately 3 dozen twists.


Window to B’s kitchen . . .

Prepping the pan with the caramel base

Shaping the dough

Twisting the dough (up close)

Read More
B's Favorite, Desserts Brenda Drake + Chelsea Kasen B's Favorite, Desserts Brenda Drake + Chelsea Kasen

Amazingly Delicious Chocolate Mousse

A delicate, creamy chocolate dessert.

This chocolate mousse is decadent, each bite is intended to be savored. This recipe is perfect for any special occasion and can be made ahead to easily serve at a party.


Amazingly Delicious Chocolate Mousse

Step 1: Chocolate Mousse Base

To a small saucepan, add:

1/2 cup heavy cream

Set over medium/low heat (2.5/10) and slowly bring to a low simmer, cooking for about 5 minutes. As soon as the cream is put over the heat, continue on.

To the bowl of a stand mixer, add:

2 egg yolks

1/4 cup sugar

Mix on medium/high speed until thickened and lightened in color, about 2 or 3 minutes. The cream will be simmering now.

With the mixer on medium/low speed, slowly drizzle the heated cream into the eggs, pouring in such a way that the cream rolls down the side of the bowl and is quickly incorporated.

  • The heated cream will temper the eggs - if it is added too fast the eggs will curdle and ruin the mousse - so keep it slow and steady.

Once fully incorporated, return the entire egg & cream mixture to the pot. Return the pot to the stove, and heat over medium/low heat (2.5/10) for about 5 minutes, whisking regularly. Near the end it should come to a very soft, rolling boil. Add:

3 oz chocolate, chopped (60-70% cacao recommended)*

Whisk the chocolate into the egg & cream mixture, continuing to whisk until the mousse base is well blended and thickens.

Transfer the mousse base to a small bowl, cover with plastic wrap and chill for ~2 hours.

Step 2: Whipped Cream

Two hours later . . .

To the bowl of a stand mixer, add:

1 1/2 cups heavy cream

2 Tbsp sugar

Whip on medium/high speed until cream has thickened.

Transfer ~3/4 of the Whipped Cream to a large mixing bowl. Set aside.

Step 3: Mousse

To the remaining portion of Whipped Cream in the bowl of the stand mixer, add the chilled Chocolate Mousse Base. Whip on medium/low speed until fully incorporated. Transfer the chocolate mixture, adding it to the bowl of whipped cream.

Fold together using a spatula, until smooth. Take your time, it will keep the mousse light and airy. Divide the finished mousse between 8 dessert cups.

Chill until serving.


Brenda’s tips:

  • Serving size: 8 (1/2 cup) servings or 4 (1 cup) servings

  • If needed, use an electric hand mixer in place of the stand mixer

  • *While just about any chocolate can be used in this recipe, the recommended 60-70% cacao will result in the perfect texture and slightly bittersweet tang

  • Prefer a lighter, sweeter mousse? Increase the amount of heavy whipping cream

  • Prefer a deeper, darker mousse? Decrease the amount of heavy whipping cream or use an 80-100% cacao bar

  • Mousse can be made 24 hours prior to serving


Window to B’s kitchen . . .

How to fold the Whipped Cream and Chocolate Mousse Base

Read More
Cake, Desserts Brenda Drake + Chelsea Kasen Cake, Desserts Brenda Drake + Chelsea Kasen

Toasted Coconut Layer Cake

Toast the coconut on this towering white cake

Delicately toasted coconut adds a crisp element to this towering white cake. A favorite of coconut lovers, this cake is perfect for any occasion.


Toasted Coconut Layer Cake

Step 1: Bake Cake

  • Preheat oven to 350 F.

  • Prepare 3 (8”) round cake pans, lining with parchment & spritzing with non-stick spray, set aside.

Prepare vanilla cake batter, recommended to use:

Optional, add:

1 tsp coconut extract

To the cake batter to enhance the coconut flavor in this cake.

Pour the cake batter into the three prepared round cake pans. Bake at 350F for 35-45 minutes, until tests done with a toothpick. Remove from oven and set aside to cool.

Step 2: Toast Coconut

Preheat oven to 325F.

To a sheetpan, add:

2 cups sweetened coconut

Spread the coconut in an even layer. Place pan in oven to toast coconut, stir & spread out every 3 minutes.

  • Depending on the oven, it may toast fairly quickly or take up to 20 minutes. Carefully observing will ensure that it does not burn! If it burns, start over with fresh coconut.

Remove from oven when sufficiently toasted. Set aside.

Step 3: Make Frosting

Note: this frosting should be made immediately prior to decorating the cake, it will take about 10 minutes to make the frosting

Follow the recipe to make Seven Minute Frosting.

Step 4: Decorate Cake

  1. Place the first layer on the cake plate

    • Optional: level by trimming the top with a long serrated knife

      1. Trim all of the layers, ensuring they are equal heights

  2. Add a generous dollop of prepared Seven Minute Frosting to the first layer, spread carefully with an offset spatula

  3. Sprinkle lightly with 2 Tbsp toasted coconut

  4. Top with the second layer of cake and repeat the frosting & toasted coconut

  5. Invert the last layer and place it on top (this will ensure a perfectly flat top)

  6. Apply the frosting around the side of the three layers, using an offset spatula

  7. Spoon the remaining frosting on top, use the offset spatula to ensure even coverage but don’t smooth it flat

  8. Add the toasted coconut uniformly to the top and the sides of the cake, creating a beautiful finished cake

Slice & serve


Brenda tips:

  • Serving size: 3 layer cake

  • Note: the cake can be made in advance, wrapped individually and frozen until immediately prior to adding the frosting. The cake will then need 2-3 hours at room temperature to defrost completely before serving.


Window to B’s kitchen . . .

Read More
Cake, Desserts Brenda Drake + Chelsea Kasen Cake, Desserts Brenda Drake + Chelsea Kasen

Seven Minute Frosting

Fluffy vanilla frosting for any cake

Cherry Chip Cake with Seven Minute Frosting was one of Grandma Saunders’ specialties. The cake was from a mix, and her frosting recipe is below. This fluffy marshmallow-like icing is also ideal for Brenda’s Toasted Coconut Cake.


Seven Minute Frosting

Note: bake the cake and have it cooling before making the frosting.

To the bottom pot of a double boiler*, add:

~2 cups water

Set over high heat on stove, and bring to a boil.

While heating the water, to the other bowl of a double boiler,* add:

2 egg whites

1 1/2 cups sugar

1/3 cup water

1 Tbsp corn syrup

1/8 tsp salt

Set bowl over heated water, reducing stove temp to medium-low to maintain a fast simmer. Beat with an electric hand mixer until sugar dissolves and frosting stands in glossy peaks. Remove from double boiler, add:

1 tsp vanilla

Continue beating until the frosting is cool and thick enough to hold swirls.

Frost cake immediately.


Brenda tips:

  • Serving size: frosting for a 3 layer cake

  • *Double boiler: used when making a recipe that requires indirect heat, it’s two pots (or a pot and a stainless steel bowl), where the top nestles slightly within the bottom, leaving a few inches of space under the bowl so it doesn’t touch the water

    • the bottom is filled ~ halfway with water and heated over the stove to create hot steam

    • the top bowl contains the ingredients, and the indirect heat created by the steam will cook it slowly

Read More
Cake, Desserts, Garden Produce, High Elevation Brenda Drake + Chelsea Kasen Cake, Desserts, Garden Produce, High Elevation Brenda Drake + Chelsea Kasen

Berry Sheet Cake

Beautiful berries dress up this delicate white cake with creamy, tangy topping
This sheet cake is glorious with any berry! Nestled in smooth, slightly tangy creamy topping, fresh berries bring an unmistakeable hint of happiness to this delicate white cake.


Berry Sheet Cake

Step 1: the cake

Preheat oven to 350 F.

Prepare vanilla cake batter, recommended to use:

Pour the batter into a greased 15”x10” sheetpan. Bake at 350F for 18-23 minutes. Set aside to cool.

Step 2: topping

To the bowl of a stand mixer, add:

2 (8 oz) packages cream cheese, softened

2 Tbsp lemon juice

1 tsp vanilla

Mix together on low for 1 min, scrape sides, add:

1 1/2 cups powdered sugar

Continue to mix on low speed until smooth. Pour in:

2 cups heavy whipping cream

Mix on low speed until incorporated, then increase speed to medium-high and whip until thickened. Spread evenly over cooled cake.

Score the topping into ~2” squares, place:

2-3 fresh berries

Within each of the ~2” spaces so that when the cake is cut the berries will remain intact.

Slice & serve.


Brenda tips:

  • Serving size: 24 - 35 slices

  • For a fluffier, creamier topping, double the heavy whipping cream

  • If needed, substitute 1 (8 oz) package cool whip for the heavy whipping cream

Read More