Potatoes, Side Dish, Savory, How To Brenda Drake + Chelsea Kasen Potatoes, Side Dish, Savory, How To Brenda Drake + Chelsea Kasen

Smashed Oven Roasted Red Potatoes

Deliciously crisp edges encasing creamy potatoes

Deliciously crisp edges encasing creamy flavorful potatoes.

Smashed Oven Roasted Red Potatoes

To a large pot, add:

1 qt water

Bring to a boil over high heat, add:

1 tsp salt

~1 lb red potatoes, cut in half

Cover and reduce heat to medium-low, cook potatoes for 15-20 minutes until fork tender. Drain.

  • Begin preheating oven to 425F.

To a baking sheet, add:

2 Tbsp oil

Cooked potatoes

Use a potato masher (or the bottom of a cup) to press down on each potato, smashing it to ~3/4” thick. Drizzle with:

2 Tbsp butter, melted

Sprinkle with:

Garlic salt

Roast for 15-20 minutes, until golden. Serve hot.


Brenda’s tips:

  • Serving size: 4 servings

  • Add any combination of herbs and spices to change up the flavor, some recommendations:

    • Salt, pepper & parsley

    • Parmesan, paprika & garlic salt

    • Salt, crushed rosemary & thyme


Window to B’s kitchen . . .

Read More
Basic Skills, Garden Produce, How To, Sauce, Savory, Soup Brenda Drake + Chelsea Kasen Basic Skills, Garden Produce, How To, Sauce, Savory, Soup Brenda Drake + Chelsea Kasen

HOW TO: Mirepoix (Carrots + Onions + Celery)

A simple, balanced, vegetable base that is the beginning of many recipes, a mirepoix is the French-style combination of onions, celery and carrots. This simple combination will add a depth of flavor to soups, sauces and more.

HOW TO: Mirepoix (Carrots + Onions + Celery)

Heat a large pot over medium-low heat, then add:

1 Tbsp butter

1/2 cup carrots, finely diced

Cook, stirring periodically for 3-5 minutes, then add:

1 cup onions, finely diced

1/2 cup celery, finely diced

Stir regularly, allowing the vegetables to slowly soften as the flavors meld and intensify. Continue to cook for 7-12 minutes. Once the vegetables are soft the mirepoix is ready to incorporate into a sauce, stew, gravy, etc.


Brenda’s tips:

  • Serving size: various

  • This recipe can be multiplied or divided as needed for the application. The ratio is 2:1:1 (onions : carrots : celery)

Read More
Garden Produce, How To, Savory, Side Dish Brenda Drake + Chelsea Kasen Garden Produce, How To, Savory, Side Dish Brenda Drake + Chelsea Kasen

HOW TO: Onion Rings

Basically the best way to eat an onion

These homemade onion rings are made from slicing a large onion, dipping the rings in a deliciously flavored batter and deep frying until perfectly golden.

CAUTION: deep frying anything can be dangerous. Always keep your hands and face away from the hot oil. DO NOT add any water to the oil (hot or cold) or an explosion may result.


HOW TO: Onion Rings

Step 1: prep onion

Select one very large:

Onion (sweet recommended)

Remove the onion skin and trim 1/2” off root end. Using a very sharp knife, cut across the layers into 1/4” slices. Separate the rings. Set aside.

Step 2: batter

To a mixing bowl add:

1 egg

1 Tbsp Worcestershire sauce

1/4 cup milk

Whisk together, pour in:

3/4 cup flour

1 tsp baking powder

1 tsp seasoned salt

1 tsp garlic powder

Using a fork, stir together until smooth. Thin the batter by adding:

1/4 cup milk

If the batter is still too thick, add:

1 Tbsp increments milk

Repeat until desired thickness is reached. Allow batter to rest while oil heats.

Step 3: preheat frying oil

Note: It will take approximately 10 minutes for the oil to properly heat to 350F.

Select one:

  1. Deep fryer

    • If there is a basket, keep it ready as it makes the process easier

    • Fill with oil to the fryer-specified level

    • Turn on fryer and set temperature to ~350F

  2. Deep pot on stovetop

    • Place a deep pot on the stovetop

    • Add ~2” of oil to the pot

    • Turn heat to medium

Step 4: deep fry

  • Place a cooling rack on a sheet pan OR line a bowl/pan with paper towels

Once oil is heated, it’s time to work quickly.

  1. From the bowl of separated onion slices, select a ring

  2. Drop it in the batter, flip with a fork and lift out, allowing to drip for a moment

  3. Carefully place the battered onion ring into the hot oil

  4. Repeat quickly with a few more rings, filling but not crowding the cooking vessel

  5. Using tongs or a fork, flip the rings once the browning is visible around the ring, about 2-3 minutes

  6. Allow to cook 1-2 minutes on the second side, transfer using tongs  to prepared sheet pan

Serve hot.


Brenda’s tips:

  • Serving size: 4 to 8 servings

  • Batter & fry one or two rings, to check batter thickness & thin if needed

  • Repurpose tip: use a brown paper shopping bag in place of paper towels to absorb the extra oil. Simply cut a bag in segments that fit your bowl/pan and be sure to arrange with the bags interior side facing up where the food will rest.


Window to B’s kitchen . . .

Read More
Basic Skills, Bread, Breakfast, How To Brenda Drake + Chelsea Kasen Basic Skills, Bread, Breakfast, How To Brenda Drake + Chelsea Kasen

HOW TO: Egg Sandwich

A perfect solution to breakfast on the run

Scrambled egg on wheat toast was my mothers solution to breakfast on the run. Particularly for her daughter who was perpetually rushing to catch the bus to head to school! There’s no record of the number of sandwiches consumed, but it’s gotta be in the hundreds.


HOW TO: Egg Sandwich

  • Preheat cast iron skillet over medium heat.

  • Preheat a second skillet over medium heat.

To a small mixing bowl, add:

2 eggs

Using a fork, whisk until the eggs are beaten. Set aside.

To the first skillet, add:

2 slices bread, buttered side down

Cook until toasted, flip and add:

1 slice cheese (optional)

Allow bread to toast on the second side while preparing the eggs.

To the second preheated skillet, add:

1 tsp butter

Using a knife or heat-proof spatula, spread the melting butter over the full cooking surface of the hot skillet.

Pour in the whisked eggs. Sprinkle lightly with:

Salt

Pepper

Don’t touch the eggs until the edge barely begins to set.

Here’s how to form a delicate egg scramble patty: Use a heat-proof spatula to gently push the section of eggs that has set to the side, allowing more of the un-cooked egg to flow across the surface of the hot skillet. Repeat until the egg doesn’t run into the void from pushing aside the set eggs. Flip egg patty. Continue cooking until eggs reach the desired doneness.

Load the cooked eggs on the toast and cover with the second slice. Serve immediately.


Brenda’s tips:

  • Serving size: 1 sandwich

  • Add meats or veggies to dress up this great breakfast sandwich


Window to B’s kitchen . . .

Read More

HOW TO: Par-cooked Shredded Potatoes

Looking for a substitute for frozen shredded potatoes? This is it.

Looking for a substitute for frozen shredded potatoes? This is it. And it’s choose your own adventure. That’s right, FOUR methods to par-cook the potatoes. I’ve listed them in the order of my preference.

Shredded frozen potatoes are already cooked before they go in the bag. The manufacturer par-cooks, shreds and flash freezes the potatoes. Then they’re funneled into bags, frozen again and shipped to the store. As a convenience item that maintains original nutrition and purpose, shredded frozen potatoes are great. Standard size bags are 1 pound, 2 pounds or 5 pounds.

We grow our own garden potatoes and live by amazing neighbors who farm hundreds of acres of potatoes, so we love the option of utilizing fresh potatoes in as many ways as possible.


HOW TO: Par-cooked Shredded Potatoes

OPTION 1: Slow Cooker Baked

Cook time: 4 hours

1, 2 or 5 lbs potatoes

  • Follow directions to make the perfect Slow Cooker Baked Potatoes

  • Remove from pot, cool to handling temperature

  • Peel potatoes using a paring knife

  • Select a hand grater and shred potatoes

  • Use the prepared shredded potatoes

OPTION 2: Pressure Cooker Baked

Cook time: 10 minutes pressure + 10 minutes natural release

1, 2 or 5 lbs potatoes

  • Follow directions to make the perfect Instant Pot Baked Potatoes

  • Remove from pot, cool to handling temperature

  • Peel potatoes using a paring knife

  • Select a hand grater and shred potatoes

  • Use the prepared shredded potatoes

OPTION 3: Traditional Oven Baked

Cook time: ~1 hour

1, 2 or 5 lbs potatoes

  • Wash and place in oven preheated to 350F

  • Bake ~60 minutes

  • Remove from oven, cool to handling temperature

  • Peel potatoes using a paring knife

  • Select a hand grater and shred potatoes

  • Use the prepared shredded potatoes

OPTION 4: Par Boiled

Cook time: ~20 minutes

1, 2 or 5 lbs potatoes

  • Peel skins from potatoes, leave whole or cut in half lengthwise

  • To a large pot, add:

    1-2 cups water

    Prepared potatoes

  • Bring to boil, stir once, cover and reduce heat to medium-low. Cook for 10 minutes.

  • Remove from pot, cool to handling temperature

  • Select a hand grater and shred potatoes

  • Use the prepared shredded potatoes


Brenda’s tips:

  • Serving size: 1 lb., 2 lbs., or 5 lbs.

  • Each of these methods have their benefits, find the one that works best for your style

Read More
Bread, How To, Breakfast, Basic Skills Brenda Drake + Chelsea Kasen Bread, How To, Breakfast, Basic Skills Brenda Drake + Chelsea Kasen

Cinnamon Swirl Bread

The technique of creating a twist results in a very cohesive loaf with slices that stay intact

Cinnamon Swirl Bread is truly delicious. The traditional method of rolling the loaf often allows gaps to form, causing the swirl in the slices to fall apart. The technique of creating a twist eliminates this, instead resulting in a very cohesive loaf with slices that stay intact. We tell you just how to do it below.

This method is inspired by America’s Test Kitchen’s Cinnamon Swirl Bread.


Cinnamon Swirl Bread

Step 1: Dough

Prepare one batch of Brenda’s Favorite Dough Recipe.

Raise 40 minutes.

Step 2: Shape

  • Line two 12”x4” loaf pans OR three 8”x4” loaf pans with parchment paper and spritz with non-stick spray. Set aside.

Prepare a large, clean surface by sprinkling with flour. You can use a rolling mat. Brenda’s preference is to use a canvas cloth mat or a silicon mat, minimum size needed is 11”x16”.

Divide the dough into equal portions reflective of the number of prepared pans.

  1. Select one portion. Using a rolling pin, roll the dough in a rectangle shape measuring 11”x16”. A true or close to true rectangle will result in uniform finished loaves.

  2. Melt:

    1 Tbsp butter

    Spread the melted butter evenly over the rectangle of dough using a rubber spatula, being sure to get all the way to the edge.

  3. Top with:

    4 Tbsp brown sugar

    Drop handfuls on and then sweep the sugar by hand to spread it out, resulting in a continuous layer over the full surface.

  4. Sprinkle liberally with:

    Ground cinnamon

    Start at one corner and sprinkle back and forth until reaching the opposite corner, then go back and fill in any "light" spots.

  5. Using your hands and starting on the short side, roll up the rectangle to make an 11” tube. Be careful not to stretch the dough while rolling it up, simply coax it into a tube as if the dough were not elastic

  6. The secret to perfection . . .

    Using a board scraper or sharp serrated knife, slice the roll from end to end, down the center. Allow the two sides of the cut tube to roll open, leaving the cut edge - and all those beautiful strips of cinnamon sugar dough - facing up.

  7. About half way, select one side, lift and drape it over the other - creating the center of the twist. Then using an over/under direction and keeping the cut edge facing up, create the twist by alternating strips and repeating the lift and drape motion to the end of the strip. Pinch the end together. Repeat going the other direction. The full length should be twisted together with the cut side facing up.

  8. With one hand on either end of the twisted loaf, slide under the dough, lift and place in the prepared loaf pan.

Repeat 1-8 with remaining portion(s) of dough.

Step 3: Proof & Bake

  • Proof loaves 40 minutes.

  • Preheat oven to 350F.

  • Bake for 30-35 minutes.

  • Remove from loaf pans immediately, remove parchment paper and place on a cooling rack. Allow to cool a minimum of 5 minutes prior to slicing loaves.


Brenda’s tips:

  • Serving size: Two 12” loaves or three 8” loaves

  • Optional: before rolling the loaf, sprinkle with chopped walnuts and/or raisins.

  • Seriously, be patient after the loaf comes out of the oven. The texture of the bread will be compromised if the loaf is too hot when it is sliced open. Wait just 5 minutes and you’ll be much happier with the results.


Window to B’s kitchen . . .

Read More
B's Favorite, Basic Skills, Beef, How To, Main Dish, Savory Brenda Drake + Chelsea Kasen B's Favorite, Basic Skills, Beef, How To, Main Dish, Savory Brenda Drake + Chelsea Kasen

HOW TO: Skillet Rib Steak

All the deliciousness natural to a rib steak, enhanced by a dash of garlic and seasoned salt

There are many ways to cook a steak. This is one that we like - because it preserves all the deliciousness natural to a rib steak, enhanced by a dash of garlic and seasoned salt.

For high temperature searing, start with a hot skillet. Cast iron is ideal because the skillet can handle the heat necessary for a crisp sear.

Note: eating anything is at your own risk; educate yourself to understand recommendations from food safety experts.


HOW TO: Skillet Rib Steak

  • Rib steak needs to be completely defrosted before beginning this recipe: defrosting tips

  • Trim any excess fat

  • Debone if desired

Place cast-iron skillet over MEDIUM-LOW heat. Allow to heat for 5-10 minutes.

Increase heat under skillet to MEDIUM. One minute later, to hot skillet add:

~1 Tbsp butter

Swirl the butter around the pan as it melts. Once it is melted, add:

Rib steak

Season with:

Seasoned salt

Cook for 2 minutes. Using a fork or tongs, flip the steak. Season with:

Garlic salt

Cook for 2 minutes.

Repeat, flipping every 1-2 minutes until desired internal temperature is reached.

  • Blue Steak: 110 F

  • Rare: 120 F

  • Medium Rare: 130 F

  • Medium: 140 F

  • Medium Well: 150 F

  • Well: 160 F

Remove from pan, allow to rest ~1 minute and serve hot.


Brenda’s tips:

  • Serving size: 2 (~4 oz) per steak

  • High temperature searing is only one method for cooking steak, but it consistently produces delicious results.

  • Note: food-born illnesses are more common in meat. Eating anything is at your own risk; educate yourself to understand recommendations from food safety experts.

Read More
Basic Skills, Breakfast, Brenda's Kitchen Hacks, How To, Pork, Savory Brenda Drake + Chelsea Kasen Basic Skills, Breakfast, Brenda's Kitchen Hacks, How To, Pork, Savory Brenda Drake + Chelsea Kasen

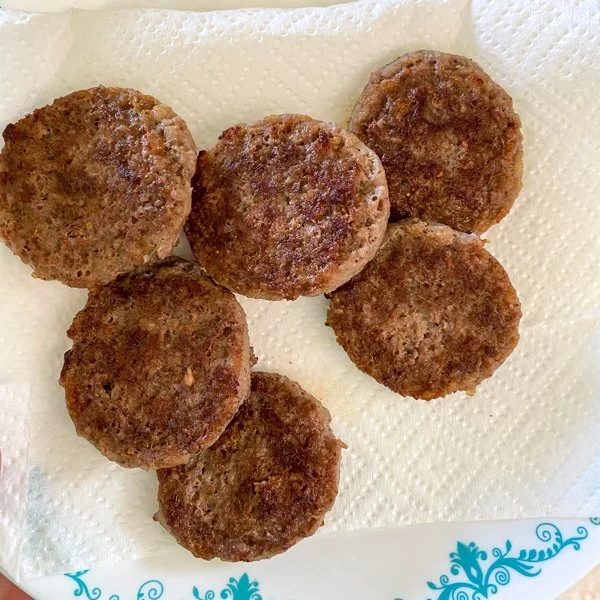
HOW TO: Perfect Sausage Patties

Prep & cook perfect sausage patties

HOW TO: Perfect Sausage Patties

Perfect Slices

  1. Select your favorite brand & flavor:

    1 - 16 oz pkg Pork Sausage Roll

    • Must not be frozen, defrost in the refrigerator overnight for perfect texture

    • Should be refrigerator temperature for precise slicing

  2. Remove plastic packaging, keeping the roll intact

    • Use a sharp knife to slice the full length of the plastic sleeve and cut the plastic ends to remove the metal ring, then peal back the plastic

  3. Use a sharp knife and mark where it will be sliced

    • For 1 oz slices, mark half (2), half each (4), then half again (8) and a final half (16)

    • 10 slices is much easier, allowing for patties that are about 1.5 oz

  4. Use non-flavored dental floss (or a length of thread) to cut at the marks into individual slices

    • Slide the floss under the tube of sausage

    • At each mark: bring the two ends up over the top, cross, and pull tightly together, slicing through the sausage and creating a perfect disk

Pan Fry

  1. Heat a skillet over medium heat

  2. Place the patties in the hot skillet, arranging in a single layer (divide into batches if needed)

  3. Cook until browned (5-6 minutes), flip and continue cooking until the patty is cooked through (3-4 minutes)

  4. Remove fully cooked patties from skillet, placing on a paper-towel lined plate

  5. Transfer patties a serving platter


Brenda’s tips:

  • Serving size: 16 - 1 oz patties

  • These patties are ideal for homemade egg & sausage sandwiches


Window to B’s kitchen . . .

Read More
How To, Main Dish, Pasta, Savory Brenda Drake + Chelsea Kasen How To, Main Dish, Pasta, Savory Brenda Drake + Chelsea Kasen

HOW TO: Fresh Cheese Tortellini

Fresh pasta filled with garlic & cheese mixture

Homemade tortellini takes time as each one requires hand filling and shaping. It’s time well spent for those of us that enjoy the process of cooking.

It is recommended to use both a Cuisinart Food Processor and Pasta Roller Kitchenaid attachment in this recipe.


HOW TO: Fresh Cheese Tortellini

Step 1: Food Processor

To the bowl of a food processor, add:

1 1/2 cups flour

2 eggs

1/2 tsp salt

2 Tbsp water

Process until mixture appears like sand. Using your hands, press into a ball and transfer to a bowl. Cover tightly with plastic wrap.

Allow to rest ~30 minutes.

Step 2: Cheese Filling

To a small bowl, add:

4 oz cream cheese

2 Tbsp parmesan cheese

1/4 tsp garlic powder

Stir together. Set aside.

Step 3: Kitchenaid Pasta Attachment

Using the Pasta Roller Kitchenaid attachment, prepare the Tortellini squares:

  • Note: between steps, keep the pasta covered so that it doesn’t dry out.

  • Divide dough into 4 equal pieces, kneading each into a disk

  • Starting with setting 1, run each piece of pasta through

    • Repeat at each number setting, flouring sheet lightly between rolls

      • Final setting will be 6 on the Kitchenaid Pasta Roller

  • Using a sharp knife or bench scraper, cut each pasta sheet into squares (1 1/2” to 2”)

    • Lightly flour between squares to prevent sticking together

Step 4: Fill & Shape

Select a square:

  • Using a pastry brush, dab a bit of water all around the edge

  • Place ~1/2 tsp of prepared filling in the center

  • Fold one corner diagonally to the opposite, creating a triangle

  • Press around the edge to seal

  • Wrap the ends together to form a circle, pressing tightly to seal

  • Place prepared tortellini onto floured sheet pan

  • Repeat with remaining squares until all are filled & shaped

Freeze or cook immediately.


Brenda’s tips:

  • Serving size: 4 servings

  • Some serving possibilities:

  • Most basic: add to simmering beef stock, cooking for about 5 minutes, and serve

  • Use prepared pasta in Tortellini Sausage Soup

  • Cook and then serve with your favorite pasta sauce


Window to B’s kitchen . . .

Making tortellini with Vivian (:

Read More
B's Favorite, Breakfast, Bread, Desserts, Fan Favorite, How To Brenda Drake + Chelsea Kasen B's Favorite, Breakfast, Bread, Desserts, Fan Favorite, How To Brenda Drake + Chelsea Kasen

HOW TO: Form Cinnamon Twists

A twist on cinnamon rolls baked in caramel sauce

A Saunders family favorite, these cinnamon twists are perfect for any occasion - just ask my brothers!


HOW TO: Form Cinnamon Twists

  1. Make a batch of Brenda’s Favorite Dough Recipe, allow to rest for 40 minutes. While dough rests, continue on to next step.

  2. Prepare the baking dish (illustrated in Window to B’s Kitchen below):

    • In order to prevent the cooking caramel overflowing in the oven, it is recommended to use a sheet pan with 2” sides = 15”x10”x2” (OR both a 13”x9” and a 9”x9”).

    • To the baking dish, add:

      2 Tbsp butter, melted

      2 Tbsp corn syrup

      4 Tbsp brown sugar

    • Use a fork to mix the ingredients and then drag the fork through, pulling streaks of caramel until the entire bottom of the pan is coated. Set aside.

  3. Prepare a large, clean surface by sprinkling with flour. You can use a rolling mat. Brenda’s preference is to use a large canvas cloth mat or a large silicon mat.

  4. Using a rolling pin, roll the dough in a long rectangle shape about 1/2 inch thick and 12” wide. Keep the corners square (not rounded) so that the resulting twists will be equal in size.

  5. Melt 2 tablespoons of butter. Spread the melted butter evenly over the long rectangle of dough using a rubber spatula, being sure to get all the way to the edge.

  6. Top with a layer of brown sugar. Drop handfuls on and then sweep the sugar by hand to spread it out, resulting in a continuous layer over the full surface. Light brown sugar recommended.

  7. Sprinkle with ground cinnamon. Start at one corner and sprinkle back and forth until reaching the opposite corner, then go back and fill in any "light" spots.

    (Optional) Add chopped walnuts and/or raisins.

  8. Using your hands, lightly flip 1/3 of the dough (about 4”) up and over center (the middle 4”), continuing this motion the full length of the long rectangle. Repeat with the other 1/3, bringing it back to over the top of the previous folded 2/3.

  9. Mark the dough using a serrated knife to score the spot where it will be cut. Brenda uses a ruler for precise 1” marks.

  10. Use a stainless steel dough scraper or a sharp knife to cut the strips at the 1” marks.

  11. Carefully lift one section, keeping the dough folded in thirds. Twist your wrists in opposite directions to create the signature twist. Carefully place in the prepared pan. Repeat with all the sections, spacing evenly as the twists are added.

  12. Let rise for 40-50 minutes or until fingerprint stays.

  13. Bake at 350F for 25-30 minutes.

  14. Remove from oven, immediately invert pan over baking sheet - dumping the twists bottom-side-up. Quickly scrape any caramel stuck to the pan onto the baked twists. Serve warm or cold.


Brenda tips:

  • Serving size: One batch makes approximately 3 dozen twists.


Window to B’s kitchen . . .

Prepping the pan with the caramel base

Shaping the dough

Twisting the dough (up close)

Read More
Chicken, Basic Skills, How To Brenda Drake + Chelsea Kasen Chicken, Basic Skills, How To Brenda Drake + Chelsea Kasen

HOW TO: Tenderize Chicken

Use a meat tenderizer to prepare chicken breasts

HOW TO: Tenderize Chicken

Note: When dealing with raw chicken it is recommended to contain the preparation area so as to ensure complete decontamination afterwards

  1. Prepare chicken breasts: ensure all bones, skin, and tendons have been removed

  2. If the breasts are thicker than 1” then slice in half (aka butterfly), creating two flat pieces

  3. To contain the mess, use two sheets of plastic wrap. Layer:

    • Plastic sheet

    • Chicken breast

    • Plastic sheet

  4. Pound with tenderizer across the full surface until evenly ~3/8” thick

    • Consistent thickness is recommended

  5. Use tenderized chicken breasts in recipes as needed


Brenda tips:

  • Shopping for a good tenderizer? Look for one shaped similar to a mallet with a comfortable handle, like this one

  • No tenderizer? Use a rolling pin


Window to B’s kitchen . . .

Read More
How To, Main Dish, Savory Brenda Drake + Chelsea Kasen How To, Main Dish, Savory Brenda Drake + Chelsea Kasen

HOW TO: Thanksgiving Turkey

Everything you need to know to roast the perfect turkey!

Getting turkey duty for Thanksgiving dinner is an honor, but it can be a bit intimidating. We’ll walk you through all the details necessary and the timeline to follow so that you can prepare an excellent bird to share.


HOW TO: Thanksgiving Turkey

Turkey questionnaire

Complete this questionnaire one or two weeks prior to Thanksgiving day.

  1. How many guests will there be for Thanksgiving dinner?

  2. Cooking in a Reynolds Turkey Bag or not?

  3. Will the bird remain whole or be butterflied?

  4. If whole, will it be stuffed?

  5. What time will the roasted turkey be served, aka T time?

Select the bird

  • Frozen is generally the most economical way to go

  • Select a bird with a weight in line with the number of guests expected

    • Estimate ~ 1.5 lbs per person to allow plenty of leftovers

    • Refer to the Turkey Time Table for serving size

  • If using a frozen bird, it should be picked up early enough to allow defrosting time

Thaw properly

Select one of two ways below to defrost the frozen turkey.

  • Refrigerator: Place turkey (in original wrapper) breast-side up on a tray in the refrigerator. Allow 24 hours per 5 lbs of turkey.

    • Example: 15 lb turkey will take ~3 days to defrost.

  • Cold Water Bath: Place turkey (in original wrapper) breast-side down in a sink of cold water. Allow 30 minutes per pound of turkey.

    • Example: 15 lb turkey will take ~7.5 hours to defrost.

  • Refer to the Turkey Time Table for recommended thawing times

Turkey bag (optional)

  • Cooking the turkey in a Reynolds Turkey Bag is strongly recommended

    • Reynolds includes a chart with accurate cooking times based on bird specs which are also noted on the Turkey Time Table

  • Benefits of bagging the bird for baking . . .

    • Cooks faster: saving 1 to 2 hours

    • Reduces work: no mid-roasting basting needed

    • Reduces cleanup: just toss the used bag

    • The bag will help negate the meat-drying effects of high elevation

  • Read the directions on the box, follow everything, plus:

    • Add 1 cup turkey broth to the bag after the turkey is in and before closing

  • Don’t forget to slice a few 1/2” slits in the top of the bag

Prepare area for turkey prep

  • Note: it is essential to be careful when dealing with raw poultry, so as to avoid the risk of food-born illness

  • Recommended to keep all preparations involving the raw bird in the sink so as to allow for proper cleanup

  • Some tips:

    • Relocate any items near the sink so that they will not be contaminated

    • Thoroughly wash sink and nearby countertop

  • Place roasting pan on countertop beside sink

The Turkey

  1. Note: the turkey should be prepared immediately prior to roasting for food safety

  2. Place turkey (in original bag) into sink

  3. Remove the original bag from the turkey

  4. Remove the giblets and neck from cavities

  5. Look over turkey, remove anything that shouldn’t be there

  6. Place whole turkey on roasting pan

    • If using a bag, arrange so that the bag drapes the pan and the front of the turkey goes in first

  7. Prepare the turkey for roasting:

    Butterfly aka Spatchcock (optional)

    • Use sharp kitchen shears to cut out the backbone

    • Spread the bird flat on the roasting pan (yes, a turkey bag can be used)

    Stuff (or not)

    Season

    • Measure out seasonings, combining in a mixing bowl:

      1 Tbsp dried rosemary, crushed

      1 Tbsp dried thyme, crushed

      1 Tbsp ground sage

      1 Tbsp seasoned salt

      1 Tbsp garlic salt

    • Sprinkle the prepared seasoning mix over the turkey, being sure to cover every bit of the bird

    • If the bird is less than 16 lbs, it will not require the full amount of seasoning

  8. Once seasoned, etc., arrange the bird in the roasting pan with legs tucked (tie if desired) and wings folded under the back to stabilize the bird

    • If using a bag, add 1 cup broth or water to the bag and tie closed with the enclosed zip tie, then use a sharp knife to cut six - 1/2” slits in the top of the bag

    • If butterflied, the bird will be splayed out so the legs cannot be tucked or tied

Roast

  • Place the roasting pan with the prepared bird in the oven

  • Bake at 350F for recommended time based on size of bird (see Turkey Time Table)

    • Use an instant-read thermometer to check the internal temperature

      • Insert probe in the thickest part of the breast

      • Food safe once temperature is 165F

Rest

  • Allow to sit for 10 to 40 minutes, refer to the Turkey Time Table for recommendations

  • Turkey will continue to cook from the internal heat, typically rising about 10F

  • Roasted bird should not be tented with tinfoil

  • Reserve drippings to make the Turkey Gravy

Carve & serve

  • Transfer roasted turkey to carving surface

    • If stuffed, use a spoon to transfer the stuffing to an oven-safe dish, cover and keep warm in oven

  • Be sure to use a sharp knife

    1. Remove the leg & thigh at the hip joint

    2. Separate the leg from the thigh

    3. Remove the wing from the backbone

    4. Slice along the breast bone to remove the breast

    5. Slice up the thigh meat and breast meat

    6. Save the bones for Homemade Turkey Broth

    7. Arrange all the prepared meat on the serving platter

  • Cover until serving time

More Helpful Hints . . .

Keep that bird HOT

  • If your bird is for a large crowd you may find it easier to have it carved in advance

    • Line a large slow cooker with a new Reynolds Turkey Bag

      • Add 1 cup broth to bag

    • Set the slow cooker to “warm” or “low”

    • Carve the turkey in the traditional manner

    • Place the carved meat into the turkey bag in the slow cooker

    • Tie top of bag with enclosed zip and put lid on slow cooker

Refrigerate

  • Cooked turkey should only be at room temperature for ~2 hours

  • Refrigerate leftovers for up to 4 days

Leftover recipes


Brenda’s tips:

  • Enjoy the process! Making the turkey (or turkeys!) for Thanksgiving is truly a privilege

  • Leftover turkey can be frozen but it will not taste quite the same, it is recommended to transform the leftovers into delicious new meals in the few days following for best flavor

  • Brenda recommends planning ahead so that the turkey can get on the table, hot, as your guests gather. Below is an example of the schedule Brenda follows:


Window to B’s kitchen . . .

Read More
Basic Skills, How To, Main Dish, Savory Brenda Drake + Chelsea Kasen Basic Skills, How To, Main Dish, Savory Brenda Drake + Chelsea Kasen

Turkey Time Table

Comprehensive time table for thawing, roasting & resting the turkey

Turkey Time Table

Use the table below to determine:

  • The size of turkey needed to feed all your guests

  • Amount of time needed to thaw a frozen bird, whether in the refrigerator or a cold water bath

  • How long to roast a turkey using either the traditional style or cooking it inside a Reynolds Turkey Bag

  • And finally, just how long you should allow that bird to rest before carving

This comprehensive table will help make planning the turkey a breeze!

For detailed information and directions on how to prep & roast the turkey, look here.


Brenda’s tips:

Read More
Brenda's Kitchen Hacks, How To, Savory Brenda Drake + Chelsea Kasen Brenda's Kitchen Hacks, How To, Savory Brenda Drake + Chelsea Kasen

HOW TO: Chipotle Pepper Purée & Preserve

Purée a can of chipotle peppers in adobo sauce, use what you need and then individually preserve the rest for easy use.

Chipotle Peppers in Adobo Sauce is an ingredient made from roasted, dried jalapenos preserved in a spiced tomato sauce. You can find canned Chipotle Peppers in Adobo Sauce in most grocery stores and add amazing flavor and heat to any recipe.

Generally, a recipe calls for only one pepper with the accompanying sauce. As there are a number of peppers per can, Brenda created this recipe to teach us how to freeze the extra purée for easy use.


HOW TO: Chipotle Pepper Purée & Preserve

Chipotle Pepper Purée

  • Transfer the entire contents of 1 can Chipotle Peppers in Adobo Sauce to a blender*

  • Blend smooth

    • Note: 1 Tbsp of the resulting purée is equivalent to 1 pepper

Preserve the leftovers

After removing the portion needed, it’s time to preserve the leftovers

  • Prepare sheet pan with a layer of parchment (or wax paper)

  • Portion purée by tablespoons, spaced at least 1” apart, onto the parchment

  • Very lightly tap the sheet pan on the countertop to flatten purée disks

  • Place filled sheet pan to freezer

  • Freeze until firm (may take up to 24 hours)

  • Transfer the frozen purée disks to a freezer-safe resealable bag

  • Freeze until needed, removing only the desired number of disks and keeping the rest frozen


Brenda’s tips:

  • Makes 8 to 12 (1 Tbsp) servings

  • Use the chipotle purée to make

    • Chipotle Beef

    • Chipotle Chicken

  • *Brenda prefers to use a single-serving blender to purée the chipotle peppers


Window to B’s kitchen . . .

Read More
Garden Produce, How To Brenda Drake + Chelsea Kasen Garden Produce, How To Brenda Drake + Chelsea Kasen

HOW TO: Flash Freeze Peppers

Learn how to flash freeze peppers and jalapenos in this How-To.

Do you have extra garden peppers or was there a great sale on peppers at the market? Flash freeze & store peppers for quick use in:


HOW TO: Flash Freeze Peppers

  1. Prepare sheet pan with a layer of parchment or wax paper

  2. Wash and dry peppers

  3. Dice peppers

    • Trim off the top and bottom, leaving the center as a tube

    • Slice down tube from top to bottom

    • Cut tube into strips

    • Cut strips into squares to create a perfect dice

    • Dice the trimmed top & bottom pieces

  4. Evenly spread the diced peppers on the prepared sheet pan

  5. Place pan in freezer

  6. Freeze for 24 hours

  7. Remove pan from freezer, immediately transfer the frozen diced peppers to a resealable freezer bag

  8. Store the bagged peppers in the freezer and use as needed


Brenda’s tips:

  • Store diced peppers in the freezer for ~6 months

  • Having flash-frozen peppers in the freezer allows for faster meal prep

  • Works great for jalapeños too. Dice jalapenos finely before following the flash freezing steps above

Read More
How To Brenda Drake + Chelsea Kasen How To Brenda Drake + Chelsea Kasen

HOW TO: Restore Cast Iron Cookware

Learn how to restore your cast iron cookware following these tips.

The thing about cast iron cookware is that it will last for generations. Good care will make for a great cooking experience. But even if the pan has been neglected, it can be restored.

Often cast iron cookware simply needs to be cleaned and greased properly to continue its kitchen service. However, if the pans have spots of rust or the seasoning has been scrubbed or soaped off, then a complete restorative seasoning is required.

If your collection needs to be re-seasoned, or perhaps you’ve picked up some tired cast iron pans at a yard sale, here are the details on how to bring it back to glory.


How To Restore a Cast Iron Pan, aka Season

  1. Scrub & Wash Clean

    • Using a stainless steel scrubber & some elbow grease, remove all rust and old debris

    • Follow the scrubbing with a thorough wash in hot soapy water

    • Ensure that absolutely everything has been cleaned from the surface

    • Rinse well with water

  2. Dry

    • Set pan over medium-low heat to dry out any remaining moisture

  3. Grease

    • Use vegetable shortening on a clean dry rag OR a paper towel to lightly “grease” the full surface, both inside and out

    • Shortening should be used to “grease” the pan. Here’s how:

      • Use a clean dry rag OR a paper towel, folded to create 4-8 layers

      • Add 1/4-1 tsp shortening to the pan (amount depends on cast iron surface area)

      • Rub the rag (or paper towel) in the shortening and over the entire surface, rubbing the shortening into the cast iron but not leaving any excess

        • Why shortening and not liquid oil? Over time, a pan greased with just about any liquid oil will develop a sticky residue. But a pan greased with plain vegetable shortening will simply get smoother and smoother, with no discernible tackiness.

  4. Bake

    • Place a layer of tinfoil on the lower oven rack

    • Invert the greased cast iron cookware, placing on the top rack

    • Bake at 350F for ~1 hour

    • Allow to cool completely in oven

  5. Repeat Step 3 (Grease) and Step 4 (Bake), if needed. It may take three or four cycles to properly season.


Brenda’s tips:

  • Seasoning cast iron cookware is the main reason you can find shortening in Brenda’s kitchen

    • Whether you use your cast iron every day or occasionally, using vegetable shortening will ensure that it maintains a smooth, non-tacky surface for the next time you need it.

  • Here is a great video from Lodge on how to restore cast iron cookware

Read More
How To Brenda Drake + Chelsea Kasen How To Brenda Drake + Chelsea Kasen

HOW TO: Maintain Cast Iron Cookware

Learn the basics of maintaining your cast iron cookware.

The thing about cast iron cookware is that it will last for generations. Good care will make for a great cooking experience. But even if the pan has been neglected, it can be restored through cleaning and seasoning.

Brenda shares the absolute best way to maintain cast iron cookware. Follow these effective steps every time you use your cast iron cookware and they’ll cook even better with time. Some absolutes are included along the way, so pay attention if you want your pans to love you back.

At the end of this post, Brenda shares some of her favorite recipes to cook on cast iron.


Cast Iron Basic Maintenance

  1. Remove cooking debris:

    • While pan is still warm:

      • Simply wipe out with a rag or paper towel

      • For difficult debris, rinse with water (no soap!) and a wet rag

      • Super stuck: use a pan scraper or firm spatula to lightly scrape at the debris

      • Do not use a stainless steel scrubber or soap

  2. Place pan over medium-low heat on stove top until dry

    • Caution: on the next step the pan will be hot!

  3. Shortening should be used to “grease” the pan. Here’s how:

    • Use a clean dry rag OR a paper towel, folded to create 4-8 layers

    • Add 1/4-1 tsp shortening to the pan (amount depends on cast iron surface area)

    • Rub the rag or paper towel in the shortening and over the entire surface, rubbing the shortening into the cast iron but not leaving any excess

      • Why shortening and not liquid oil? Over time, a pan greased with liquid oil will develop a sticky residue. A pan greased with plain vegetable shortening will simply get smoother and smoother, with no discernible tackiness.

Other Cast Iron Tips

Dirty pan has cooled?

  • Add a little water, place over high heat to boil, dump out water, and clean as instructed above

OR

  • Make a paste of salt mixed with a little water, scrub with a rag to remove debris

Rancid smell?

  • Cast iron does not need to be reseasoned, instead:

    • Fill pan with salted water and bring to boil over high heat

    • Boil for 5-10 minutes, shut off heat, and allow to cool ~10 minutes

    • Water will still be hot, carefully dump out

    • Wipe out cookware with a rag

    • Grease with shortening, following instructions above

Proper cast iron storage?

  • Store in a clean, dry place

  • Avoid nesting the pans as nesting promotes moisture accumulation

  • Recommended to invert pans for storage

Recommended recipes

Try out some of Brenda’s favorites in your beautifully maintained cast iron cookware:


Brenda’s tips:

  • Seasoning cast iron cookware is the main reason you can find shortening in Brenda’s kitchen

    • Whether you use your cast iron every day or occasionally, using vegetable shortening will ensure that it maintains a smooth, non-tacky surface for the next time you need it

Read More
Basic Skills, How To Brenda Drake + Chelsea Kasen Basic Skills, How To Brenda Drake + Chelsea Kasen

HOW TO: Zest & Juice Citrus Fruits

Brenda’s tips for the easiest way to zest and juice citrus fruits!

HOW TO: Zest & Juice Citrus Fruits

Select:

1 citrus fruit

Thoroughly wash, then:

Zest

  • Using a stainless steel zester, scrape the outer skin of the citrus fruit, grating off only the darkest layer

  • Reserve the zest in a covered bowl, refrigerate until needed

Juice

  1. Microwave the citrus fruit (outer skin removed for zest) for 15-25 seconds, this will burst some of the juice cells

  2. Pressing the citrus firmly under your palm, roll it around on the countertop, further bursting the juice cells inside

  3. Cut the citrus fruit in half

    • Blade should slice halfway between the stem and bud ends of the fruit, slicing midway through all the carpels, or segments

    • Note: some juice will drip out, so cut the citrus fruit open over a bowl.

  4. Using a hand-held juicing reamer, juice the citrus fruit, allowing the juice to run into a bowl

  5. Using a small mesh strainer, strain the citrus juice into a measuring cup

Repeat with additional citrus fruit until the required amount of juice is obtained.


Brenda’s tips:

  • Zest can be refrigerated for about a week, or dried and stored in an airtight container to be used in other recipes

  • Heating the citrus before juicing opens the cells and allows more of the juice to be harvested, the microwave is the easiest method


Window to B’s kitchen . . .

Zesting a lime with a stainless steel zester . . .

Pressing the citrus firmly under my palm, and rolling it around on the countertop. This helps to burst the juice cells making it easier to juice AND more juicy . . .

Using a hand-held juicing reamer, to juice the lime . . .

Read More
How To Brenda Drake + Chelsea Kasen How To Brenda Drake + Chelsea Kasen

HOW TO: Store Fresh Asparagus

Learn how to store fresh asparagus to extend its shelf life.

HOW TO: Store Fresh Asparagus

Fresh asparagus won’t keep long, but if you can’t use it within 12 hours, try this:

  1. Add about 1” of water to the bottom of a wide mouth jar

  2. Trim ~1/4” off the bottom of the cut asparagus

  3. Stand asparagus in the water in the jar

  4. Cover loosely with a plastic bag (produce bag works great)

  5. Refrigerate for ~3 days


Brenda’s tips:

  • Asparagus is one of the most delicious spring vegetables

  • Try fresh asparagus in:

Read More
Breakfast, Savory, How To, Bacon Brenda Drake + Chelsea Kasen Breakfast, Savory, How To, Bacon Brenda Drake + Chelsea Kasen

HOW TO: Breakfast Burritos

The perfect grab-and-go breakfast with lots of carbs and protein.

Brenda is a big believer in breakfast, ideally mostly carbs. John also enjoys breakfast, but prefers a breakfast that prioritizes protein. The breakfast burrito, in all it’s many iterations, brings both. Along with the added benefit of “grab and go” since time always seems to be tight in the morning.


HOW TO: Breakfast Burritos

Identify & set aside desired additional ingredients for the breakfast burrito filling, here are some suggestions:

  • Bacon, cooked and chopped

  • Sausage, cooked and drained

  • Ham, cubed or deli-slices

  • Mushrooms, chopped

  • Onions, finely diced

  • Bell peppers, diced

  • Potatoes, cooked (hash browns, tots, fries, etc.)

  • Rice (leftover fried rice is especially delicious)

  • Corn, steamed

Place a non-stick skillet on the stove and set to medium to preheat skillet.

Place a second skillet on the stove, adjust heat to medium-low, and immediately add:

1 flour tortilla

Brush lightly with:

Butter

Flip. Add:

Cheese (sliced or shredded or crumbled)

Allow to cook so the cheese slowly melts and tortilla stays soft. While that cooks, prepare the following . . .

To a small bowl, add:

2 eggs

1 tsp water

Whisk until well blended.

Grease the first skillet with:

~1 tsp butter (or bacon fat)

Ensure that full surface of the skillet is covered. When butter has completely melted and sizzles, pour in:

Whisked eggs

Additional Ingredients (~ 1 Tbsp of each)

Using a heat-proof spatula,* scrape mixing bowl. Use the spatula to cook the eggs, lifting and stirring, while keeping the eggs & additions together as a single patty. Flip the egg patty over to cook on the other side. DO NOT allow the egg to brown.

Once cooked through, transfer the egg patty to top the melted cheese on the tortilla.

Add any fresh ingredients:

  • Tomatoes, diced

  • Avocados, sliced (or guacamole)

  • Green onions

  • Micro greens

And condiments:

  • Sour cream

  • Taco sauce

  • Salsa

  • Horse radish

Roll up and serve hot OR wrap in a sheet of aluminum foil for breakfast on the go.


Brenda’s tips:


Window to B’s kitchen . . .

Read More