Basic Skills, Garden Produce, How To, Sauce, Savory, Soup Brenda Drake + Chelsea Kasen Basic Skills, Garden Produce, How To, Sauce, Savory, Soup Brenda Drake + Chelsea Kasen

HOW TO: Mirepoix (Carrots + Onions + Celery)

A simple, balanced, vegetable base that is the beginning of many recipes, a mirepoix is the French-style combination of onions, celery and carrots. This simple combination will add a depth of flavor to soups, sauces and more.

HOW TO: Mirepoix (Carrots + Onions + Celery)

Heat a large pot over medium-low heat, then add:

1 Tbsp butter

1/2 cup carrots, finely diced

Cook, stirring periodically for 3-5 minutes, then add:

1 cup onions, finely diced

1/2 cup celery, finely diced

Stir regularly, allowing the vegetables to slowly soften as the flavors meld and intensify. Continue to cook for 7-12 minutes. Once the vegetables are soft the mirepoix is ready to incorporate into a sauce, stew, gravy, etc.


Brenda’s tips:

  • Serving size: various

  • This recipe can be multiplied or divided as needed for the application. The ratio is 2:1:1 (onions : carrots : celery)

Read More
Basic Skills, Bread, Breakfast, How To Brenda Drake + Chelsea Kasen Basic Skills, Bread, Breakfast, How To Brenda Drake + Chelsea Kasen

HOW TO: Egg Sandwich

A perfect solution to breakfast on the run

Scrambled egg on wheat toast was my mothers solution to breakfast on the run. Particularly for her daughter who was perpetually rushing to catch the bus to head to school! There’s no record of the number of sandwiches consumed, but it’s gotta be in the hundreds.


HOW TO: Egg Sandwich

  • Preheat cast iron skillet over medium heat.

  • Preheat a second skillet over medium heat.

To a small mixing bowl, add:

2 eggs

Using a fork, whisk until the eggs are beaten. Set aside.

To the first skillet, add:

2 slices bread, buttered side down

Cook until toasted, flip and add:

1 slice cheese (optional)

Allow bread to toast on the second side while preparing the eggs.

To the second preheated skillet, add:

1 tsp butter

Using a knife or heat-proof spatula, spread the melting butter over the full cooking surface of the hot skillet.

Pour in the whisked eggs. Sprinkle lightly with:

Salt

Pepper

Don’t touch the eggs until the edge barely begins to set.

Here’s how to form a delicate egg scramble patty: Use a heat-proof spatula to gently push the section of eggs that has set to the side, allowing more of the un-cooked egg to flow across the surface of the hot skillet. Repeat until the egg doesn’t run into the void from pushing aside the set eggs. Flip egg patty. Continue cooking until eggs reach the desired doneness.

Load the cooked eggs on the toast and cover with the second slice. Serve immediately.


Brenda’s tips:

  • Serving size: 1 sandwich

  • Add meats or veggies to dress up this great breakfast sandwich


Window to B’s kitchen . . .

Read More

HOW TO: Par-cooked Shredded Potatoes

Looking for a substitute for frozen shredded potatoes? This is it.

Looking for a substitute for frozen shredded potatoes? This is it. And it’s choose your own adventure. That’s right, FOUR methods to par-cook the potatoes. I’ve listed them in the order of my preference.

Shredded frozen potatoes are already cooked before they go in the bag. The manufacturer par-cooks, shreds and flash freezes the potatoes. Then they’re funneled into bags, frozen again and shipped to the store. As a convenience item that maintains original nutrition and purpose, shredded frozen potatoes are great. Standard size bags are 1 pound, 2 pounds or 5 pounds.

We grow our own garden potatoes and live by amazing neighbors who farm hundreds of acres of potatoes, so we love the option of utilizing fresh potatoes in as many ways as possible.


HOW TO: Par-cooked Shredded Potatoes

OPTION 1: Slow Cooker Baked

Cook time: 4 hours

1, 2 or 5 lbs potatoes

  • Follow directions to make the perfect Slow Cooker Baked Potatoes

  • Remove from pot, cool to handling temperature

  • Peel potatoes using a paring knife

  • Select a hand grater and shred potatoes

  • Use the prepared shredded potatoes

OPTION 2: Pressure Cooker Baked

Cook time: 10 minutes pressure + 10 minutes natural release

1, 2 or 5 lbs potatoes

  • Follow directions to make the perfect Instant Pot Baked Potatoes

  • Remove from pot, cool to handling temperature

  • Peel potatoes using a paring knife

  • Select a hand grater and shred potatoes

  • Use the prepared shredded potatoes

OPTION 3: Traditional Oven Baked

Cook time: ~1 hour

1, 2 or 5 lbs potatoes

  • Wash and place in oven preheated to 350F

  • Bake ~60 minutes

  • Remove from oven, cool to handling temperature

  • Peel potatoes using a paring knife

  • Select a hand grater and shred potatoes

  • Use the prepared shredded potatoes

OPTION 4: Par Boiled

Cook time: ~20 minutes

1, 2 or 5 lbs potatoes

  • Peel skins from potatoes, leave whole or cut in half lengthwise

  • To a large pot, add:

    1-2 cups water

    Prepared potatoes

  • Bring to boil, stir once, cover and reduce heat to medium-low. Cook for 10 minutes.

  • Remove from pot, cool to handling temperature

  • Select a hand grater and shred potatoes

  • Use the prepared shredded potatoes


Brenda’s tips:

  • Serving size: 1 lb., 2 lbs., or 5 lbs.

  • Each of these methods have their benefits, find the one that works best for your style

Read More
Basic Skills, Bread, Breakfast Brenda Drake + Chelsea Kasen Basic Skills, Bread, Breakfast Brenda Drake + Chelsea Kasen

Baby Dutch Baby

Lightly eggy with beautifully crisp edges, this is the perfect breakfast

Dutch Baby’s . . . German Pancakes . . . Yorkshire Pudding . . . this dish goes by quite a few names and is very similar to Popovers. This recipe is scaled way down and makes only a 6” Dutch Baby. Lightly eggy with beautifully crisp edges, this is the perfect addition to a brunch or a simple breakfast for two, Enjoy!

Baby Dutch Baby

  • Place a 6” cast iron skillet in the oven and preheat oven to 400F.

To a small bowl, add:

1 egg

1/4 cup flour

1 tsp sugar

1/8 tsp salt

Whisk together. Thin out with:

1/4 cup milk

1/2 tsp vanilla

Whisk batter until super smooth.

Remove hot skillet from oven, add:

1 Tbsp butter

Return to oven for 1 minute. Remove from oven, swirl butter in pan and pour in:

Prepared batter

Return skillet to oven. Bake at 400F for 20-25 minutes. Serve immediately.


Brenda’s tips:

  • Serving size: 1 to 4 servings

  • Use an 8” skillet and double the recipe.

  • Blender instructions: simply add all ingredients to a blender and blend until smooth.

  • Rest the batter anywhere from 30 minutes to 12 hours for improved poof.


Window to B’s kitchen . . .

Read More
Bread, How To, Breakfast, Basic Skills Brenda Drake + Chelsea Kasen Bread, How To, Breakfast, Basic Skills Brenda Drake + Chelsea Kasen

Cinnamon Swirl Bread

The technique of creating a twist results in a very cohesive loaf with slices that stay intact

Cinnamon Swirl Bread is truly delicious. The traditional method of rolling the loaf often allows gaps to form, causing the swirl in the slices to fall apart. The technique of creating a twist eliminates this, instead resulting in a very cohesive loaf with slices that stay intact. We tell you just how to do it below.

This method is inspired by America’s Test Kitchen’s Cinnamon Swirl Bread.


Cinnamon Swirl Bread

Step 1: Dough

Prepare one batch of Brenda’s Favorite Dough Recipe.

Raise 40 minutes.

Step 2: Shape

  • Line two 12”x4” loaf pans OR three 8”x4” loaf pans with parchment paper and spritz with non-stick spray. Set aside.

Prepare a large, clean surface by sprinkling with flour. You can use a rolling mat. Brenda’s preference is to use a canvas cloth mat or a silicon mat, minimum size needed is 11”x16”.

Divide the dough into equal portions reflective of the number of prepared pans.

  1. Select one portion. Using a rolling pin, roll the dough in a rectangle shape measuring 11”x16”. A true or close to true rectangle will result in uniform finished loaves.

  2. Melt:

    1 Tbsp butter

    Spread the melted butter evenly over the rectangle of dough using a rubber spatula, being sure to get all the way to the edge.

  3. Top with:

    4 Tbsp brown sugar

    Drop handfuls on and then sweep the sugar by hand to spread it out, resulting in a continuous layer over the full surface.

  4. Sprinkle liberally with:

    Ground cinnamon

    Start at one corner and sprinkle back and forth until reaching the opposite corner, then go back and fill in any "light" spots.

  5. Using your hands and starting on the short side, roll up the rectangle to make an 11” tube. Be careful not to stretch the dough while rolling it up, simply coax it into a tube as if the dough were not elastic

  6. The secret to perfection . . .

    Using a board scraper or sharp serrated knife, slice the roll from end to end, down the center. Allow the two sides of the cut tube to roll open, leaving the cut edge - and all those beautiful strips of cinnamon sugar dough - facing up.

  7. About half way, select one side, lift and drape it over the other - creating the center of the twist. Then using an over/under direction and keeping the cut edge facing up, create the twist by alternating strips and repeating the lift and drape motion to the end of the strip. Pinch the end together. Repeat going the other direction. The full length should be twisted together with the cut side facing up.

  8. With one hand on either end of the twisted loaf, slide under the dough, lift and place in the prepared loaf pan.

Repeat 1-8 with remaining portion(s) of dough.

Step 3: Proof & Bake

  • Proof loaves 40 minutes.

  • Preheat oven to 350F.

  • Bake for 30-35 minutes.

  • Remove from loaf pans immediately, remove parchment paper and place on a cooling rack. Allow to cool a minimum of 5 minutes prior to slicing loaves.


Brenda’s tips:

  • Serving size: Two 12” loaves or three 8” loaves

  • Optional: before rolling the loaf, sprinkle with chopped walnuts and/or raisins.

  • Seriously, be patient after the loaf comes out of the oven. The texture of the bread will be compromised if the loaf is too hot when it is sliced open. Wait just 5 minutes and you’ll be much happier with the results.


Window to B’s kitchen . . .

Read More
B's Favorite, Basic Skills, Beef, How To, Main Dish, Savory Brenda Drake + Chelsea Kasen B's Favorite, Basic Skills, Beef, How To, Main Dish, Savory Brenda Drake + Chelsea Kasen

HOW TO: Skillet Rib Steak

All the deliciousness natural to a rib steak, enhanced by a dash of garlic and seasoned salt

There are many ways to cook a steak. This is one that we like - because it preserves all the deliciousness natural to a rib steak, enhanced by a dash of garlic and seasoned salt.

For high temperature searing, start with a hot skillet. Cast iron is ideal because the skillet can handle the heat necessary for a crisp sear.

Note: eating anything is at your own risk; educate yourself to understand recommendations from food safety experts.


HOW TO: Skillet Rib Steak

  • Rib steak needs to be completely defrosted before beginning this recipe: defrosting tips

  • Trim any excess fat

  • Debone if desired

Place cast-iron skillet over MEDIUM-LOW heat. Allow to heat for 5-10 minutes.

Increase heat under skillet to MEDIUM. One minute later, to hot skillet add:

~1 Tbsp butter

Swirl the butter around the pan as it melts. Once it is melted, add:

Rib steak

Season with:

Seasoned salt

Cook for 2 minutes. Using a fork or tongs, flip the steak. Season with:

Garlic salt

Cook for 2 minutes.

Repeat, flipping every 1-2 minutes until desired internal temperature is reached.

  • Blue Steak: 110 F

  • Rare: 120 F

  • Medium Rare: 130 F

  • Medium: 140 F

  • Medium Well: 150 F

  • Well: 160 F

Remove from pan, allow to rest ~1 minute and serve hot.


Brenda’s tips:

  • Serving size: 2 (~4 oz) per steak

  • High temperature searing is only one method for cooking steak, but it consistently produces delicious results.

  • Note: food-born illnesses are more common in meat. Eating anything is at your own risk; educate yourself to understand recommendations from food safety experts.

Read More
Basic Skills, Garden Produce, Main Dish, One Pot Wonders, Savory, Side Dish Brenda Drake + Chelsea Kasen Basic Skills, Garden Produce, Main Dish, One Pot Wonders, Savory, Side Dish Brenda Drake + Chelsea Kasen

Vegetable Stir Fry

Collection of delicious crisp-tender vegetables

Stir Fry is a great side dish and the perfect way to use up extra veggies. We’re sharing our preferred combination but many delicious veggies can be substituted. The secret to very good Stir Fry is to cut each veggie in equal-bite-sized pieces. That will ensure even cooking and enjoyable eating.


Vegetable Stir Fry

  • Gather & prep veggies (place each in a separate prep bowl) listed below.

Preheat skillet over medium heat, add:

1 tsp oil

1/2 cup onions, cut lengthwise into narrow strips

2 tsp garlic cloves, minced

Sauté for 2-3 minutes, then add:

1 tsp oil

1 cup carrots, peeled and cut into 1/8” disks

Allow to cook for 3 minutes, stir and cook an additional 3 minutes. Add:

1 tsp oil

1 cup broccoli, trimmed and cut in bite size pieces

1 cup cauliflower, trimmed and cut into bite size pieces

Cook 3 minutes then stir. Continue to cook until veggies are crisp-tender, about 5 more minutes.

Serve hot over Rice with Sweet & Sour Sauce and Crispy Chicken Bites.


Brenda’s tips:

  • Serving size: serve 4

  • Scale this recipe for more servings by adding additional veggies or increasing the amount of any or all veggies.

  • If needed, prepare the veggies in batches and combine in a large pot to keep warm.

Read More
Basic Skills, Breakfast, Brenda's Kitchen Hacks, How To, Pork, Savory Brenda Drake + Chelsea Kasen Basic Skills, Breakfast, Brenda's Kitchen Hacks, How To, Pork, Savory Brenda Drake + Chelsea Kasen

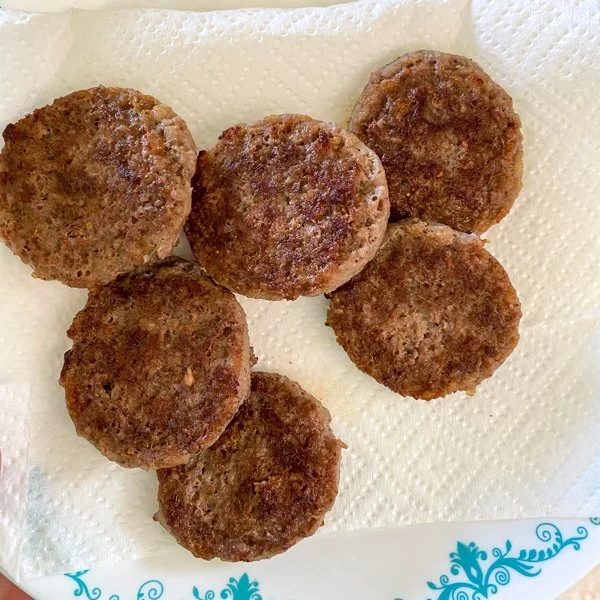
HOW TO: Perfect Sausage Patties

Prep & cook perfect sausage patties

HOW TO: Perfect Sausage Patties

Perfect Slices

  1. Select your favorite brand & flavor:

    1 - 16 oz pkg Pork Sausage Roll

    • Must not be frozen, defrost in the refrigerator overnight for perfect texture

    • Should be refrigerator temperature for precise slicing

  2. Remove plastic packaging, keeping the roll intact

    • Use a sharp knife to slice the full length of the plastic sleeve and cut the plastic ends to remove the metal ring, then peal back the plastic

  3. Use a sharp knife and mark where it will be sliced

    • For 1 oz slices, mark half (2), half each (4), then half again (8) and a final half (16)

    • 10 slices is much easier, allowing for patties that are about 1.5 oz

  4. Use non-flavored dental floss (or a length of thread) to cut at the marks into individual slices

    • Slide the floss under the tube of sausage

    • At each mark: bring the two ends up over the top, cross, and pull tightly together, slicing through the sausage and creating a perfect disk

Pan Fry

  1. Heat a skillet over medium heat

  2. Place the patties in the hot skillet, arranging in a single layer (divide into batches if needed)

  3. Cook until browned (5-6 minutes), flip and continue cooking until the patty is cooked through (3-4 minutes)

  4. Remove fully cooked patties from skillet, placing on a paper-towel lined plate

  5. Transfer patties a serving platter


Brenda’s tips:

  • Serving size: 16 - 1 oz patties

  • These patties are ideal for homemade egg & sausage sandwiches


Window to B’s kitchen . . .

Read More
Basic Skills, Desserts Brenda Drake + Chelsea Kasen Basic Skills, Desserts Brenda Drake + Chelsea Kasen

Cream Puffs

Delicate pastries filled with custard or sweet whipped cream

Use a few pantry staples to put together these light-as-air puffs and fill them with anything delicious!


Cream Puffs

  • Begin preheating oven to 400F

  • Prepare a baking sheet by spritzing lightly with non-stick spray, set aside

To a small saucepan add:

1/2 cup water

1/4 cup butter

Bring to a boil, reduce heat and dump in:

1/2 cup flour

Stir briskly, after about one minute the mixture should form into a ball. Remove from heat. Beat in individually:

2 eggs

Continue to stir until mixture is smooth. Using two small spoons, form the batter into puffs, placing two inches apart on the prepared baking sheet. Bake at 400F for 22-25 minutes, until beautifully golden. Transfer to cooling rack and allow to cool completely.

Slice open - but not apart. Fill with your favorite filling. Recommended:

Drizzle with:

Dust with:

  • Powdered sugar


Brenda tips:

  • Serving size: 10-15 puffs, depending on size

  • These cream puffs can also be filled with savory fillings and are very delicious paired with chicken salad


Window to B’s kitchen . . .

Read More
Chicken, Basic Skills, How To Brenda Drake + Chelsea Kasen Chicken, Basic Skills, How To Brenda Drake + Chelsea Kasen

HOW TO: Tenderize Chicken

Use a meat tenderizer to prepare chicken breasts

HOW TO: Tenderize Chicken

Note: When dealing with raw chicken it is recommended to contain the preparation area so as to ensure complete decontamination afterwards

  1. Prepare chicken breasts: ensure all bones, skin, and tendons have been removed

  2. If the breasts are thicker than 1” then slice in half (aka butterfly), creating two flat pieces

  3. To contain the mess, use two sheets of plastic wrap. Layer:

    • Plastic sheet

    • Chicken breast

    • Plastic sheet

  4. Pound with tenderizer across the full surface until evenly ~3/8” thick

    • Consistent thickness is recommended

  5. Use tenderized chicken breasts in recipes as needed


Brenda tips:

  • Shopping for a good tenderizer? Look for one shaped similar to a mallet with a comfortable handle, like this one

  • No tenderizer? Use a rolling pin


Window to B’s kitchen . . .

Read More
Basic Skills, Bread Brenda Drake + Chelsea Kasen Basic Skills, Bread Brenda Drake + Chelsea Kasen

HOW TO: No-Knead Bread

Beautiful, tasty bread that anyone can make

A popular recipe for it’s simplicity, this bread uses very little yeast and requires little more effort than a quick stir. You will have to wait a bit though . . . the dough needs to sit overnight to achieve perfection.


HOW TO: No-Knead Bread

15 to 24 hours before serving . . .

To a large mixing bowl, add:

1 1/2 cups warm water

1/4 tsp yeast

1/2 cup oats (quick or regular)

Allow to sit for about 5 minutes, then stir in:

3 cups flour

1 tsp salt

Continue to stir until the dough holds together, though it will be shaggy. Cover tightly (lid or plastic wrap) and allow to rest at room temperature for 12+ hours.

Optional: stir the dough at hour 2 and/or hour 10 during the 12+ hour raising cycle

3 hours before serving (2 hours prior to baking) . . .

  • Cut a sheet of parchment, about 8” x 12”

  • Shape loaf:

  1. Flour surface (recommend to shape on a silicone sheet)

  2. Dump dough on floured surface

  3. Fold one third over center, then fold the other side over center

  4. Rotate 180 degrees and repeat both 1/3 folds and pinch edges together

  5. Place seam-side down on parchment square

  6. Invert mixing bowl and place over prepared loaf, protecting it from drying out while it rises

1 hour 30 minutes before serving (30 minutes prior to baking) . . .

  • Place 6 to 8 qt. oven-safe covered pot* in oven

  • Preheat oven to 450F

Baking time! (1 hour before serving)

  1. Remove pot from oven (careful it’s hot!) and remove lid

  2. Lift parchment containing loaf by long opposite corners and set inside pot

  3. Cover with lid and place in hot oven

  4. Bake for 20 minutes covered

  5. Remove lid, bake an additional 20 minutes

  6. Loaf with be golden and internal temp should be 200F

  7. Remove from oven and transfer to wire rack to cool

  8. Allow to rest for 20 minutes

Slice & serve.


Brenda tips:

  • Serving size: 8-12 servings

  • This bread is amazing to use for grilled cheese sandwiches!

  • *Covered pot can be cast iron dutch oven or enamel cast iron dutch oven as both can handle the heat of 450F. Other covered pots may work, but it is critical to ensure in advance that they are oven-safe to 450F to prevent injury. Some recipes recommend glass pans, but keep in mind that 425F is their very top temperature so plan accordingly.

  • Baking parchment can generally be reused for a few loaves


Window to B’s kitchen . . .

Read More
Basic Skills, How To, Main Dish, Savory Brenda Drake + Chelsea Kasen Basic Skills, How To, Main Dish, Savory Brenda Drake + Chelsea Kasen

Turkey Time Table

Comprehensive time table for thawing, roasting & resting the turkey

Turkey Time Table

Use the table below to determine:

  • The size of turkey needed to feed all your guests

  • Amount of time needed to thaw a frozen bird, whether in the refrigerator or a cold water bath

  • How long to roast a turkey using either the traditional style or cooking it inside a Reynolds Turkey Bag

  • And finally, just how long you should allow that bird to rest before carving

This comprehensive table will help make planning the turkey a breeze!

For detailed information and directions on how to prep & roast the turkey, look here.


Brenda’s tips:

Read More
B's Favorite, Basic Skills, Breakfast, Desserts Brenda Drake + Chelsea Kasen B's Favorite, Basic Skills, Breakfast, Desserts Brenda Drake + Chelsea Kasen

HOW TO: Fresh Whipped Cream

Create perfect whipped cream to compliment any sweet recipe.

Whipped Cream. Top waffles, fresh fruit, ice cream sundaes . . . fold into puddings, jellos, mousse . . . layer in cakes, trifles, pies . . . whipped cream compliments or becomes an integral ingredient to many delicious recipes. Simply multiply the amounts below when more is needed.


HOW TO: Fresh Whipped Cream

Essential elements for success:

  1. “Heavy Cream” or not? Both will whip but to achieve very thick whipped cream, you’ll likely prefer to select a cream with “heavy” in the title. This simply indicates a higher percentage of milk fat contained in the product.

  2. Ensure the cream is fresh: soured cream will ruin everything (and the expiration date shouldn’t be trusted above your senses)

    • Smell: your nose will know. IF the smell test is successfully passed, then . . .

    • Taste: dip the tip of a spoon into the cream and taste to confirm that the cream is still sweet.

  3. Colder cream will whip better:

    • Keep cream refrigerated until immediately prior to whipping

    • Chill the metal bowl in the freezer for ~10 minutes prior to use

To make whipped cream, add to the chilled bowl of a stand mixer:

1 cup heavy cream

2 Tbsp sugar

Using the whisk attachment, whip on medium speed until just stiff.

  • If whipped too much, it will turn into butter.

Use the freshly whipped cream immediately for best results.


Brenda’s tips:

  • Serving size: Cream approximately doubles in volume when whipped

Read More
Basic Skills Brenda Drake + Chelsea Kasen Basic Skills Brenda Drake + Chelsea Kasen

HOW TO: Separate Eggs

Learn how to separate the yolks and whites of eggs!

Many recipes require separated eggs. This allows both parts of the egg to highlight their unique elements. A few examples:

  • Egg whites can be beaten to incorporate air and help cakes, cookies, or even waffles, rise further while achieving an airy, light crumb.

  • Egg yolks enhance moisture (because of the inherent fat) in baked goods and are critical to making custards.

We explain how to separate eggs below. Please remember, the key to useful whites is to NEVER contaminate them with any amount of the yolk.


HOW TO: Separate Eggs

Assemble:

  • Eggs: number of eggs required by the recipe

  • Bowl 1: a small bowl to catch the egg white during separation

  • Bowl 2: a bowl to hold the separated egg yolks

  • Bowl 3: a larger bowl to gather the separated egg whites

Select one egg, use the two halves of the shell to remove the white from the yolk:

  1. Carefully crack the egg, dividing the shell into two halves

  2. Each hand should be holding a half, with the intact yolk contained in one

  3. Carefully transfer the yolk back and forth, allowing the liquid white to drain into Bowl 1

  4. Once the white has been removed, place the yolk in Bowl 2

  5. Inspect the white, ensuring that it was not contaminated by yolk or shells

  6. Transfer the clean egg white to Bowl 3

Repeat with remaining eggs, use egg whites and yolks as directed in the recipe.


Brenda’s tips:

  • Always use three separate bowls, this will ensure that you avoid the risk of contaminating a large bowl of egg whites on the final one


Window to B’s kitchen . . .

Read More
Basic Skills, How To Brenda Drake + Chelsea Kasen Basic Skills, How To Brenda Drake + Chelsea Kasen

HOW TO: Zest & Juice Citrus Fruits

Brenda’s tips for the easiest way to zest and juice citrus fruits!

HOW TO: Zest & Juice Citrus Fruits

Select:

1 citrus fruit

Thoroughly wash, then:

Zest

  • Using a stainless steel zester, scrape the outer skin of the citrus fruit, grating off only the darkest layer

  • Reserve the zest in a covered bowl, refrigerate until needed

Juice

  1. Microwave the citrus fruit (outer skin removed for zest) for 15-25 seconds, this will burst some of the juice cells

  2. Pressing the citrus firmly under your palm, roll it around on the countertop, further bursting the juice cells inside

  3. Cut the citrus fruit in half

    • Blade should slice halfway between the stem and bud ends of the fruit, slicing midway through all the carpels, or segments

    • Note: some juice will drip out, so cut the citrus fruit open over a bowl.

  4. Using a hand-held juicing reamer, juice the citrus fruit, allowing the juice to run into a bowl

  5. Using a small mesh strainer, strain the citrus juice into a measuring cup

Repeat with additional citrus fruit until the required amount of juice is obtained.


Brenda’s tips:

  • Zest can be refrigerated for about a week, or dried and stored in an airtight container to be used in other recipes

  • Heating the citrus before juicing opens the cells and allows more of the juice to be harvested, the microwave is the easiest method


Window to B’s kitchen . . .

Zesting a lime with a stainless steel zester . . .

Pressing the citrus firmly under my palm, and rolling it around on the countertop. This helps to burst the juice cells making it easier to juice AND more juicy . . .

Using a hand-held juicing reamer, to juice the lime . . .

Read More
B's Favorite, Basic Skills, How To Brenda Drake + Chelsea Kasen B's Favorite, Basic Skills, How To Brenda Drake + Chelsea Kasen

HOW TO: Select a Ripe Avocado

Please stop squeezing avocados, simply brush or flick the stem instead. We’ll show you how!

Please stop squeezing avocados, simply brush or flick the stem instead. Squeezing avocados will result in dark bruises that can make it inedible.


HOW TO: Select a Ripe Avocado

Gently brush or flick the stem of the avocado . . .

  1. Stem doesn’t budge: the avocado is still too green to consume

    • It should be ready to eat in 2 to 5 days: store at room temperature and check stem daily

    • Be careful not to force the stem off, applying excessive pressure will remove the stem but it won’t make the avocado any more ripe

  2. Stem removes easily & fruit is green under the stem: the avocado is perfectly ripe and ready to enjoy

    • Eat it today or tomorrow

    • It is recommended to store a perfectly ripe avocado in the refrigerator after it has ripened

  3. Stem easily flicks off & fruit inside is darkly colored: the avocado is past it’s prime

    • Avoid the avocado, most likely it has rotted

Note: exterior color doesn’t always indicate ripeness. A ripe avocado may appear bright green or almost a purplish black. It’s best to simply brush or flick the stem to identify the perfect avocado.


Brenda’s tips:


Window to B’s kitchen…

Read More
Basic Skills, How To, Savory, Side Dish, High Elevation Brenda Drake + Chelsea Kasen Basic Skills, How To, Savory, Side Dish, High Elevation Brenda Drake + Chelsea Kasen

HOW TO: Cook & Peel Boiled Eggs

Learn how to use a spoon to easily peel soft or hard boiled eggs.

Below is one of various possible processes to make boiled eggs. Two factors need to be considered prior to making boiled eggs:

  1. Do you want soft or hard boiled eggs? Stating the obvious, soft are less cooked than hard, so soft take less time.

  2. Elevation. Elevation impacts cooking time. Lower elevations cook faster than higher elevations.

Once you identify how long to cook for perfection, WRITE IT DOWN. Then you can repeat it on an infinite loop.


One foolproof way to boil eggs

  1. Add eggs to a large pot

  2. Add enough water to cover eggs

  3. Place pot over “high” heat

  4. Start timer immediately

  5. Bring to boil & reduce heat* to “med/low,” cover pot with a lid

  6. When timer rings, remove pot from heat

  7. Either:

    1. Transfer eggs immediately to cold water (soft boiled eggs)

    2. Set timer and let eggs rest in hot water (hard boiled eggs

      1. When timer rings, pour off hot water

      2. Add cold water until eggs are covered


The best way to peel boiled eggs

This peeling method works on both soft and hard boiled eggs

  1. Once cool enough to handle, pick up a boiled egg

  2. Using the back of a spoon, tap all over egg, shattering shell completely

  3. Using fingers, remove some of the shell from bottom of egg (enough to slip a spoon through)

  4. Dip spoon into cold water

  5. Slip spoon between shell and egg

  6. Rotate egg to remove shattered shell completely

  7. Rinse clean

    • ALWAYS rinse with clear water to ensure shells are truly gone

  8. Repeat with remaining eggs

Serve hot.


Brenda’s tips:

  • * Many recipes recommend shutting off heat to finish the eggs, but Brenda suggests keeping the heat on med/low. The primary reason for this is that water boils at a higher temperature at sea level that progressively decreases as elevation increases. Since the water boils ~10F lower where Brenda lives, the initial boil doesn’t retain quite enough heat to finish the boiled eggs.

  • At 6100 ft, these are the times recommended:

    • Starting eggs in cold water, set timer immediately after placing pot on high heat:

      • Soft boil: 10 min with heat on, transfer immediately to cold water

      • Hard boil: 10 min boiling + 5 min resting in hot water


Window to B’s kitchen…

The best way to peel a boiled egg

Soft boiled eggs

Read More
Basic Skills, How To, Brenda's Kitchen Hacks, Garden Produce Brenda Drake + Chelsea Kasen Basic Skills, How To, Brenda's Kitchen Hacks, Garden Produce Brenda Drake + Chelsea Kasen

HOW TO: Flash-Freeze Fresh Berries

Learn how to flash-freeze summer berries to enjoy them all year long!

HOW TO: Flash-Freeze Fresh Berries

Line sheet pan with silicone mat or parchment paper.

Wash and drain:

Fresh berries

Place berries in single layer on prepared sheet pan.

Freeze berries for 1-2 hours, or until firm.

Transfer berries to freezer ziplock or air tight container.

Store in freezer until use (up to 6 months).


Brenda’s tips:

Read More
Basic Skills, How To, Cake, High Elevation Brenda Drake + Chelsea Kasen Basic Skills, How To, Cake, High Elevation Brenda Drake + Chelsea Kasen

HOW TO: Bake Cakes & Cake-like Goods at Different Elevations

If you live more than 3k above sea-level, review this high-elevation adjustment chart to adjust the recipe for altitude impacts.

Have you ever made a cake, put it in to bake - anticipating golden perfection - but upon opening the oven…

  • you find a total disaster?

  • the center a deep crater?

  • the sides bubbled over with the bottom seemingly dropped out?

You, my friend, are baking at a higher altitude than the recipe was written for. At higher elevations the air pressure is lower than at sea level, disrupting the precious balance needed for baking. A few simple adjustments to the recipes measurements and you’ll once again produce heavenly results. 

A word of caution . . . some recipes work at any elevation, so try it before you adjust it. If the recipe doesn't work, start small. I recommend making adjustments one at a time to identify the sweet spot where your recipe creates the most perfect baked good. I also recommend to ALWAYS note what you’ve changed so you'll be able to repeat supreme results.

What makes me qualified to talk about altitude adjustments?

  • I grew up at 2600

  • Moved to 4800 for college

  • Worked at 0 for 10 yrs

  • Life today is at 6100

I’ve experienced major successes and failures that can be chalked up to altitude.  For baking recipes, it's all about perfect proportions and knowing what a negative result actually means.

In general, if something is perfect at sea level then it will **almost** certainly need adjustments.

Chelsea and I developed this infographic to help with high altitude adjustments and it applies particularly to the cake & cake-like segment of baking.

Altitude Infographic

Why will the adjustments make a difference?

  • Leavening: The lower atmospheric pressure at high altitudes is more rapidly overcome, consequently baking powder and baking soda both work more efficiently, allowing for smaller amounts to produce adequate leavening. The gradual leavening resulting from the reduction of these agents will bring the recipe back to perfection.

  • Heat/Time: Higher heat helps the baked good to set up more quickly to help offset faster evaporation and the efficiency of leavening, and, inversely, the baking time must be shortened to compensate for the temperature increase. 

  • Flour: Many recipes rely on flour for structural integrity, an increase is often required to balance out the impact of elevation and the other adjustments to maintain requisite form. Flour adjustments are the easiest to over-do. Measure each incremental change and note it so that you know exactly when the perfect structure is reached and can readily replicate refined results.

  • Liquid: Evaporation speeds up as the atmospheric pressure decreases + that increase of oven temp above . . . an increase in liquid (including milk, eggs, oil, etc. as appropriate) is critical to maintaining the desired succulent texture.

  • Sugar: Also impacted by evaporation speed, sugar becomes more concentrated resulting in a weakened structure. I personally leaves this adjustment as a last-ditch effort. I feel that an adjustment to sugar has too much potential for a negative impact to flavor. Keep sugar changes as minimal as possible - baked goods need to be sweet.

Interested in learning more?

Here are a few of my favorite altitude resources . . . 

Read More
How To, Basic Skills, Garden Produce Brenda Drake + Chelsea Kasen How To, Basic Skills, Garden Produce Brenda Drake + Chelsea Kasen

HOW TO: Julienne Carrots

Julia Davidson, of America’s Test Kitchen and Cooks Country, recently shared this technique for Julienne Carrots. Brenda was amazed at its ease and wants to share it with you.

Julienne, or matchstick, carrots add beauty to any dish. Brenda saw an ingenious hack for beautiful julienned carrots on Instagram. The post was created and shared by Julia Davidson, of America’s Test Kitchen and Cooks Country. Lately she has been sharing a series of basic prep and cooking tips. When Julia shared this method, Brenda immediately tried it out and was amazed at the ease.

Brenda has already employed this technique to cut slender carrot sticks, widening the cuts to ~1/4”, perfect for a 2 yr old to munch on at snack time.


HOW TO: Julienne Carrots—Quickly

You’ll need a cutting board, a sharp knife (Brenda prefers the Cutco Santoku Chef’s Knife, but any knife will do), and carrots.

Recommended: select the fattest carrots from the bag.

Step #1: Oblong Disks

  • Prepare carrot, either peeling or scrubbing clean

  • Trim the root end of carrot at an angle of ~45 degrees

  • Using a sharp knife, cut 1/8” slices, following the angle of the first cut for the length of the carrot

Step #2: Julienne

  • Cut each oblong disk in 1/8” matchsticks (cut individually or stack a few)


Brenda’s tips:

  • Quick! Julienne some carrots:

  • Using the fattest carrots reduces work time as the oblong disks cut in step one are wider, resulting in more matchsticks.

Read More