Smashed Oven Roasted Red Potatoes
Deliciously crisp edges encasing creamy potatoes
Deliciously crisp edges encasing creamy flavorful potatoes.
Smashed Oven Roasted Red Potatoes
To a large pot, add:
1 qt water
Bring to a boil over high heat, add:
1 tsp salt
~1 lb red potatoes, cut in half
Cover and reduce heat to medium-low, cook potatoes for 15-20 minutes until fork tender. Drain.
Begin preheating oven to 425F.
To a baking sheet, add:
2 Tbsp oil
Cooked potatoes
Use a potato masher (or the bottom of a cup) to press down on each potato, smashing it to ~3/4” thick. Drizzle with:
2 Tbsp butter, melted
Sprinkle with:
Garlic salt
Roast for 15-20 minutes, until golden. Serve hot.
Brenda’s tips:
Serving size: 4 servings
Add any combination of herbs and spices to change up the flavor, some recommendations:
Salt, pepper & parsley
Parmesan, paprika & garlic salt
Salt, crushed rosemary & thyme
Window to B’s kitchen . . .
Cabbage Rolls
Tangy cabbage rolls stuffed with beef, pork and rice
These tangy cabbage rolls are a great winter dinner.
Cabbage Rolls
Step 1: Sauce
To a pot placed over medium heat, add:
1 Tbsp oil
1/4 cup onion, diced
1 tsp garlic, minced
Sauté for 2 minutes. Then stir in:
1 (15 oz) can crushed tomatoes
1 (8 oz) can tomato sauce
1/4 cup apple, grated
2 Tbsp brown sugar
1 Tbsp apple cider vinegar
Bring to a low boil, reduce heat to medium-low and simmer until needed.
Step 2: Cabbage Leaves
To a large pot, add:
1 qt water
Heat to boiling, then add:
1 head cabbage, triangular stem removed
Steam for 5 minutes, or until leaves are malleable. Carefully peel all of the leaves, keeping them intact as much as possible. Set aside.
Step 3: Filling
To a mixing bowl, add:
1/2 lb ground beef (uncooked)
1/2 lb pork sausage (uncooked)
2 Tbsp onion, minced
1 egg
1/4 cup breadcrumbs
1 cup rice (cooked)
1/2 tsp salt
1/2 cup sauce prepared in Step 1
Use hands to mix well.
Step 4: Cabbage Rolls
Preheat oven to 350F.
Spritz a 13”x9” baking dish with non-stick spray
Select a cabbage leaf
Add a spoonful* of filling
Fold or roll to contain the filling
Place in baking dish
Repeat with remaining cabbage leaves and filling
Pour sauce (Step 1) over prepared cabbage rolls. Cover tightly with aluminum foil. Bake at 350F for 75 minutes. Remove from oven and rest for 10 minutes before serving.
Brenda’s tips:
Serving size: 8 servings
*Cabbage heads come in various sizes, so ration the filling accordingly
This recipe freezes well. Prepare completely, including covering with aluminum foil, then wrap tightly in plastic wrap. Freeze for up to 2 months. Remove from freezer, remove plastic wrap and bake at 350F for 2 hours.
Window to B’s kitchen . . .
HOW TO: Mirepoix (Carrots + Onions + Celery)
A simple, balanced, vegetable base that is the beginning of many recipes, a mirepoix is the French-style combination of onions, celery and carrots. This simple combination will add a depth of flavor to soups, sauces and more.
HOW TO: Mirepoix (Carrots + Onions + Celery)
Heat a large pot over medium-low heat, then add:
1 Tbsp butter
1/2 cup carrots, finely diced
Cook, stirring periodically for 3-5 minutes, then add:
1 cup onions, finely diced
1/2 cup celery, finely diced
Stir regularly, allowing the vegetables to slowly soften as the flavors meld and intensify. Continue to cook for 7-12 minutes. Once the vegetables are soft the mirepoix is ready to incorporate into a sauce, stew, gravy, etc.
Brenda’s tips:
Serving size: various
This recipe can be multiplied or divided as needed for the application. The ratio is 2:1:1 (onions : carrots : celery)
HOW TO: Onion Rings
Basically the best way to eat an onion
These homemade onion rings are made from slicing a large onion, dipping the rings in a deliciously flavored batter and deep frying until perfectly golden.
CAUTION: deep frying anything can be dangerous. Always keep your hands and face away from the hot oil. DO NOT add any water to the oil (hot or cold) or an explosion may result.
HOW TO: Onion Rings
Step 1: prep onion
Select one very large:
Onion (sweet recommended)
Remove the onion skin and trim 1/2” off root end. Using a very sharp knife, cut across the layers into 1/4” slices. Separate the rings. Set aside.
Step 2: batter
To a mixing bowl add:
1 egg
1 Tbsp Worcestershire sauce
1/4 cup milk
Whisk together, pour in:
3/4 cup flour
1 tsp baking powder
1 tsp seasoned salt
1 tsp garlic powder
Using a fork, stir together until smooth. Thin the batter by adding:
1/4 cup milk
If the batter is still too thick, add:
1 Tbsp increments milk
Repeat until desired thickness is reached. Allow batter to rest while oil heats.
Step 3: preheat frying oil
Note: It will take approximately 10 minutes for the oil to properly heat to 350F.
Select one:
Deep fryer
If there is a basket, keep it ready as it makes the process easier
Fill with oil to the fryer-specified level
Turn on fryer and set temperature to ~350F
Deep pot on stovetop
Place a deep pot on the stovetop
Add ~2” of oil to the pot
Turn heat to medium
Step 4: deep fry
Place a cooling rack on a sheet pan OR line a bowl/pan with paper towels
Once oil is heated, it’s time to work quickly.
From the bowl of separated onion slices, select a ring
Drop it in the batter, flip with a fork and lift out, allowing to drip for a moment
Carefully place the battered onion ring into the hot oil
Repeat quickly with a few more rings, filling but not crowding the cooking vessel
Using tongs or a fork, flip the rings once the browning is visible around the ring, about 2-3 minutes
Allow to cook 1-2 minutes on the second side, transfer using tongs to prepared sheet pan
Serve hot.
Brenda’s tips:
Serving size: 4 to 8 servings
Batter & fry one or two rings, to check batter thickness & thin if needed
Repurpose tip: use a brown paper shopping bag in place of paper towels to absorb the extra oil. Simply cut a bag in segments that fit your bowl/pan and be sure to arrange with the bags interior side facing up where the food will rest.
Window to B’s kitchen . . .
Chalupas
These tender chalupa shells are deep fried for a delightfully crispy crunch. Fill with your favorites and enjoy!
Chalupas
Step 1: prepare meat or bean filling
Make a batch of one or more of the following:
Step 2: dough
To a large mixing bowl, add:
1 1/4 cup flour
1 1/2 tsp baking powder
1/4 tsp salt
Sift together, stir in:
2 tsp oil
1/2 cup warmed milk (90-100F)
Clean spoon and begin to knead, adding only if needed:
1 Tbsp increments milk
Knead for 1-2 minutes.
Divide into 4 equal portions. Place dough balls in a single layer and cover tightly. Let rest.
Step 3: preheat frying oil
Note: It will take approximately 10 minutes for the oil to properly heat to 350F.
Select one:
Deep fryer
If you have a basket, set it aside — you will not need it
Fill with oil to the fryer-specified level
Turn on fryer and set temperature to ~350F
Deep pot on stovetop
Place a deep pot on the stovetop
Add ~2” of oil to the pot
Turn heat to medium
Step 4: deep fry
While oil heats, roll each ball into a flat disk*. Pierce all over with a fork.
Deep fry for 1 minute:
Place the flattened disk in the hot oil, frying for 30 seconds
Flip and, using tongs, fold the disk in half with the cooked side inside
Hold the fold using tongs and a heat-safe spoon between the layers
Fry until golden
Use tongs to transfer from hot oil to a cooling rack
Step 5: fill & serve
Immediately dress:
Meat (Step 1)
Refried beans
Sour cream
Tomatoes, diced
Onions (optional)
Lettuce, shredded
Fold and serve immediately.
Brenda’s tips:
Serving size: 4 chalupa shells
* To roll out chalupas, flatten rested dough ball with fingers and place between two square pieces of plastic wrap. Use a rolling pin to press dough into an even circle. Rolling chalupas is similar to rolling out pie crust.
Window to B’s kitchen . . .
Shredded Beef Enchiladas
These enchiladas are shrouded in a rich, beefy sauce and bursting with shredded beef and melty cheese
These enchiladas are shrouded in a rich, beefy sauce and bursting with shredded beef and melty cheese. Prepare in advance, storing in the refrigerator until ready to bake. This recipe also freezes well.
Shredded Beef Enchiladas
Step 1: beef
To the bowl of a slow cooker, add:
1 cup beef broth (or water)
1 (15 oz) can diced tomatoes
1 (4 oz) can diced green chilies
2 lbs beef roast, trimmed
Season with:
2 tsp chili powder
1 tsp ground cumin
1 tsp garlic powder
1/2 tsp oregano
Cover and cook on low for 8 hours (or high for 4 hours).
Strain, retaining the liquid
Shred beef, set aside
Step 2: sauce
To a medium saucepan, add:
2 Tbsp cornstarch
2 Tbsp water
Whisk together, continue whisking while pouring in:
Cooking liquid, retained from roast
Heat over medium-high heat until thickened, whisking continuously. Remove from heat.
Step 3: assemble & bake
Preheat oven to 350F
Prepare 9” x 9” baking dish by spraying with non-stick baking spray. Pour ~1/2 cup of sauce (Step 2) into bottom of baking dish.
Select 1 flour tortilla
Sprinkle with ~2 Tbsp cheese
Spoon in 1/8 portion shredded beef
Roll up and place in baking dish
Repeat steps 1-5 with remaining 7 tortillas
Pour remaining sauce (Step 2) over the rolled enchiladas.
Bake at 350F for 20 minutes (uncovered). Remove from oven and sprinkle with:
1 cup shredded cheese
Return to oven and bake an additional 5 minutes.
Serve hot, garnished with cilantro and sour cream.
Additional recommended toppings:
shredded lettuce
diced tomatoes
sliced olives
chopped green onions
salsa
Brenda’s tips:
Serving size: 8 enchiladas
Flour tortillas are recommended but can be replaced with 12 corn tortillas
Optional: if you’re not eating right away, cover baking dish with tinfoil and store in refrigerator (up to 24 hours) until ready to bake. Increase baking time by 15 minutes due to the cold start, baking 35 minutes + 5 minutes with cheese.
Window to B’s kitchen . . .
Beef and Broccoli
Fresh steamed broccoli complements tender steak strips drenched in flavorful gravy.
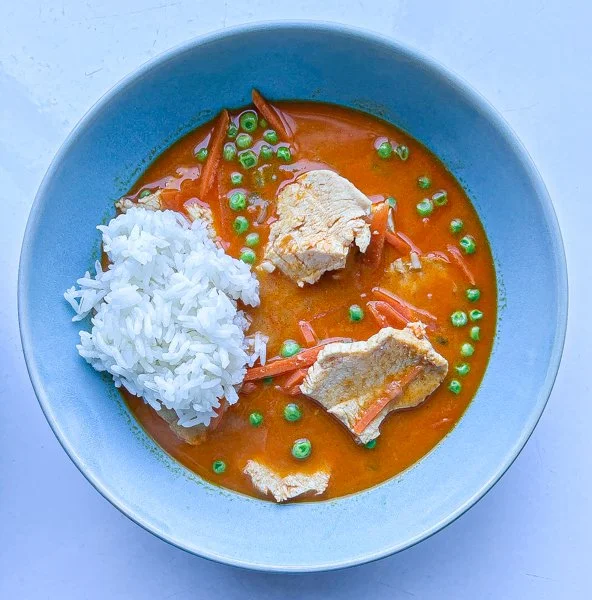
Beef and Broccoli
Step 1: rice
Start rice
Step 2: assemble sauce
To a small mixing bowl, add:
3 Tbsp soy sauce
3 Tbsp brown sugar
2 Tbsp cornstarch
2 tsp garlic chili sauce
1/4 tsp ground ginger
1 cup beef broth
Whisk together, set aside.
Step 3: steam broccoli
To a small pot, add:
1/2 cup water
1 head broccoli, trimmed and cut into bite-size pieces
Place over high heat, bring to a boil, cover and shut off heat. Leave covered for 5 minutes, remove lid and drain. Set aside until serving.
Step 4: beef & sauce
To a skillet, heated to medium, add:
1 Tbsp oil
1 lb steak, sliced thin against grain
1/4 cup onions, sliced thin
1 tsp minced garlic
Sauté for ~5 minutes until vegetables are tender. Push the beef to one side, pour in:
Sauce assembled in Step 2
Continuously stir as it will thicken quickly into gravy, cook for ~1 minute.
Serve hot with steamed broccoli and rice.
Brenda’s tips:
Serving size: 4 servings
If desired, peel and slice the stalk and add it to the broccoli florets
Tip: mostly frozen steak will slice more easily than fully defrosted steak
If using a tough cut of steak, like round steak, cook the steak in the crockpot on high for ~3 hours, then slice and add with the onions and garlic
Window to B’s kitchen . . .
Hawaiian Haystacks
Pineapple and coconut are the stars of these delicious haystacks
Let’s be honest, no matter where Hawaiian Haystacks originated (spoiler: not Hawaii), everyone - everyone - has their own unique list of toppings. Here is Mama Saunders way of making them and it is the superior flavor combination. And yes, there are countless chicken ways to make this dish, but in Mama Saunders recipe, the gravy is made from canned tuna.
Hawaiian Haystacks
Step 1: Rice
In the removable pot of the pressure cooker, combine:
2 cups rice, rinsed
2 cups water
1 tsp salt
1 tsp butter
Put pot in pressure cooker and lock lid in place. Select the "Rice" cycle. Once complete, allow the natural release for 5 minutes. Release remaining pressure (carefully) and fluff rice with a fork.
Or use an alternate method to make rice.
Step 2: Prep Toppings
Individually prepare the following toppings, keeping them in separate dishes:
1 cup cheese, shredded
1 cup carrots, shredded
2 cups lettuce, chopped
1 (20 oz) can crushed pineapple, drained
1/2 cup shredded sweetened coconut
1/4 cup walnuts, coarsely chopped
Step 3: Gravy
To a 2 qt saucepan, add:
3 Tbsp butter
3 Tbsp flour
Cook for 2-4 minutes on medium heat to make a roux.
Whisking continuously, add:
1 3/4 cups milk
1/4 tsp garlic powder
1/4 tsp pepper
1/4 tsp salt
Once smooth, fold in:
1 (5 oz) can tuna (in water)
Simmer. Once thickened, cook an additional 1-2 minutes. Remove from heat.
Step 4: The perfect stack
Rice
Cheese
Gravy
Carrots
Lettuce
Pineapple
Coconut
Walnuts
Brenda’s tips:
Serving size: 4 servings
Obviously you can mix up the toppings to fit your preferences
And yes, go ahead and replace the tuna with chicken
Sloppy Joes
Easy & fast tangy beef sandwich
This tangy beef sandwich is easy and fast, making the perfect weeknight dinner.
As with any recipe shared by Sheryl, these are delicious and should be added to your menu asap.
Sloppy Joes
To a large skillet, add:
1 lb ground beef
Cook over medium heat until browned and cooked through. Skim off rendered fat and season with:
1/2 tsp seasoned salt
1/4 tsp garlic powder
1/8 tsp ground red pepper
Stir in:
3/4 tsp Worcestershire sauce
3/4 tsp mustard
1 (8 oz) can tomato sauce
1/4 cup ketchup
2 Tbsp brown sugar
2 tsp vinegar
Simmer for ~10 minutes. Serve hot over Soft Pretzel Buns or Quick Hamburger Buns.
Brenda’s tips:
Serving size: 4 servings
This recipe is delicious using either ground beef or chopped steak.
Soft Pretzel Buns
Pretzel rolls, perfect for you next cookout
Add more flavor to your burgers or chicken sandwiches by serving them on these pretzel buns.
Soft Pretzel Buns
Step 1: Dough
To a large mixing bowl, add:
1 cup (8 oz) warm water
4 tsp sugar
2 tsp yeast
1 cup flour
Stir until combined, then mix each in individually:
1 tsp salt
2 Tbsp oil
1 1/4 cup flour
Clean spoon and begin to knead, sprinkling in:
1 Tbsp increments flour, totaling 1/4-1/2 cup
Knead for about 10 minutes or until dough “blisters” and is soft and elastic. Cover bowl.
Let rise 30 minutes.
Divide into 8 equal pieces, shaping each into a ball. Place the balls a few inches apart on a sheet pan, flatten each so that the roll becomes a 3/4” thick disk. Cover with a towel.
Proof 20 minutes.
Step 2: Boil & Bake
Preheat oven to 425F. To a large pot, add:
6-8 cups water
Bring to a boil over high heat, reduce heat to medium-high. Add:
2 Tbsp baking soda
Boil the rolls in batches of 2-3 rolls:
Using a slotted spoon, quickly add the rolls
Boil for 20 seconds, flip over with slotted spoon & boil for a final 20 seconds
Using a slotted spoon, remove the boiled rolls, transferring to a cooling rack
Brush with butter and sprinkle with coarse sea salt
Using a sharp knife, slash a slit in the top of each roll
Transfer to a baking sheet
Bake at 425 for 10 - 12 minutes. Let sit 5 minutes, then serve.
Brenda’s tips:
Serving size: 8 buns
The dough can be prepared in a bread maker, using the “dough” cycle
New to kneading? Check out Brenda's HOW TO: Knead Yeast Dough post.
And find more tips about making yeast dough
Panang Curry
Panang Curry is a sweet red Thai curry, a rich broth enhanced with peanut and coconut flavors
Panang Curry is a sweet red Thai curry, a rich broth enhanced with peanut and coconut flavors. Increase the red curry paste to intensify the flavor or to increase the heat in this delicious curry. Full of fresh veggies and tender chicken, it is ideal served with steamed rice.
Panang Curry
Step 1: Chicken
Prepare:
1 lb chicken
Cook & slice thin. Select the cooking method that best fits your needs:
Baked: Oven Roasted Chicken Breast
Crockpot: Shredded Chicken
Whole Chicken: Engagement Chicken
Velvet Chicken:
Thinly slice raw chicken and toss with 1/2 tsp baking soda. Allow to rest 20 minutes, rinse thoroughly, and cook (sauté or steam).
Cover cooked chicken and set aside.
Step 2: Curry
Start rice
To a large pot, heating over medium heat, add:
1 Tbsp oil
2 - 4 Tbsp panang paste*
Or substitute:
2 - 4 Tbsp red curry paste*
1 tsp ground coriander
1 tsp ground cumin
1 tsp peanut butter
Stir while heating for 2 or 3 minutes to release the flavors. Add:
1 tsp garlic, minced
2 Tbsp onion, finely diced
Continue to stir as the ingredients sauté for ~1 minute. Then stir in:
1 Tbsp fish sauce
1 Tbsp sugar
2 Tbsp lime juice
2 (15 oz) cans coconut milk
Heat to simmering, cover and simmer for 10-15 minutes. Add vegetables:
1/2 cup carrots, julienned
1/2 cup bell peppers, julienned
1/2 cup frozen petite peas
Cover and cook for 3 minutes. Stir in:
Chicken, cooked & sliced thin
Serve hot with steamed rice.
Brenda’s tips:
Serving size: 4 servings
Select your favorite method to cook the chicken and sub favorite veggies to make this dish uniquely yours
* Panang paste or red curry paste is the flavor base for this curry. Adding more will increase the flavor and it will also bring the heat. Start with a small amount and increase if desired.
Window to B’s kitchen . . .
Garlic Cilantro Hummus
A delicious kick, enhanced by the refreshing element of fresh cilantro
This recipe is inspired by Trader Joes Cilantro and Jalapeño Hummus. It’s got a delicious kick, enhanced by the refreshing element of fresh cilantro.
This recipe will work fantastically with either canned or dry garbanzo beans (aka chickpeas). If you’re interested in starting out with dry garbanzo beans, we’ve shared precise instructions here. Note, it is strongly recommended to soak the dry garbanzo beans for ~8 hours and then pressure cook, as directed below.
Garlic Cilantro Hummus
If starting with dry beans, allow 8-24 hours to soak the beans.
Step 1: Prepare Garbanzo Beans (Chickpeas)
Either:
2 (15 oz) cans garbanzo beans
OR:
To a quart jar, add:
1 1/2 cups dry garbanzo beans
Fill to the top with:
Water
Allow to sit for 8 hours (if longer, refrigerate during soaking).
After soaking 8(+) hours: to the removable insert of Instant Pot pressure cooker, add:
Garbanzo beans; soaked, drained & rinsed
1 qt water
Put the removable pot in pressure cooker and lock the lid in place. Select the "bean" cycle, or “manual,” and pressure for 45 minutes. Once complete, allow natural pressure release.
Step 2: Make Hummus
Place the work bowl and chopping/mixing blade attachment on the food processor base. To the work bowl, add:
~4 cups garbanzo beans (pressure cooked or canned, from step 1)
1 Tbsp fresh garlic, minced
1/2 cup fresh cilantro*
2 Tbsp jalapeño pepper, minced
4 Tbsp lemon juice
1 1/2 tsp salt
4 Tbsp water
Lock food processor cover in place, insert the pusher assembly and turn the machine on. Process for 20 seconds. Remove pusher assembly and cover, scrape sides and reassemble. Process for ~3 minutes, stopping to scrape sides as needed.
Transfer to 4 wide-mouth half-pint jars. Chill or serve immediately.
Brenda’s tips:
Serving size: 4 cups hummus
Amounts of every ingredient can be tweaked for personal preference.
Cilantro*: fresh herbs aren’t exactly consistent, so a reasonable way to measure is to loosely fill the measuring cup with rough chopped herbs.
A blender can be used in place of a food processor to create creamy hummus.
Hummus should be stored in the refrigerator.
Serve with fresh vegetables, or as a spread, or with tortilla chips.
Window to B’s kitchen . . .
Cabbage Stir Fry
This quick side dish is filled with fresh cut vegetables.
This quick side dish is filled with fresh cut vegetables and is a great compliment to any meal.
Cabbage Stir Fry
To a skillet or wok, heated to medium, add:
1 Tbsp oil
1/4 cup onions, sliced thin
1 tsp garlic, minced
Sauté for 1 minute. Then add:
1 cup julienned carrots
Cook, stirring frequently, for 5 minutes. Then stir in:
4 cups cabbage, sliced thin
Cook for 2 minutes, finish by stirring in:
1 Tbsp brown sugar
1 Tbsp soy sauce
1/8 tsp ground ginger
Serve hot.
Brenda’s tips:
Serving size: 4 servings
Serve as a side dish
Substitute or add other vegetables as desired
HOW TO: Slow Cooker Baked Potatoes
This is truly a one ingredient recipe. No water added. Only potatoes.
Potatoes are easily one of the most important ingredient in my world. Any preparation makes me happy. Learning that potatoes could be “baked” in the slow cooker - - - I had to try it out for myself and was very pleased with the results. In particular, THIS preparation is ideal when par-cooked potatoes are required in a recipe as the potatoes retain a perfect texture for dicing, shredding or slicing.
This is truly a one ingredient recipe. No water added. Only potatoes.
This HOW TO shares just how easy it is to make baked potatoes in the slow cooker. These potatoes can be used in:
Potato Salad
Breakfast Hashbrowns
It is my particular favorite to prepare the potatoes this way when I need par-cooked shredded potatoes. Once cooked in the slow cooker, simply peel & shred.
HOW TO: Slow Cooker Baked Potatoes
*This recipe is great for potatoes from the garden or grocery store.
Use any amount of potatoes that fits within the removable bowl of the slow cooker.
Prepare potatoes
Rinse dirt from potatoes (if eating peels, be sure 100% dirt moved)
Trim any bad spots but do not peel the potatoes
No need to poke holes or trim ends for steam release
To removable bowl of slow cooker, add:
Potatoes
That’s it. Not even any water is needed.
Cover with slow cooker lid. Cook on high for 3.5 to 4.5 hours.
Serve hot or use in recipes requiring baked potatoes.
Brenda’s tips:
Serving size: however many fit in the slow cooker
These potatoes can be cooked up to 4 days in advance and stored in the refrigerator until use.
Slow Cooker Baked Potatoes: this preparation is ideal when par-cooked potatoes are required in a recipe as the potatoes retain a perfect texture for dicing, shredding or slicing, such as:
Potato Salad
Breakfast Hashbrowns
Window to B’s kitchen…
Brown Sugar Chicken
This hits all the notes of a sweet-savory dish
As I truly enjoy cooking, I’m usually the one making dinner in our house, but sometimes John volunteers to take a turn and I thank him effusively. This is one of his recipes and it’s a family favorite.
Brown Sugar Chicken comes together quickly and hits all the notes of a sweet-savory dish. While it cooks, the brown sugar caramelizes on the chicken, creating a delicate sauce enhanced with garlic for exceptional flavor.
Brown Sugar Chicken
Serving tip: start a batch of steamed rice and then continue with preparing the chicken
Heat a large skillet over medium heat until hot, then add:
1 Tbsp oil
1 lb chicken, cut into 1” cubes
1/4 cup brown sugar
Season with:
Garlic salt
Allow the chicken to cook for about 3 minutes, then turn chicken pieces and cook 3 minutes. Repeat until all sides of the chicken pieces are browned. It total, the chicken will cook for about 20 minutes. The brown sugar will caramelize on the chicken as it cooks.
Serve hot over steamed rice.
Brenda’s tips:
Serving size: 4 servings
Prefer spicy & sweet? Add 1 Tbsp hot sauce while cooking
Pairs well with Vegetable Stir Fry
Window to B’s kitchen . . .
Creamy Chicken Chili
Chicken and white beans are the base for this creamy chili
Use great northern beans for this Creamy Chicken Chili as they are a small, mild bean that soaks up the delicious chili flavors. For the fastest version, use canned beans and cook this chili on the stove, or use pressure-cooked dry beans, or start it in the slow cooker in the morning and enjoy a perfect dinner.
Creamy Chicken Chili
To a large pot, heated to medium, add:
1 tsp oil
1/2 cup onion, finely diced
2 tsp garlic, minced
Sauté for 2 minutes. Add:
1 lb chicken, cut into 1/2” cubes
1 tsp dried oregano
1 tsp ground cumin
1 tsp ground coriander
1 tsp chili powder
1 tsp salt
1/2 tsp pepper
1/4 tsp cayenne pepper
Cook for 5 minutes, stirring regularly. Pour in:
4 cups chicken broth
2 (15 oz) cans great northern beans, drained and rinsed
1 (4 oz) can diced green chilies
1 (15 oz) can corn
Simmer for 30-90 minutes. Stir in:
4 oz cream cheese
1/4 cup heavy cream
Serve hot with tortilla chips, garnish with:
Avocados, diced
Tomatoes, diced
Cheese, shredded
Brenda’s tips:
Serving size: 4-8 servings
Substitute: instead of using canned beans, pressure cook 1 1/2 cups dry great northern beans (drained & rinsed)
This recipe can be prepared in the slow cooker. Simply add all ingredients to a slow cooker, cook on High for 3 hours or Low for 6 hours.
Window to B’s kitchen . . .
Chow Mein
Crisp-tender veggies in a light sauce
A perfect compliment to Sweet & Sour Chicken or Orange Chicken, or add Oven Roasted Chicken Breast and serve over rice for a complete dinner.
Chow Mein
To a large skillet or wok, preheated over medium heat, add:
1 tsp oil
1/2 cup onion, slivered
Sauté for 2 minutes, then stir in:
1 cup celery, cut into 1/4” slices
2 cups celery, sliced thin
1/2 cup carrots, julienned
Cook for 2 minutes, stirring frequently. Stir in:
1 1/2 cup chicken broth
2 Tbsp soy sauce
1 Tbsp sugar
Simmer for 8-12 minutes, or until veggies are tender.
In a separate bowl, whisk together:
1 Tbsp cold water
1 Tbsp cornstarch
Whisk mixture into simmering veggies. Cook for one minute.
Serve hot over steamed rice or noodles.
Brenda’s tips:
Serving size: 4 servings
Substitute vegetable broth for Vegetarian Chow Mein
Add Oven Roasted Chicken Breast for Chicken Chow Mein
Substitute other veggies such as broccoli, bean sprouts, bell peppers, etc.
Window to B’s kitchen . . .
Bacon Wrapped Pork Loin
Wrap strips of bacon around a pork tenderloin and oven roast to perfection
Pork tenderloin looks fancy and can be prepared by even the least experienced chef. Simply roast it for a delicious addition to any dinner.
This recipe doubles the pork through wrapping strips of bacon around the loin and then oven roasting. The bacon drippings will help tenderize the loin and keep it from drying out during roasting - not to mention the phenomenal flavor enhancement.
Bacon Wrapped Pork Loin
Step 1: Prep Tenderloin
Preheat oven to 400F
Place one sheet of aluminum foil, about 15” long, on a sheet pan. Using:
12 oz bacon
Create a bacon bed by placing strips of bacon horizontally across tinfoil-covered sheet pan.
Tip: place the strips close enough together that they almost overlap on the long sides
Select:
1 (~2 lb) boneless pork tenderloin
Place in the center of the prepared bacon bed. Season all over with:
Garlic salt
Selecting one piece of bacon at a time and rotating between left and right, create a “braided” design over the top of the pork loin:
Bring up the end of the slice of bacon and wrap around the pork loin at a slight angle
Next, select the bacon end from the opposite side and wrap over the loin, also covering the end of the first strip
Repeat, rotating between the two sides, with remaining bacon strips to create the appearance of a braid down the center of the pork loin (see recipe photo)
Secure the end of the final strip with a wooden toothpick if needed
Step 2: Roast Tenderloin
Lightly cover the prepared pork loin with aluminum foil, transfer to the preheated oven:
Roast the loin at 400F for 15 minutes
Remove aluminum foil (retain for later), return loin to oven and roast for an additional 20 minutes, or until internal temperature is 145F
Remove from oven and cover with the retained foil
Rest for 10 minutes then slice to serve
Brenda’s tips:
Serving size: 4-8 servings
Note: any size of tenderloin can be used in this recipe, just be sure to adjust cooking time so that the tenderloin is cooked to 145F
Plan ~20 minutes per pound when cooking a pork tenderloin
For additional flavor, marinade pork loin for ~8 hours in a mixture of garlic and soy sauce prior to wrapping in bacon
Or give the loin a good rubdown with salt and refrigerate for ~8 hours before roasting
Window to B’s kitchen . . .
Ham Bone Soup
Best use of that ham bone - Ham Bone Soup
Anytime you serve a bone-in ham, you should plan to have Ham Bone Soup shortly thereafter. When the ham is carved, simply set aside the bone - it’s even better if there is a bit of ham still stuck to it - and that bone will become the base of this soup. Remember to refrigerate (or freeze) until it’s time to make the soup.
For the most economical soup, start with dry beans.
Ham Bone Soup
Step 1: Pressure dry beans
To the removable pot of a pressure cooker, add:
1 lb dry navy beans (or great northern)
~4 cups water
Put removable pot in pressure cooker and lock lid in place. Select the "Beans" cycle, adjusting time to “25” minutes. Once complete, allow the natural release for at least 5 minutes. Release remaining pressure (carefully).
Step 2: Wrap Bone (optional)
Optional step. By wrapping the bone in cheesecloth all the flavor can permeate the broth to create an amazing soup, while simultaneously keeping the bones contained and easy to remove before serving.
Spread a 12” square piece of cheesecloth over a dinner plate and in the center, place:
Ham bone
Wrap the cheesecloth over and around the bone, being sure to encase the full bone in cheesecloth. Add another piece of cheesecloth if needed.
Step 3: Slow Cooker
To a slow cooker, add in order:
Ham bone, wrapped
1 cup apple juice
5 cups water
1 lb navy beans (pressure cooked, drained & rinsed)
4 Tbsp brown sugar
2 Tbsp molasses
1/4 cup onion, finely diced
1 tsp garlic, finely minced
1 tsp dry mustard
1/8 tsp red pepper flakes
2 tsp salt
~1/2 cup ham, chopped (optional)
Place lid on slow cooker. Cook on High for 3-5 hours or Low for 5-8 hours.
Step 4: Serve
Transfer bone bundle to a plate. Using kitchen shears, cut off the cheesecloth to expose the bone. Pull off any bits of ham and add ham back to the soup. Serve soup hot with fresh crusty bread.
Brenda’s tips:
Serving size: 8 servings
Sub: canned beans for the dry beans if needed
Window to B’s kitchen . . .
Tzatziki Sauce
Cucumber and fresh garlic flavor thick yogurt for a Greek classic
This classic Greek yogurt sauce is a great addition to any Mediterranean meal.
Tzatziki Sauce
To a small mixing bowl add:
1 cup Greek yogurt (optional step: strain yogurt*)
1 cucumber, seeds removed, chopped fine
1 tsp fresh garlic, minced
1 Tbsp olive oil
1/2 tsp salt
1/4 tsp pepper
1 Tbsp lemon juice
1 Tbsp fresh dill, chopped fine
Fold together. Chill 30 minutes. Serve.
Brenda’s tips:
Serves: 4-8 servings
Strained: for a thicker Tzatziki, strain the Greek yogurt through a triple-layer of cheesecloth.
Substitute 1 tsp dried dill for 1 Tbsp fresh dill.