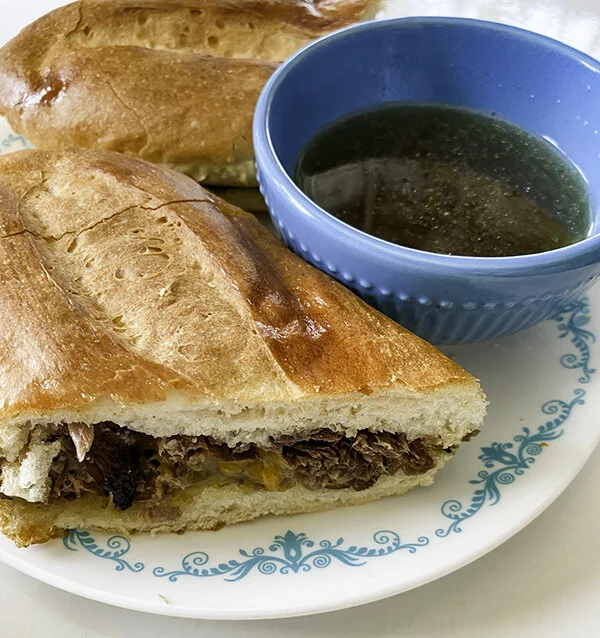
Beef, Bread, Main Dish, Savory, Slow Cooker Brenda Drake + Chelsea Kasen Beef, Bread, Main Dish, Savory, Slow Cooker Brenda Drake + Chelsea Kasen

HOW TO: French Dip

Have roast beef leftovers? Meet your new favorite meal. Use the broth that is created when slow-cooking a beef roast for an unbeatable flavor.

Crisp bread, flavorful broth and tender beef . . . simply divine.

Done right, this sandwich will be a new favorite at your table. It is best to use the broth that is created when slow-cooking a beef roast, as that flavor is unbeatable.


HOW TO: French Dip

1. Bread

This is best on a fresh loaf of Brenda’s French Bread

  • Plan 2.5 hours to make the bread fresh OR

  • Substitute: bakery crusty rolls

2. Meat

Using leftover fully cooked Roast Beef:

  • Trim the fat and remove any bones

  • Slice tender beef 1/4” thick, across grain, for sandwiches

  • Retain the beef broth for the Au Jus (below)

3. Cheese

Select & slice your favorite melting cheese, recommended:

  • Provolone or

  • Mozzarella or

  • Cheddar

4. Au Jus

To a small pot, add:

1 1/2 cups beef broth (skim fat prior to measuring)

1 Tbsp Worcestershire sauce

1/4 tsp garlic powder

Taste test. If bland, add salt (~1/8 tsp).

Simmer for 10-20 minutes, reducing slightly. While simmering, assemble:

5. Sandwiches

Build the sandwiches:

  • Cut loaf into desired lengths (4 to 8”)

  • Slice loaf lengthwise

Layer (amounts subject to personal preference):

Mayonnaise

Roast beef, sliced

Pepper

Salt

Cheese

Keep the sandwich open-faced, placing both sides on pan and put in toaster oven.

  • “Toast” for 3-5 minutes, until cheese is melted.

  • Alternately, “broil” for 2-5 minutes in the oven

Close sandwich.

6. Serve

Toasted sandwich with a bowl of hot Au Jus for dipping.


Brenda’s tips:

  • Serving size: Au Jus recipe serves 4, and can be multiplied or divided.

  • Substitute as desired. The very best results will be achieved by using Brenda’s recipes for Roast Beef and French Bread as they provide the perfect flavor & texture.

  • The flavor of the Au Jus is dependent on the beef broth that is used. Brenda recommends using the leftover broth created when making a slow-cooked beef roast. The broth will have flavor from slow-cooking the meat & spices that simply can’t be matched.


Window to B’s kitchen . . .

Read More
Beef, Main Dish, Savory, Leftover Meals Brenda Drake + Chelsea Kasen Beef, Main Dish, Savory, Leftover Meals Brenda Drake + Chelsea Kasen

Chimichangas with Shredded Beef

Have roast beef leftovers? Make these chimichangas. Using leftover roast beefs helps this meal come together quickly, making it perfect for anyone.

This recipe is designed to use leftover roast beef, simmering with additional spices to make it perfect for Chimichangas. Using leftover roast beefs helps this meal come together quickly, making it perfect for anyone.

CAUTION: frying anything can be dangerous. Always keep your hands and face away from the hot oil. DO NOT add any water to the oil (hot or cold) or an explosion may result.


Chimichangas with Shredded Beef

Step 1: Prepare filling

To a medium pot, add:

1 cup roast beef, slow cooked to perfection & shredded

1/8 cup beef broth

1/2 tsp lime juice

1/2 tsp white vinegar

1/2 tsp garlic powder

1/2 tsp chili powder

1/4 tsp ground cumin

Simmer over medium heat until heated through, about 5 minutes.

Then fold in:

1/2 cup rice, cooked (optional)

1/2 cup black beans, cooked & heated (optional)

Set aside.

Step 2: Assemble chimichangas

Microwave for 10-20 seconds:

4 tortillas, burrito size

Placing on one edge, fill the tortilla with:

~1/2 cup filling

2 Tbsp shredded cheese

Roll up each tortilla:

  • Starting at the edge with the filling, begin to roll the tortilla while folding the two sides in slightly. Continue to roll the tortilla, containing all of the filling inside the roll.

  • Repeat until all tortillas are filled & rolled

Step 3: Pan-fry

To a large skillet (10” recommended), add:

1/4 inch oil (canola recommended)

Place over medium and heat until simmering.

Pan-fry chimichangas:

  • Carefully add the filled tortilla rolls, seam side down, to the hot oil

    • Fry in batches if the pan is not big enough to fit all four

  • Fry for about 1 minute, then, using tongs, turn about 60 degrees (1/6 turn)

  • Repeat rotations until all sides are golden brown

  • Remove from hot oil, drain on a paper towel

Step 4: Serve

Serve with a side of:

And/or over a bed of:


Brenda’s tips:


Window to B’s kitchen . . .

Read More
Cake, Desserts Brenda Drake + Chelsea Kasen Cake, Desserts Brenda Drake + Chelsea Kasen

Tunnel of Fudge Cake

The walnuts in this fudge cake provide the structure for a beautiful chocolate tunnel - making each slice perfection.

Our good friend Brigham requested this cake for his birthday a few years back. Adapted from Pillsbury’s recipe, the walnuts in this fudge cake provide the structure for a beautiful chocolate tunnel. Each slice is perfection.


Tunnel of Fudge Cake

Prepare a bundt pan:

  • Butter & flour the complete inner surface

Preheat oven to 350F

To the bowl of a stand mixer (or a large mixing bowl), add:

1 3/4 cups sugar

1 3/4 cups butter, softened

Cream together until lightened.

Individually add, mixing well after each:

6 eggs

Then add:

2 cups powdered sugar, in 1/2 cup increments

Sift together and fold in:

2 1/4 cups flour

3/4 cups cocoa

2 cups walnuts, coarsely chopped

Spoon batter into the prepared bundt pan.

Bake for 45-50 minutes, until cake appears set and edges begin to pull away from the pan.

  • Remove from oven and cool, upright, for 2 hours

  • Invert on serving plate and cool an additional 2 hours

Chocolate Glaze

Combine in a small bowl:

3/4 cup powdered sugar

4 Tbsp cocoa

2 Tbsp heavy cream

Whisk together until smooth.

Drizzle over cooled cake.

  • Optional: top with chopped walnuts.

Allow glaze to set.

Slice & serve.


Brenda’s tips:

  • Serving size: 16 slices

  • The walnuts are critical to developing the “tunnel of fudge” in the center of this cake - do NOT omit


Window to B’s kitchen . . .

Read More
Beef, Main Dish, Savory, Slow Cooker, One Pot Wonders Brenda Drake + Chelsea Kasen Beef, Main Dish, Savory, Slow Cooker, One Pot Wonders Brenda Drake + Chelsea Kasen

Roast Beef in the Slow Cooker

This recipe produces a tremendously tender roast with a deep yet delicate savory flavor.

This recipe produces a tremendously tender roast with a deep yet delicate savory flavor. The bay leaves are intrinsic to producing the best tasting roast beef.

The directions below are for a slow cooker, but this recipe can be adapted for the stovetop or oven. See the Brenda’s tips section for these directions.


Roast Beef in the Slow Cooker

To the removable pot of a slow cooker, sprinkle the bottom with:

Seasoned salt

Garlic salt

In the slow cooker, where the beef rests, place:

2-4 bay leaves

Carefully place on top the bay leaves:

1+ lb roast, fully defrosted

Season the top of the roast:

Seasoned salt

Garlic salt

2-4 bay leaves

To the pot, add:

1 1/2 cups beef broth

Set heat* to “HIGH” and allow to cook for 4-8 hours, or “LOW” for 6-12 hours.

Test for tenderness with a fork, pulling a piece from the center of the roast:

  • Tender = done

  • Tough = allow to cook 1-2 hours longer and test again

Once cooked,

  • Transfer roast to serving platter

  • Strain broth through a wire mesh colander, reserving the broth for gravy or soup

Serve hot.


Brenda’s tips:

  • Serving size: Makes one roast, size dependent on the size of the roast

  • Recipe is for a fully trimmed roast or a bone-in beef roast

  • Use leftover roast beef for:

    • Shredded Beef Chimichangas

    • Roast Beef Stroganoff

    • French Dip Sandwiches

    • Chipotle Beef Rice Bowls

  • *Determining length of cooking time isn’t simply a mathematical equation as all slow cookers are not equal. Bone-in or fully trimmed may also impact the total cooking time. Keep in mind any specifics of the device in your kitchen. Below are some estimated times that may help:

    • Small roast = 1-2 lbs, cook on HIGH for ~4 hours, or LOW for ~6 hours

    • Medium roast = 3-5 lbs, cook on HIGH for ~5 hours, or LOW for ~8 hours

    • Large roast = 6-7 lbs, cook on high for ~8 hours, or LOW for ~12 hours

  • Stovetop Instructions: Sear the roast, season & add broth. Cover, reduce heat, and cook for 2-8 hours until tender. Hourly, check liquid and add as necessary to prevent pot from boiling dry.

  • Oven Instructions: Prep the same way as for a crockpot, cover, and place in 325F oven for 3-10 hours. Hourly, check liquid and add as necessary to prevent pot from boiling dry.


Window to B’s kitchen . . .

Read More
Beef, Main Dish, Savory, Pork Brenda Drake + Chelsea Kasen Beef, Main Dish, Savory, Pork Brenda Drake + Chelsea Kasen

Baked Classic Meatballs

These meatballs are best served with Brenda’s Marinara Sauce over spaghetti.

Baked Classic Meatballs

Heat a non-stick skillet to medium, and sauté:

1 Tbsp oil

1/4 cup onions, finely diced

2 tsp garlic, minced

Once cooked, set aside.

To a medium mixing bowl, add:

1/2 lb spicy Italian sausage

1/2 lb ground beef

1/4 cup bread crumbs

Sautéd onions & garlic

1/4 cup parmesan cheese

4 oz cream cheese

1 egg

1/2 tsp salt

1/4 tsp pepper

Mix together, working the ingredients together with your hands.

Form meatballs:

  • Portion meat mixture using a 2 Tbsp scoop

  • Lightly roll each between hands* to form the meatball

  • Evenly space in baking dish

Bake at 425F for 20-25 minutes until internal temp is at least 160F (recommended internal temp 175F).

Serve hot, with Marinara Sauce.


Brenda’s tips:

  • Serving size: 4

  • Substitute mild ground sausage if desired

  • *Rub canola or olive oil over hands prior to forming the meatballs to decrease stickiness


Window to B’s kitchen . . .

Mixing all the ingredients together with your hands . . .

Discover & share this Animated GIF with everyone you know. GIPHY is how you search, share, discover, and create GIFs.

Portioning the meatballs . . .

Discover & share this Animated GIF with everyone you know. GIPHY is how you search, share, discover, and create GIFs.

Shaping the meatballs with your hands . . .

Discover & share this Animated GIF with everyone you know. GIPHY is how you search, share, discover, and create GIFs.

Read More
Pasta, Savory Brenda Drake + Chelsea Kasen Pasta, Savory Brenda Drake + Chelsea Kasen

Marinara Sauce

A quick, red pasta sauce that can be put together in minutes, or simmered all day.

This basic marinara comes together quickly and can simmer for a few minutes. For a more developed flavor, simmer all day.


Marinara Sauce

To a large pot, heated to medium, add:

1 tbsp oil

1/2 cup onions, finely diced

2 tsp garlic, minced

Sauté until translucent, then add:

2 (15 oz) cans crushed tomatoes

1 tsp salt

1/2 tsp oregano, crushed

1/8 tsp cayenne pepper

1/8 tsp crushed red pepper

Simmer on low for 15 minutes. . . or a few hours.

If making with meatballs . . .

  • Add meatballs, continue to simmer for 15 minutes.

Serve hot over pasta.


Brenda’s tips:

Read More
Desserts, Cookies, Garden Produce Brenda Drake + Chelsea Kasen Desserts, Cookies, Garden Produce Brenda Drake + Chelsea Kasen

Rhubarb Bars

A delicious combination of shortbread crust, rhubarb compote, and streusel topping.

Rhubarb Bars

Step 1: Shortbread crust

Line a 9” square baking dish with parchment paper, set aside

Combine in a large mixing bowl:

2 Tbsp corn starch

4 Tbsp powdered sugar

Sift together, then cut in:

1/2 cup butter

Stir in:

1/2 cup flour

Continue mixing while adding:

1/2 cup flour, in 2 Tbsp increments

Continue to mix until well combined. Stir with a spoon until it’s too difficult, then knead by hand for ~1 minute longer to create shortbread.

Preheat oven to 350F.

Press dough into the prepared 9”x9” glass baking dish.

Transfer to oven and bake for 20 minutes.

While baking, complete Steps 2 & 3.

Step 2: Compote

Prepare one batch of Rhubarb Compote

Step 3: Streusel topping

To a small mixing bowl, add:

1/2 cup flour

1/4 cup brown sugar

Sift together, cut in:

3 Tbsp butter

Continue to mix until a sandy mixture results.

Step 4: Assemble & bake

Remove shortbread crust from oven.

Spoon compote over par-baked crust.

Sprinkle streusel topping over compote layer.

Return to oven and bake for 40 minutes. Remove from oven and cool for about 10 minutes.

  • Optional: remove from baking dish by lifting the parchment out. This will make it easier to cut into precise servings but isn’t critical for success

Serve cooled.


Brenda’s tips:

  • Serving size: 8

  • For a prettier presentation, trim about half an inch off all sides to make an 8”x8” bar. Cut into 2-inch squares for 16 bars.

  • The shortbread crust can be mixed in a food processor. For instructions, follow the recipe outlined on Brenda’s Shortbread Cookie recipe


Window to B’s kitchen . . .

Read More
Breakfast, Desserts, Side Dish, Garden Produce Brenda Drake + Chelsea Kasen Breakfast, Desserts, Side Dish, Garden Produce Brenda Drake + Chelsea Kasen

Rhubarb Compote

This rhubarb compote is absolutely divine over crepes, pancakes, biscuits, or by simply taking a spoonful directly from the jar.

Rhubarb seems to be a ‘love it’ or ‘yuck!’ ingredient. No matter what side you are on, Brenda suggests giving this recipe a try.

This rhubarb compote is absolutely divine over crepes, pancakes, biscuits, scones, or by simply taking a spoonful directly from the jar.


Rhubarb Compote

To a small saucepan, add:

1 cup rhubarb, washed and cut into 1/2” pieces

1/4 cup water

2 Tbsp sugar

1/16 tsp salt

Bring to a boil, stirring with a heat-proof spatula.

Boil for ~3 minutes.

Reduce heat to low and simmer for 10 minutes, stirring regularly.

Remove from heat.

Serve immediately, or transfer to a half-pint jar and store in the refrigerator.


Brenda’s tips:


Window to B’s kitchen . . .

Read More
B's Favorite, Desserts, Breakfast, Bread Brenda Drake + Chelsea Kasen B's Favorite, Desserts, Breakfast, Bread Brenda Drake + Chelsea Kasen

HOW TO: Deep-fried Scones

This deep-fried bread is best served when topped with a generous serving of honey butter.

These scones have been enjoyed by countless friends and family over the years. Brenda has hosted many scone parties, it seems that everyone’s favorite way to eat scones is to slather them in honey butter.

CAUTION: deep frying anything can be dangerous. Always keep your hands and face away from the hot oil. DO NOT add any water to the oil (hot or cold) or an explosion may result.


HOW TO: Deep-fried Scones

Step 1: Make a batch of Brenda’s Favorite Yeast Dough

  • Allow to proof once for 45 minutes

Step 2: Begin heating oil

Note: It will take approximately 10-15 minutes for the oil to properly heat to 375F.

Select one:

  1. Deep fryer

    • If you have a basket, set it aside — you will not need it

    • Fill with oil to the fryer-specified level

    • Turn on fryer and set temperature to ~375F

  2. Deep pot on stovetop

    • Place a deep pot on the stovetop

    • Add ~2” of oil to the pot

    • Turn heat to medium*

Step 3: Prepare surface and roll out dough

  • Recommended to use a silicone mat

  • Spritz lightly with non-stick cooking spray

    • Optional alternative: dust with flour (downside is that each scone will have a little flour on its exterior, which may burn in the hot oil)

  • Dump dough onto mat and spritz lightly with non-stick cooking spray

  • Using a rolling pin, roll dough evenly until it is ~3/4” thick

Step 4: Cut out scones

  • Circles: use a biscuit cutter, or drinking glass, to cut out circles

    • Re-roll scraps, cut more scones

  • Square(ish): use a pizza cutter or knife, to cut strips then cut across to make squares

Step 5: Test oil temp

  • Fryer: there should be an indicator light and, most likely, it should be off when the oil has reached the selected cooking temp

  • Pot: use a thermometer to test . . . . or [faster] hold hand about 2” above the surface of the oil, if it is almost too hot to keep your hand there then the oil is definitely hot enough. A final test is to break off a small piece of dough and CAREFULLY slip it into the oil, if the oil immediately bubbles around the dough, it is hot enough to cook the scones.

Step 6: Cook scones

  • Slip scones, one-by-one, into the hot oil (do not touch the hot oil)

    • Each scone will drift momentarily towards the bottom and then pop back to the surface

    • Add only enough scones to allow easy movement between them

  • Watch around the edges, the scones will begin to show browning after ~2 minutes

  • Flip using a fork or slotted spoon

  • Cook for an additional 1-2 minutes, until the other side is equally browned

  • Carefully remove, using a slotted spoon or tongs and place on a paper towel lined pan

Serve hot with honey butter, jam or maple syrup.


Brenda’s tips:

  • Serving size: one batch of Brenda’s Favorite Yeast Dough yields approximately three and four dozen 3” scones

  • *When deep frying, the oil’s temperature is critical to success. The desired temp is ~375F for scones. This can be estimated using the hand test mentioned above if needed. Additionally, observe the results of the fried scones. If the color is a little darker than desired then slightly reduce the heat. If the color is a little lighter, increase the heat. The most important thing is that the scones are cooked through and not doughy. The best starting point is “medium” heat making slight adjustments as needed.

  • These scones can also be shallow-fried: to a large skillet, add about 1/4” oil, and heat at medium. Once hot, continue to follow directions above.

  • Pair with chili for Navajo Tacos


Window to B’s kitchen . . .

Serving suggestion: Chocolate & Banana Scones

  • Flatten scone into a thin disk, about 5” in diameter

  • Add chocolate chips and diced banana, keeping filling to one edge

  • Roll the dough, tucking the sides as you roll so that the filling is completely contained

  • Deep Fry

Read More
Desserts, Fan Favorite, B's Favorite Brenda Drake + Chelsea Kasen Desserts, Fan Favorite, B's Favorite Brenda Drake + Chelsea Kasen

Brenda Brownies (Half Batch)

Use this half-batch Brenda Brownie recipe to make Brenda Brookies.

This recipe takes the standard Brenda Brownies recipe and scales it to fit an 8”x8” baking pan.


Brenda Brownies (Half Batch)

To your favorite mixing bowl add:

1 cups sugar

1/4 cup cocoa

Stir well, then cream in:

1/2 cup butter, softened

Next add:

1/2 tsp vanilla 

1/2 tsp salt 

2 eggs, mixing well after each

Finally, stirring until just incorporated, add:

1 cups flour 

Set oven to 350F. Spoon about half the batter into a greased 13x9 pan, sprinkle with:

1/3 cup miniature marshmallows

2 Tbsp chocolate chips

Spoon and smooth the remaining batter evenly over the top.

Bake for 22-27 minutes. Serve cooled. 


Brenda’s Tips:

  • Serving size: recipe made to fit an 8”x8” pan (~9 brownies)

  • Use this recipe to make Brenda Brookies

  • Stirring the cocoa into the sugar allows the granules to eliminate any lumps of cocoa, enhancing the texture of the finished brownies

  • If baking at sea level, reduce the flour to 3/4 cup

  • Recommended to use a metal pan, using glass will cause the brownies to cook differently

  • These brownies are Brenda’s favorite dessert that she makes


Window to B’s Kitchen…

Read More
Cookies, Desserts, Fan Favorite Brenda Drake + Chelsea Kasen Cookies, Desserts, Fan Favorite Brenda Drake + Chelsea Kasen

Brenda Brookies

The best of both worlds: Brenda Brownies and Brenda Cookies in one dessert!

A gooey brownie layer topped with chocolate chip cookies, baked as one. And since these are Brenda style, obviously they leverage Brenda Brownies and Brenda Cookies to attain perfection.


Brenda Brookies

1. Make the Cookie Layer

Prepare the dough from the recipe for Brenda Cookies (Half Batch), reducing the chocolate chips by about half (unless you live for chocolate, then use the full amount)

  • Line a 13”x9” baking pan with parchment paper

  • Spritz lightly with non-stick cooking spray

  • Evenly distribute the cookie dough over entire surface, pressing down lightly with an off-set spatula, or your hands, to create one giant cookie

  • Cover tightly with plastic wrap (or a lid)

  • Refrigerate for 24 hours OR flash freeze for 20 minutes while preparing brownies

2. Make the Brownie Layer

Prepare the batter from the recipe for Brenda Brownies (Half Batch), leave out the marshmallows & chocolate chips

  • Preheat oven to 350F

  • Remove the cookie layer from the refrigerator or freezer

  • Place a piece of plastic wrap on the counter (re-using the plastic wrap from the cookie layer, or a new piece)

  • Remove the parchment paper and cookie layer from the 13'“x9” pan

  • Invert the cookie layer, placing it on the plastic wrap

  • Peel the parchment paper from the cookie

  • Wrap the cookie layer in the plastic wrap and return to the refrigerator or freezer

  • Return the parchment paper to the same 13”x9” pan

  • Spritz lightly with non-stick cooking spray

  • Spoon the brownie batter into the prepared baking pan, spreading evenly with an offset spatula

  • Sprinkle with

    1/3 cup marshmallows

  • Lightly press the marshmallows into the brownie batter and, using the offset spatula, smear a bit of batter over the top of every marshmallow

  • Transfer pan to preheated oven and bake for 12 minutes

3. Make the Brookie

  • Remove the par-baked brownies from the oven

  • Remove the plastic wrap from the cookie layer and immediately place on top of the brownie layer

  • Lightly press down on the cookie layer to ensure contact with brownie layer

  • Return immediately to oven and bake for 15-17 minutes, until the cookie is golden brown and edges begin to caramelize

  • Remove from oven and allow to rest until completely cooled (ideally overnight)

  • Cut and serve


Brenda’s tips:

  • Serving size: Makes a 13”x9” pan, 16-24 servings

  • To reheat, preheat an oven or toaster oven to 375F. Place Brookies in oven for 5 minutes, cool enough to touch, then enjoy


Window to B’s kitchen . . .

Read More
Cookies, Desserts, Fan Favorite, B's Favorite Brenda Drake + Chelsea Kasen Cookies, Desserts, Fan Favorite, B's Favorite Brenda Drake + Chelsea Kasen

Brenda Cookies (Half Batch)

Sometimes all you need is a half batch of Brenda Cookies — especially when you’re making Brenda Brookies.

Sometimes you want cookies, but you don’t want the temptation presented by an entire batch . . . we’ve simply adjusted this recipe to create half the cookies of the regular recipe.


The Brenda Cookie (Half Batch)

Cream together, mixing for approximately 5 minutes:

1/2 cup (4.5 oz) brown sugar

1/2 cup (4 oz) sugar

10 Tbsp (5 oz) butter, softened 

Then add, stirring until smooth:

1 egg

1 tsp vanilla 

Sift dry ingredients together and fold into the above mixture:

1 3/4 cups (8.5 oz) flour

3/4 tsp baking powder

5/8 tsp baking soda

1/8 tsp salt

1/2 tsp coarse salt

Just before the dry ingredients are fully incorporated, add:

1/2 pkg (5 oz) Ghirardelli 60% Cacao Chips

Do not overmix!

Portion by scooping equal sized dough balls onto a greased 13x9. Cover and refrigerate 24-72 hours.

Bake at 370F for 8-10 minutes, adding 5 minutes for extra-large cookies. 


Brenda’s Tips:

  • Serving Size: Brenda’s 1/2 cup cookie scoop makes 8 to 10 balls of dough per batch

  • Use this recipe to make a full batch of Brenda Cookies

  • This 1/2 batch is perfect to make Brenda Brookies with

  • Brenda uses a stand mixer to make the cookies. She starts the butter and sugar creaming and then measures out all the other ingredients while waiting for the sugars and butter to whip. 

  • Resting the dough allows the flavors to fully meld and the textures to develop. This cookie has a chewy bite with just the right combination of intense dark chocolate and caramelized butter. It will taste good immediately, but if you can be patient it will be even better.

  • Brenda seldom recommends a brand, but you’ll notice that Ghirardeli 60% Cacao are listed. These chips will create the flat layers of intense chocolate that indicates a true Brenda Cookie.

  • At high elevations, add more flour. At the farm (2600 ft), Brenda uses 8.8 oz of flour and at home (6200 ft) Brenda uses 9.2 oz

  • Let the baked cookies rest 3-6 hours before serving or packaging. A properly prepared Brenda Cookie will stay soft internally without being stored in an airtight container.


Window to B’s Kitchen…

Creaming butter + sugar:

Incorporating flour:

Mixing in the chocolate chips:

Scooping the dough:

Read More
Chicken, Main Dish, Savory Brenda Drake + Chelsea Kasen Chicken, Main Dish, Savory Brenda Drake + Chelsea Kasen

Chicken Fajitas

The perfect dinner dish to share with friends and family.

If you are looking for a way to use up the extra peppers and onions you have, Brenda highly recommends making these chicken fajitas. It’s the perfect dish to share with friends and family.


Chicken Fajitas

Prepare one batch of Tortillas: Tex-Mex style

  • Follow directions to make twenty 5” tortillas

  • OR use pre-packaged flour tortillas (Mission brand recommended)

Prepare one single batch of Fajita Seasoning

  • OR if you’ve got some mix already prepared

  • OR use a packet of Fajita Seasoning Mix

To a large [non-stick] skillet, heated to medium, add:

1 Tbsp oil

~1 cup red bell pepper, julienned

~1 cup green bell pepper, julienned

~1 cup onions, julienned

Sauté until crisp-tender. Transfer to serving dish & cover to retain heat. Set aside.

To that same skillet, heated to medium, add:

1 tsp oil

1 lb chicken breast, cut into 1/2” strips

Cook chicken, turning frequently, until it is evenly browned (~8 minutes). Reduce heat to medium-low and add:

1/4 cup chicken broth

~1 Tbsp fajita seasoning mix

Stir together well. Cover and simmer for ~2-4 minutes, stirring periodically, until chicken is cooked through.

While chicken cooks, prepare serving platter:

Tortillas, warmed

Sautéd onions & peppers

Sour Cream

Salsa

Guacamole

Tomatoes, diced

Lettuce, shredded

Cheese, grated

Transfer cooked chicken to serving dish* and serve hot.


Brenda’s tips:

  • Serving size: 4

  • *Recommended to cook everything in a non-stick skillet and, while cooking, heat an empty cast iron skillet in the oven at 300F. Once chicken is cooked, remove cast iron skillet from oven, add ~1 tsp of oil to coat bottom. Pour cooked chicken into hot cast iron skillet to serve.


Window’s to B’s kitchen . . .

Read More
Beef, Chicken, Main Dish, Savory Brenda Drake + Chelsea Kasen Beef, Chicken, Main Dish, Savory Brenda Drake + Chelsea Kasen

Fajita Seasoning

Pro tip: make a large batch of this fajita seasoning so you can make a quick lunch or dinner.

We’ve written this recipe in two ways:

  1. Single batch

  2. Enough to fill a spice jar (6 batches)

If you’re making enough to fill a spice jar, we recommend reusing an empty one. You’ll be glad you’ve made extra when you’re looking for a quick lunch or dinner idea.


Fajita Seasoning: Single Batch

*Recipe makes amount to season ~1 lb of chicken

To a small mixing bowl, add:

1 tsp corn starch

1 tsp chili powder

1/2 tsp salt

1/2 tsp sugar

1/4 tsp paprika

1/4 tsp ground cumin

1/4 tsp onion powder

1/4 tsp garlic powder

1/4 tsp chicken bouillon

1/8 tsp cayenne pepper

Sift together until evenly incorporated.


Fajita Seasoning: Mix Ahead & Store

*Recipe makes amount to season ~6 lbs of chicken

To a small mixing bowl, add:

2 Tbsp corn starch

2 Tbsp chili powder

1 Tbsp salt

1 Tbsp sugar

1 1/2 tsp paprika

1 1/2 tsp ground cumin

1 1/2 tsp onion powder

1 1/2 tsp garlic powder

1 1/2 tsp chicken bouillon

3/4 tsp cayenne pepper

Sift together until evenly incorporated.


Brenda’s tips:

  • Serving size: 1 or 6 batches of fajitas

  • Prefer spicier? Increase the cayenne pepper incrementally until desired spice level is reached

  • Remove or adjust amounts of each ingredient for personal flavor preference

Read More
Chicken, Main Dish, Savory Brenda Drake + Chelsea Kasen Chicken, Main Dish, Savory Brenda Drake + Chelsea Kasen

Crispy Chicken Bites

Toss these Crispy Chicken Bites in sauce or serve as is.

A long-time family favorite, Brenda has been making these Crispy Chicken Bites for decades. Toss with sauce, or serve as is.


Crispy Chicken Bites

Step 1: Assemble

  1. Prepare a first sheet pan by lightly spritzing with non-stick spray = Sheet Pan A

  2. Prepare a second sheet pan by covering with aluminum foil = Sheet Pan B

  3. Set oven to 400F to preheat

  4. To a first pie plate add:

    1 egg, beaten

    1 tsp garlic salt

  5. To a second pie plate, add:

    1/2 cup corn starch

  6. Trim & cut:

    1 lb chicken breast, cut into 1” cubes

  7. Begin to heat a large skillet over medium, with:

    1/4” oil (canola recommended)

  8. Allow to heat while continuing to Step 2.

Step 2: Prep Chicken

  1. Add all of the chicken to the first pie plate, combining with the beaten egg and stir around until each piece is coated

  2. Select one piece:

  • Dredge in the prepared corn starch in the second pie plate

  • Flip to coat other side

  • Remove and place coated chicken on prepared Sheet Pan A (spritzed with non-stick spray)

  • Repeat until all chicken is coated

Step 3: Cook

Note: it may be necessary to cook the chicken in 2 or 3 batches. It is important not to crowd the skillet, but to leave at least 1/2” of space between chicken pieces.

Caution: always be careful when frying - even in shallow oil.

Using heat-proof tongs:

  1. Carefully & quickly, piece by piece, add the coated chicken pieces to the hot oil

  2. Cook for ~2 minutes, or until golden

  3. Flip each piece to other side, cooking an additional 2 minutes or until golden

  4. Transfer chicken to Sheet Pan B (foil-covered)

  5. Place Sheet Pan B in hot oven

  6. Repeat with remaining chicken (if needed)

Bake chicken for 8-12 minutes, until internal temperature is 165F.

Remove Sheet Pan B from oven and sprinkle Crispy Chicken lightly with:

Garlic Salt

Serve hot.


Brenda’s tips:

  • Serving size: 4

  • The oil added to the skillet is not specified in cups or ounces, but instead adding oil until it is 1/4” deep in the skillet - this direction is given because two skillets that are marketed as the same size may have vastly different volumes (due to shape) and the depth of the oil is the important element.

  • When cooking, “dredge” refers to coating the item with a dry ingredient, in this recipe it is corn starch.

  • The method of pan-frying and then baking is recommended to create a crisp crust without drying out the chicken pieces. Pan frying until the chicken is cooked through is also an option, but often the breading will become soggy. It also makes it easier to manage if many batches are needed. Alternately, the chicken can be deep fried, cooking for 3-6 minutes in small batches.

  • Serving recommendations:


Window to B’s kitchen . . .

Crispy Chicken Bites served with Brenda’s favorite Sweet & Sour Sauce

Read More
Chicken, Main Dish, Pork, Savory, Beef Brenda Drake + Chelsea Kasen Chicken, Main Dish, Pork, Savory, Beef Brenda Drake + Chelsea Kasen

Sweet & Sour Sauce

The balanced flavors of this sauce compliment beef, pork, chicken, noodles, and veggies.

A good Sweet & Sour Sauce is a necessary element in any home cooks repertoire. This one is the best - balanced flavors that compliment beef, pork, chicken, noodles, and veggies.


Sweet & Sour Sauce

To a small saucepan, add:

2/3 cup pineapple juice*

1/2 cup brown sugar

2 Tbsp apple cider vinegar

2 Tbsp ketchup

2 tsp soy sauce

1/8 tsp garlic powder

1 Tbsp corn starch

Whisk together, place pot over medium heat.

Stir continuously (otherwise cornstarch will clump) until the sauce boils and begins to thicken.

Remove from heat, continuing to stir for ~1 minute.

Serve hot.


Brenda’s tips:

  • Serving size: 4

  • *Sub ~2 Tbsp pineapple concentrate stirred into water to make 3/4 cup

  • Refrigerate leftover sauce, reheating to use

  • Serve over chicken, pork, beef or noodles

Read More
Cookies, Desserts, High Elevation Brenda Drake + Chelsea Kasen Cookies, Desserts, High Elevation Brenda Drake + Chelsea Kasen

Peanut Butter Cookies

Crisp and chewy, but never crumbly, these peanut butter cookies are easy and quick to make.

These Peanut Butter Cookies are the best. Crisp and chewy, but never crumbly, they’re easy and quick to make. This recipe is based on a recipe shared by Two Peas & Their Pod.


Peanut Butter Cookies

To a small mixing bowl, add:

1 1/2 cups flour

1/2 tsp baking powder

1/2 tsp baking soda

1/2 tsp salt

Sift together, set aside.

To the bowl of a stand mixer, add:

1/2 cup butter

1/2 cup peanut butter

1/2 cup sugar

1/2 cup brown sugar

Cream together for 2-3 minutes, until mixture lightens in color.

Add:

1 egg

1 tsp vanilla

Mix until smooth, then add:

Dry ingredients

Fold in until fully incorporated.

Scoop onto greased baking sheet. Using a fork, press to create a classic criss-cross design while simultaneously flattening the cookie to ~3/4” thick.

Bake at 350F for ~10 minutes, adding 5 minutes for extra-large cookies.

Transfer to cooling rack. Serve warm or cooled.


Brenda’s tips:

  • Serving size: Makes 12, 4” cookies or 24, 2” cookies

  • This recipe can be made stirring by hand or using a electric hand mixer

  • For higher elevations (~6K ft) recommended to add ~2 Tbsp flour

  • Creamy or crunchy peanut butter work equally well


Window to B’s kitchen . . .

Read More
Breakfast, Savory, How To, Bacon Brenda Drake + Chelsea Kasen Breakfast, Savory, How To, Bacon Brenda Drake + Chelsea Kasen

HOW TO: Breakfast Burritos

The perfect grab-and-go breakfast with lots of carbs and protein.

Brenda is a big believer in breakfast, ideally mostly carbs. John also enjoys breakfast, but prefers a breakfast that prioritizes protein. The breakfast burrito, in all it’s many iterations, brings both. Along with the added benefit of “grab and go” since time always seems to be tight in the morning.


HOW TO: Breakfast Burritos

Identify & set aside desired additional ingredients for the breakfast burrito filling, here are some suggestions:

  • Bacon, cooked and chopped

  • Sausage, cooked and drained

  • Ham, cubed or deli-slices

  • Mushrooms, chopped

  • Onions, finely diced

  • Bell peppers, diced

  • Potatoes, cooked (hash browns, tots, fries, etc.)

  • Rice (leftover fried rice is especially delicious)

  • Corn, steamed

Place a non-stick skillet on the stove and set to medium to preheat skillet.

Place a second skillet on the stove, adjust heat to medium-low, and immediately add:

1 flour tortilla

Brush lightly with:

Butter

Flip. Add:

Cheese (sliced or shredded or crumbled)

Allow to cook so the cheese slowly melts and tortilla stays soft. While that cooks, prepare the following . . .

To a small bowl, add:

2 eggs

1 tsp water

Whisk until well blended.

Grease the first skillet with:

~1 tsp butter (or bacon fat)

Ensure that full surface of the skillet is covered. When butter has completely melted and sizzles, pour in:

Whisked eggs

Additional Ingredients (~ 1 Tbsp of each)

Using a heat-proof spatula,* scrape mixing bowl. Use the spatula to cook the eggs, lifting and stirring, while keeping the eggs & additions together as a single patty. Flip the egg patty over to cook on the other side. DO NOT allow the egg to brown.

Once cooked through, transfer the egg patty to top the melted cheese on the tortilla.

Add any fresh ingredients:

  • Tomatoes, diced

  • Avocados, sliced (or guacamole)

  • Green onions

  • Micro greens

And condiments:

  • Sour cream

  • Taco sauce

  • Salsa

  • Horse radish

Roll up and serve hot OR wrap in a sheet of aluminum foil for breakfast on the go.


Brenda’s tips:


Window to B’s kitchen . . .

Read More
B's Favorite, Cake, Desserts, High Elevation Brenda Drake + Chelsea Kasen B's Favorite, Cake, Desserts, High Elevation Brenda Drake + Chelsea Kasen

Brenda's Best Chocolate Cake for High Elevation

Brenda’s favorite chocolate cake inspired by a recipe from Barefoot Contessa.

This is the best chocolate cake, adjusted to bake perfectly at ~6000 feet (high elevation). For the recipe at sea level, look here.

Ashley introduced Brenda to the original recipe when Brenda was looking for the perfect chocolate cake to celebrate her 30th birthday. This recipe makes a stunning 3-tier cake when frosted with Chocolate Pudding Frosting.


Brenda’s Best Chocolate Cake for High Elevation

Prepare three, 8” round cake pans

  • Alternate pan options noted in Brenda’s tips below

Preheat oven to 350F.

In a small bowl combine:

1 1/8 cups buttermilk

1/2 cup oil

2 eggs

1 tsp vanilla

Whisk together, set aside.

To the bowl of a stand mixer, add:

2 1/4 cups flour

1 3/4 cups sugar

3/4 cup cocoa

1 tsp baking soda

1/2 tsp baking powder

1 tsp salt

Adjust speed to “stir” to sift together.

Keep mixer on “stir” while pouring in the liquid ingredients from above.

Stop mixer and scrape down sides, then continue to mix on low until well combined.

Slowly pour in:

3/4 cup heavy cream

“Stir” until just combined.

Divide equally among prepared cake pan(s).

Bake at 350F for 35-50 minutes, until inserted toothpick comes out clean.


Brenda’s tips:

  • Serving size: one cake, or 24 cupcakes

  • The following pan(s) can be used for this recipe:

    • One - 13” x 9” = bake for 30-45 minutes

    • Two - 9” round = bake for 35-50 minutes

    • Two - 8” or 9” square = bake for 30-45 minutes

    • One - 10” round = bake for 40-55 minutes

  • This recipe is written for ~6000, high elevation

  • Frost with Brenda’s favorite, Chocolate Pudding Frosting


Window to B’s kitchen . . .

Read More
B's Favorite, Cake, Desserts Brenda Drake + Chelsea Kasen B's Favorite, Cake, Desserts Brenda Drake + Chelsea Kasen

Brenda's Best Chocolate Cake

Brenda’s favorite chocolate cake inspired by a recipe from Barefoot Contessa.

This is the best chocolate cake. Brenda’s friend, Ashley, introduced Brenda to the original recipe from Barefood Contessa when Brenda was looking for the perfect chocolate cake to celebrate her 30th birthday.

Brenda made some changes to the recipe to make it fit her deep love of chocolate. This recipe makes a stunning 3-tier cake when frosted with Chocolate Pudding Frosting.


Brenda’s Best Chocolate Cake

Prepare three - 8” round cake pans

  • Alternate pan options noted in Brenda’s tips below

Preheat oven to 350F.

In a small bowl combine:

1 cup buttermilk

1/2 cup oil

2 eggs

1 tsp vanilla

Whisk together, set aside.

To the bowl of a stand mixer, add:

2 cups flour

2 cups sugar

3/4 cup cocoa

1 1/2 tsp baking soda

1 tsp baking powder

1 tsp salt

Adjust speed to “stir” to sift together.

Keep mixer on “stir” while pouring in the liquid ingredients from above.

Stop mixer and scrape down sides, then continue to mix on low until well combined.

Slowly pour in:

3/4 cup heavy cream

“Stir” until just combined.

Divide equally among prepared cake pan(s).

Bake at 350F for 40-55 minutes, until inserted toothpick comes out clean.


Brenda’s tips:

  • Serving size: one cake, or 24 cupcakes

  • The following pan(s) can be used for this recipe:

    • One - 13” x 9” = bake for 35-50 minutes

    • Two - 9” round = bake for 40-55 minutes

    • Two - 8” or 9” square = bake for 35-50 minutes

    • One - 10” round = bake for 45-60 minutes

  • This recipe is written for sea level.

  • Brenda highly recommends frosting this cake with her favorite Chocolate Pudding Frosting


Window to B’s kitchen . . .

Read More