
Fresh Strawberry Pie
Brenda’s Fresh Strawberry Pie is a long time Saunders’ family favorite. This is all you need for summer!

(No Cook) Fresh Strawberry Freezer Jam
Brenda recruited her sister Sheryl to help out with this week’s photos. Today, Sheryl made Brenda’s easy, no-cook strawberry freezer jam.

Chocolate Pudding Frosting
Brenda’s favorite cake frosting: this Chocolate Pudding Frosting. It’s a fan favorite too.

Best Buttercream Frosting
Buttercream frosting is perfect for decorating cakes—all you have to do is add a few drops of some food coloring of the color you want.

Best Sour Cream Cake for High Elevations
This recipe makes a great basic white cake with a tender crumb, particularly perfect because it can be put together in mere minutes. This recipe was written for an elevation of ~6k above sea level.

Best Sour Cream Cake
This recipe makes a great basic white cake with a tender crumb, particularly perfect because it can be put together in mere minutes.

Brigham Young Donuts (Cake Donuts)
These delicious cake donuts are a favorite tradition for Brenda and her family. During The Church of Jesus Christ of Latter-day Saint’s semi-annual General Conference Sessions, Brenda makes these to feast on during the broadcasts.


Dumplings Part 1: Wontons (Wrappers)
Brenda prefers the Hot Water Method when it comes to making dumplings. While making wontons from scratch may seem daunting, Brenda supplies ample resources to make your dumpling experience the best it can be!


The Very Best Icebox Cake
Known as the BEST icebox cake, and a true Brenda Fan-Favorite, this crowd-pleasing cake will leave everyone wanting more.

Chocolate Cookies
These chocolate cookies have a brownie-like texture. You can intensify the chocolate flavor by adding your favorite chocolate chips, or leave them plain and use them to create an Icebox Cake!
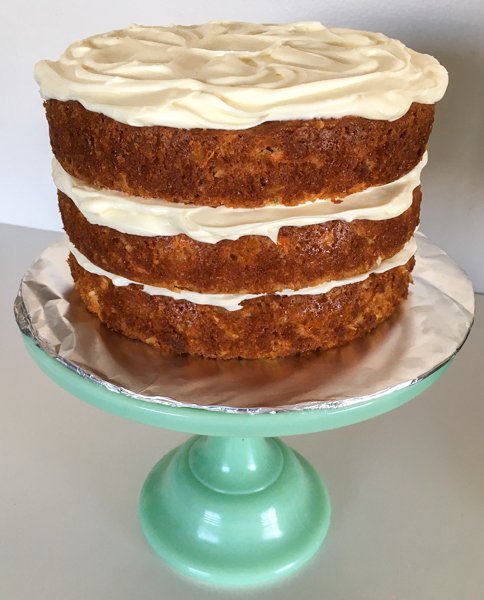
Brenda’s Favorite Carrot Cake
This Carrot Cake includes pineapple, coconut, loads of carrots, and you can optionally add in walnuts or pecans. Brenda recommends frosting this cake with her Cream Cheese Frosting for the ultimate cake experience.
HOW TO: Prepare A Cake Pan
What may seem like an “extra step” for the casual baker/cook, is labeled “essential” by Brenda. Find out why.

Ma’s Pumpkin Pie
Brenda firmly believes Thanksgiving celebrations need pumpkin pie, and that her mom’s recipe is the best.

Dad's Favorite Cherry Pie
Learn how to make a flaky pie crust (the secret is a heavy whipping cream and sugar topcoat), and how to finger crimp the edges (for that “local bakery” look).

Chocolate Mousse Pie
This Chocolate Mousse Pie recipe is a super-secret recipe. That’s why you just found it on the internet.

Pie Crusts
Brenda is known for her pies. Why? Brenda’s NYC pie parties were of epic proportions. These are her 5 favorite pie crusts.

HOW TO: Form Cinnamon Rolls
Learn how to turn Brenda's Favorite Dough recipe into scrumptious Cinnamon Rolls.