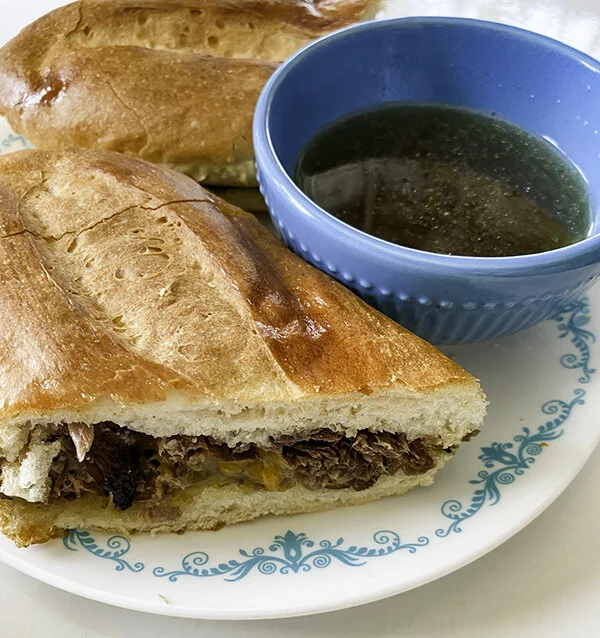
Beef, Main Dish, Pasta, Savory, Leftover Meals Brenda Drake + Chelsea Kasen Beef, Main Dish, Pasta, Savory, Leftover Meals Brenda Drake + Chelsea Kasen

Roast Beef Stroganoff

This recipe is the most decadent way to make this savory dish. Yum!

This recipe is the most decadent way to make this savory dish. This recipe is also a great way to use up two leftovers: Roast Beef and the Beef Gravy.


Roast Beef Stroganoff

To a large pot, add:

~1 qt water

Turn heat to High. Bring to rolling boil, add:

1 tsp salt

8 oz pasta (fusilli recommended)

Reduce heat slightly to Med-High, retaining a rolling boil until pasta is cooked to desired texture.

  • Follow the package recommended time for best results

While pasta cooks, prepare the sauce.

To a large skillet, heated to medium, add:

1 tsp oil

1/4 cup onions, finely diced

1 tsp garlic, minced

Sauté for 1 minute, then add:

2 cups fresh mushrooms, peeled & sliced

Continue to cook, stirring regularly, until mushrooms are tender, about 2 minutes.

Add:

1 1/2 cups beef broth*

2 Tbsp ketchup

1 tsp Worcestershire sauce

1/2 tsp salt

1/4 tsp pepper

Increase heat to Med-High and bring to a boil.

While heating, in a small jar combine:

1/4 cup warm water*

3 Tbsp flour*

Shake until smooth. Once beef broth is boiling, pour the mixture into the broth, whisking continuously.

  • Pro-tip: pour water and flour mixture through a wire strainer to avoid lumps

Continue cooking at a rolling boil for about 1 minute.

Reduce heat to Med-Lo. Stir in:

1/2 cup sour cream

Add:

1 1/2 cups roast beef, fully cooked and chopped into ~1/2” cubes

Fold in, being careful not to break up the pieces.

Simmer until pasta is finished cooking.

Drain pasta. Add to sauce. Fold together.

Serve hot.


Brenda’s tips:

  • Serving size: 4

  • *If available, substitute ~ 2 cups Beef Gravy for the Beef Broth & flour mixture.

  • This recipe works great with canned mushrooms, simply substitute one can mushroom stems & pieces for the fresh mushrooms. You may want to give them a quick chop to create uniform pieces.

Read More
Beef, Bread, Main Dish, Savory, Slow Cooker Brenda Drake + Chelsea Kasen Beef, Bread, Main Dish, Savory, Slow Cooker Brenda Drake + Chelsea Kasen

HOW TO: French Dip

Have roast beef leftovers? Meet your new favorite meal. Use the broth that is created when slow-cooking a beef roast for an unbeatable flavor.

Crisp bread, flavorful broth and tender beef . . . simply divine.

Done right, this sandwich will be a new favorite at your table. It is best to use the broth that is created when slow-cooking a beef roast, as that flavor is unbeatable.


HOW TO: French Dip

1. Bread

This is best on a fresh loaf of Brenda’s French Bread

  • Plan 2.5 hours to make the bread fresh OR

  • Substitute: bakery crusty rolls

2. Meat

Using leftover fully cooked Roast Beef:

  • Trim the fat and remove any bones

  • Slice tender beef 1/4” thick, across grain, for sandwiches

  • Retain the beef broth for the Au Jus (below)

3. Cheese

Select & slice your favorite melting cheese, recommended:

  • Provolone or

  • Mozzarella or

  • Cheddar

4. Au Jus

To a small pot, add:

1 1/2 cups beef broth (skim fat prior to measuring)

1 Tbsp Worcestershire sauce

1/4 tsp garlic powder

Taste test. If bland, add salt (~1/8 tsp).

Simmer for 10-20 minutes, reducing slightly. While simmering, assemble:

5. Sandwiches

Build the sandwiches:

  • Cut loaf into desired lengths (4 to 8”)

  • Slice loaf lengthwise

Layer (amounts subject to personal preference):

Mayonnaise

Roast beef, sliced

Pepper

Salt

Cheese

Keep the sandwich open-faced, placing both sides on pan and put in toaster oven.

  • “Toast” for 3-5 minutes, until cheese is melted.

  • Alternately, “broil” for 2-5 minutes in the oven

Close sandwich.

6. Serve

Toasted sandwich with a bowl of hot Au Jus for dipping.


Brenda’s tips:

  • Serving size: Au Jus recipe serves 4, and can be multiplied or divided.

  • Substitute as desired. The very best results will be achieved by using Brenda’s recipes for Roast Beef and French Bread as they provide the perfect flavor & texture.

  • The flavor of the Au Jus is dependent on the beef broth that is used. Brenda recommends using the leftover broth created when making a slow-cooked beef roast. The broth will have flavor from slow-cooking the meat & spices that simply can’t be matched.


Window to B’s kitchen . . .

Read More
Beef, Main Dish, Savory, Leftover Meals Brenda Drake + Chelsea Kasen Beef, Main Dish, Savory, Leftover Meals Brenda Drake + Chelsea Kasen

Chimichangas with Shredded Beef

Have roast beef leftovers? Make these chimichangas. Using leftover roast beefs helps this meal come together quickly, making it perfect for anyone.

This recipe is designed to use leftover roast beef, simmering with additional spices to make it perfect for Chimichangas. Using leftover roast beefs helps this meal come together quickly, making it perfect for anyone.

CAUTION: frying anything can be dangerous. Always keep your hands and face away from the hot oil. DO NOT add any water to the oil (hot or cold) or an explosion may result.


Chimichangas with Shredded Beef

Step 1: Prepare filling

To a medium pot, add:

1 cup roast beef, slow cooked to perfection & shredded

1/8 cup beef broth

1/2 tsp lime juice

1/2 tsp white vinegar

1/2 tsp garlic powder

1/2 tsp chili powder

1/4 tsp ground cumin

Simmer over medium heat until heated through, about 5 minutes.

Then fold in:

1/2 cup rice, cooked (optional)

1/2 cup black beans, cooked & heated (optional)

Set aside.

Step 2: Assemble chimichangas

Microwave for 10-20 seconds:

4 tortillas, burrito size

Placing on one edge, fill the tortilla with:

~1/2 cup filling

2 Tbsp shredded cheese

Roll up each tortilla:

  • Starting at the edge with the filling, begin to roll the tortilla while folding the two sides in slightly. Continue to roll the tortilla, containing all of the filling inside the roll.

  • Repeat until all tortillas are filled & rolled

Step 3: Pan-fry

To a large skillet (10” recommended), add:

1/4 inch oil (canola recommended)

Place over medium and heat until simmering.

Pan-fry chimichangas:

  • Carefully add the filled tortilla rolls, seam side down, to the hot oil

    • Fry in batches if the pan is not big enough to fit all four

  • Fry for about 1 minute, then, using tongs, turn about 60 degrees (1/6 turn)

  • Repeat rotations until all sides are golden brown

  • Remove from hot oil, drain on a paper towel

Step 4: Serve

Serve with a side of:

And/or over a bed of:


Brenda’s tips:


Window to B’s kitchen . . .

Read More
Beef, Main Dish, Savory, Slow Cooker, One Pot Wonders Brenda Drake + Chelsea Kasen Beef, Main Dish, Savory, Slow Cooker, One Pot Wonders Brenda Drake + Chelsea Kasen

Roast Beef in the Slow Cooker

This recipe produces a tremendously tender roast with a deep yet delicate savory flavor.

This recipe produces a tremendously tender roast with a deep yet delicate savory flavor. The bay leaves are intrinsic to producing the best tasting roast beef.

The directions below are for a slow cooker, but this recipe can be adapted for the stovetop or oven. See the Brenda’s tips section for these directions.


Roast Beef in the Slow Cooker

To the removable pot of a slow cooker, sprinkle the bottom with:

Seasoned salt

Garlic salt

In the slow cooker, where the beef rests, place:

2-4 bay leaves

Carefully place on top the bay leaves:

1+ lb roast, fully defrosted

Season the top of the roast:

Seasoned salt

Garlic salt

2-4 bay leaves

To the pot, add:

1 1/2 cups beef broth

Set heat* to “HIGH” and allow to cook for 4-8 hours, or “LOW” for 6-12 hours.

Test for tenderness with a fork, pulling a piece from the center of the roast:

  • Tender = done

  • Tough = allow to cook 1-2 hours longer and test again

Once cooked,

  • Transfer roast to serving platter

  • Strain broth through a wire mesh colander, reserving the broth for gravy or soup

Serve hot.


Brenda’s tips:

  • Serving size: Makes one roast, size dependent on the size of the roast

  • Recipe is for a fully trimmed roast or a bone-in beef roast

  • Use leftover roast beef for:

    • Shredded Beef Chimichangas

    • Roast Beef Stroganoff

    • French Dip Sandwiches

    • Chipotle Beef Rice Bowls

  • *Determining length of cooking time isn’t simply a mathematical equation as all slow cookers are not equal. Bone-in or fully trimmed may also impact the total cooking time. Keep in mind any specifics of the device in your kitchen. Below are some estimated times that may help:

    • Small roast = 1-2 lbs, cook on HIGH for ~4 hours, or LOW for ~6 hours

    • Medium roast = 3-5 lbs, cook on HIGH for ~5 hours, or LOW for ~8 hours

    • Large roast = 6-7 lbs, cook on high for ~8 hours, or LOW for ~12 hours

  • Stovetop Instructions: Sear the roast, season & add broth. Cover, reduce heat, and cook for 2-8 hours until tender. Hourly, check liquid and add as necessary to prevent pot from boiling dry.

  • Oven Instructions: Prep the same way as for a crockpot, cover, and place in 325F oven for 3-10 hours. Hourly, check liquid and add as necessary to prevent pot from boiling dry.


Window to B’s kitchen . . .

Read More
Beef, Main Dish, Savory, Pork Brenda Drake + Chelsea Kasen Beef, Main Dish, Savory, Pork Brenda Drake + Chelsea Kasen

Baked Classic Meatballs

These meatballs are best served with Brenda’s Marinara Sauce over spaghetti.

Baked Classic Meatballs

Heat a non-stick skillet to medium, and sauté:

1 Tbsp oil

1/4 cup onions, finely diced

2 tsp garlic, minced

Once cooked, set aside.

To a medium mixing bowl, add:

1/2 lb spicy Italian sausage

1/2 lb ground beef

1/4 cup bread crumbs

Sautéd onions & garlic

1/4 cup parmesan cheese

4 oz cream cheese

1 egg

1/2 tsp salt

1/4 tsp pepper

Mix together, working the ingredients together with your hands.

Form meatballs:

  • Portion meat mixture using a 2 Tbsp scoop

  • Lightly roll each between hands* to form the meatball

  • Evenly space in baking dish

Bake at 425F for 20-25 minutes until internal temp is at least 160F (recommended internal temp 175F).

Serve hot, with Marinara Sauce.


Brenda’s tips:

  • Serving size: 4

  • Substitute mild ground sausage if desired

  • *Rub canola or olive oil over hands prior to forming the meatballs to decrease stickiness


Window to B’s kitchen . . .

Mixing all the ingredients together with your hands . . .

Discover & share this Animated GIF with everyone you know. GIPHY is how you search, share, discover, and create GIFs.

Portioning the meatballs . . .

Discover & share this Animated GIF with everyone you know. GIPHY is how you search, share, discover, and create GIFs.

Shaping the meatballs with your hands . . .

Discover & share this Animated GIF with everyone you know. GIPHY is how you search, share, discover, and create GIFs.

Read More
Pasta, Savory Brenda Drake + Chelsea Kasen Pasta, Savory Brenda Drake + Chelsea Kasen

Marinara Sauce

A quick, red pasta sauce that can be put together in minutes, or simmered all day.

This basic marinara comes together quickly and can simmer for a few minutes. For a more developed flavor, simmer all day.


Marinara Sauce

To a large pot, heated to medium, add:

1 tbsp oil

1/2 cup onions, finely diced

2 tsp garlic, minced

Sauté until translucent, then add:

2 (15 oz) cans crushed tomatoes

1 tsp salt

1/2 tsp oregano, crushed

1/8 tsp cayenne pepper

1/8 tsp crushed red pepper

Simmer on low for 15 minutes. . . or a few hours.

If making with meatballs . . .

  • Add meatballs, continue to simmer for 15 minutes.

Serve hot over pasta.


Brenda’s tips:

Read More
Chicken, Main Dish, Savory Brenda Drake + Chelsea Kasen Chicken, Main Dish, Savory Brenda Drake + Chelsea Kasen

Chicken Fajitas

The perfect dinner dish to share with friends and family.

If you are looking for a way to use up the extra peppers and onions you have, Brenda highly recommends making these chicken fajitas. It’s the perfect dish to share with friends and family.


Chicken Fajitas

Prepare one batch of Tortillas: Tex-Mex style

  • Follow directions to make twenty 5” tortillas

  • OR use pre-packaged flour tortillas (Mission brand recommended)

Prepare one single batch of Fajita Seasoning

  • OR if you’ve got some mix already prepared

  • OR use a packet of Fajita Seasoning Mix

To a large [non-stick] skillet, heated to medium, add:

1 Tbsp oil

~1 cup red bell pepper, julienned

~1 cup green bell pepper, julienned

~1 cup onions, julienned

Sauté until crisp-tender. Transfer to serving dish & cover to retain heat. Set aside.

To that same skillet, heated to medium, add:

1 tsp oil

1 lb chicken breast, cut into 1/2” strips

Cook chicken, turning frequently, until it is evenly browned (~8 minutes). Reduce heat to medium-low and add:

1/4 cup chicken broth

~1 Tbsp fajita seasoning mix

Stir together well. Cover and simmer for ~2-4 minutes, stirring periodically, until chicken is cooked through.

While chicken cooks, prepare serving platter:

Tortillas, warmed

Sautéd onions & peppers

Sour Cream

Salsa

Guacamole

Tomatoes, diced

Lettuce, shredded

Cheese, grated

Transfer cooked chicken to serving dish* and serve hot.


Brenda’s tips:

  • Serving size: 4

  • *Recommended to cook everything in a non-stick skillet and, while cooking, heat an empty cast iron skillet in the oven at 300F. Once chicken is cooked, remove cast iron skillet from oven, add ~1 tsp of oil to coat bottom. Pour cooked chicken into hot cast iron skillet to serve.


Window’s to B’s kitchen . . .

Read More
Beef, Chicken, Main Dish, Savory Brenda Drake + Chelsea Kasen Beef, Chicken, Main Dish, Savory Brenda Drake + Chelsea Kasen

Fajita Seasoning

Pro tip: make a large batch of this fajita seasoning so you can make a quick lunch or dinner.

We’ve written this recipe in two ways:

  1. Single batch

  2. Enough to fill a spice jar (6 batches)

If you’re making enough to fill a spice jar, we recommend reusing an empty one. You’ll be glad you’ve made extra when you’re looking for a quick lunch or dinner idea.


Fajita Seasoning: Single Batch

*Recipe makes amount to season ~1 lb of chicken

To a small mixing bowl, add:

1 tsp corn starch

1 tsp chili powder

1/2 tsp salt

1/2 tsp sugar

1/4 tsp paprika

1/4 tsp ground cumin

1/4 tsp onion powder

1/4 tsp garlic powder

1/4 tsp chicken bouillon

1/8 tsp cayenne pepper

Sift together until evenly incorporated.


Fajita Seasoning: Mix Ahead & Store

*Recipe makes amount to season ~6 lbs of chicken

To a small mixing bowl, add:

2 Tbsp corn starch

2 Tbsp chili powder

1 Tbsp salt

1 Tbsp sugar

1 1/2 tsp paprika

1 1/2 tsp ground cumin

1 1/2 tsp onion powder

1 1/2 tsp garlic powder

1 1/2 tsp chicken bouillon

3/4 tsp cayenne pepper

Sift together until evenly incorporated.


Brenda’s tips:

  • Serving size: 1 or 6 batches of fajitas

  • Prefer spicier? Increase the cayenne pepper incrementally until desired spice level is reached

  • Remove or adjust amounts of each ingredient for personal flavor preference

Read More
Chicken, Main Dish, Savory Brenda Drake + Chelsea Kasen Chicken, Main Dish, Savory Brenda Drake + Chelsea Kasen

Crispy Chicken Bites

Toss these Crispy Chicken Bites in sauce or serve as is.

A long-time family favorite, Brenda has been making these Crispy Chicken Bites for decades. Toss with sauce, or serve as is.


Crispy Chicken Bites

Step 1: Assemble

  1. Prepare a first sheet pan by lightly spritzing with non-stick spray = Sheet Pan A

  2. Prepare a second sheet pan by covering with aluminum foil = Sheet Pan B

  3. Set oven to 400F to preheat

  4. To a first pie plate add:

    1 egg, beaten

    1 tsp garlic salt

  5. To a second pie plate, add:

    1/2 cup corn starch

  6. Trim & cut:

    1 lb chicken breast, cut into 1” cubes

  7. Begin to heat a large skillet over medium, with:

    1/4” oil (canola recommended)

  8. Allow to heat while continuing to Step 2.

Step 2: Prep Chicken

  1. Add all of the chicken to the first pie plate, combining with the beaten egg and stir around until each piece is coated

  2. Select one piece:

  • Dredge in the prepared corn starch in the second pie plate

  • Flip to coat other side

  • Remove and place coated chicken on prepared Sheet Pan A (spritzed with non-stick spray)

  • Repeat until all chicken is coated

Step 3: Cook

Note: it may be necessary to cook the chicken in 2 or 3 batches. It is important not to crowd the skillet, but to leave at least 1/2” of space between chicken pieces.

Caution: always be careful when frying - even in shallow oil.

Using heat-proof tongs:

  1. Carefully & quickly, piece by piece, add the coated chicken pieces to the hot oil

  2. Cook for ~2 minutes, or until golden

  3. Flip each piece to other side, cooking an additional 2 minutes or until golden

  4. Transfer chicken to Sheet Pan B (foil-covered)

  5. Place Sheet Pan B in hot oven

  6. Repeat with remaining chicken (if needed)

Bake chicken for 8-12 minutes, until internal temperature is 165F.

Remove Sheet Pan B from oven and sprinkle Crispy Chicken lightly with:

Garlic Salt

Serve hot.


Brenda’s tips:

  • Serving size: 4

  • The oil added to the skillet is not specified in cups or ounces, but instead adding oil until it is 1/4” deep in the skillet - this direction is given because two skillets that are marketed as the same size may have vastly different volumes (due to shape) and the depth of the oil is the important element.

  • When cooking, “dredge” refers to coating the item with a dry ingredient, in this recipe it is corn starch.

  • The method of pan-frying and then baking is recommended to create a crisp crust without drying out the chicken pieces. Pan frying until the chicken is cooked through is also an option, but often the breading will become soggy. It also makes it easier to manage if many batches are needed. Alternately, the chicken can be deep fried, cooking for 3-6 minutes in small batches.

  • Serving recommendations:


Window to B’s kitchen . . .

Crispy Chicken Bites served with Brenda’s favorite Sweet & Sour Sauce

Read More
Chicken, Main Dish, Pork, Savory, Beef Brenda Drake + Chelsea Kasen Chicken, Main Dish, Pork, Savory, Beef Brenda Drake + Chelsea Kasen

Sweet & Sour Sauce

The balanced flavors of this sauce compliment beef, pork, chicken, noodles, and veggies.

A good Sweet & Sour Sauce is a necessary element in any home cooks repertoire. This one is the best - balanced flavors that compliment beef, pork, chicken, noodles, and veggies.


Sweet & Sour Sauce

To a small saucepan, add:

2/3 cup pineapple juice*

1/2 cup brown sugar

2 Tbsp apple cider vinegar

2 Tbsp ketchup

2 tsp soy sauce

1/8 tsp garlic powder

1 Tbsp corn starch

Whisk together, place pot over medium heat.

Stir continuously (otherwise cornstarch will clump) until the sauce boils and begins to thicken.

Remove from heat, continuing to stir for ~1 minute.

Serve hot.


Brenda’s tips:

  • Serving size: 4

  • *Sub ~2 Tbsp pineapple concentrate stirred into water to make 3/4 cup

  • Refrigerate leftover sauce, reheating to use

  • Serve over chicken, pork, beef or noodles

Read More
Breakfast, Savory, How To, Bacon Brenda Drake + Chelsea Kasen Breakfast, Savory, How To, Bacon Brenda Drake + Chelsea Kasen

HOW TO: Breakfast Burritos

The perfect grab-and-go breakfast with lots of carbs and protein.

Brenda is a big believer in breakfast, ideally mostly carbs. John also enjoys breakfast, but prefers a breakfast that prioritizes protein. The breakfast burrito, in all it’s many iterations, brings both. Along with the added benefit of “grab and go” since time always seems to be tight in the morning.


HOW TO: Breakfast Burritos

Identify & set aside desired additional ingredients for the breakfast burrito filling, here are some suggestions:

  • Bacon, cooked and chopped

  • Sausage, cooked and drained

  • Ham, cubed or deli-slices

  • Mushrooms, chopped

  • Onions, finely diced

  • Bell peppers, diced

  • Potatoes, cooked (hash browns, tots, fries, etc.)

  • Rice (leftover fried rice is especially delicious)

  • Corn, steamed

Place a non-stick skillet on the stove and set to medium to preheat skillet.

Place a second skillet on the stove, adjust heat to medium-low, and immediately add:

1 flour tortilla

Brush lightly with:

Butter

Flip. Add:

Cheese (sliced or shredded or crumbled)

Allow to cook so the cheese slowly melts and tortilla stays soft. While that cooks, prepare the following . . .

To a small bowl, add:

2 eggs

1 tsp water

Whisk until well blended.

Grease the first skillet with:

~1 tsp butter (or bacon fat)

Ensure that full surface of the skillet is covered. When butter has completely melted and sizzles, pour in:

Whisked eggs

Additional Ingredients (~ 1 Tbsp of each)

Using a heat-proof spatula,* scrape mixing bowl. Use the spatula to cook the eggs, lifting and stirring, while keeping the eggs & additions together as a single patty. Flip the egg patty over to cook on the other side. DO NOT allow the egg to brown.

Once cooked through, transfer the egg patty to top the melted cheese on the tortilla.

Add any fresh ingredients:

  • Tomatoes, diced

  • Avocados, sliced (or guacamole)

  • Green onions

  • Micro greens

And condiments:

  • Sour cream

  • Taco sauce

  • Salsa

  • Horse radish

Roll up and serve hot OR wrap in a sheet of aluminum foil for breakfast on the go.


Brenda’s tips:


Window to B’s kitchen . . .

Read More
Beef, Main Dish, Savory, One Pot Wonders Brenda Drake + Chelsea Kasen Beef, Main Dish, Savory, One Pot Wonders Brenda Drake + Chelsea Kasen

Beef Enchilada Skillet

This recipe is all about getting dinner on the table fast. Pair with Sweet Corn Bread and/or Instant Pot Spanish Rice for a filling dinner in less than half an hour.

This recipe is all about getting dinner on the table fast. Recommended to pair this recipe with:

Start both and then put together the skillet, and dinner could be on the table in less than half an hour.


Beef Enchilada Skillet

In an oven-safe skillet, prepare:

1/2 recipe Red Enchilada Sauce

  • Or, substitute: 1 packet of Enchilada Seasoning Mix & 3/4 cup chicken broth

To the prepared sauce, add:

1/2 lb ground beef, cooked & drained

1 (15 oz) can black beans, rinsed & drained

1 cup frozen petite corn

Cook on medium heat for ~10 minutes, stirring occasionally.

Sprinkle with:

1/2 cup shredded cheese

Allow cheese to melt & serve hot.

Garnish with:

  • Cilantro

  • Tomatoes, diced (or salsa)

  • Guacamole

  • Lettuce


Brenda’s tips:

  • Serving size: 4

  • Brenda prefers to use 3/4 cup dry beans prepared in the pressure cooker (takes an extra ~40 minutes) in place of canned. Don’t forget to rinse after cooking.

Read More
Instant Pot, Savory, Side Dish, One Pot Wonders Brenda Drake + Chelsea Kasen Instant Pot, Savory, Side Dish, One Pot Wonders Brenda Drake + Chelsea Kasen

Instant Pot Spanish Rice

A delicious and basic Spanish rice to accent any meal. Especially great when paired with Tacos, Enchiladas, or Brenda’s Beef Enchilada Skillet.

A delicious basic Spanish Rice to accent any meal.

Leveraging the multi-function possibilities of the Instant Pot, this recipe is truly one pot.

*A word of caution* any time you start a recipe by sautéing in the Instant Pot, it is absolutely critical to deglaze the pot. Or when the pressure is released, you’ll lift the lid to find the bottom burned. As directed below, don’t forget to deglaze the pot!


Instant Pot Spanish Rice

Select “Sauté” setting on the Instant Pot, add:

1 Tbsp oil

1/4 cup onion, finely diced

1 tsp garlic, minced

Stir while cooking, about 2 minutes.

Deglaze pot by adding:

1/2 cup water (or chicken broth)

**Make sure the entire bottom was deglazed, or else the rice will burn**

Immediately add:

1 cup chicken broth

1 1/2 cups rice

1 (15 oz) can crushed tomatoes

1 tsp chili powder

3/4 tsp salt

1/4 tsp ground cumin

Stir well to combine.

Cover with pressure lid:

  • Adjust pressure release valve to "Sealing"

  • Select "Rice

Allow pressure cooker to complete cycle, then:

  • 5 minutes Natural Pressure Release

  • Quick Pressure Release any remaining pressure

Fluff rice & serve hot.


Brenda’s tips:

Read More
Bread, Savory Brenda Drake + Chelsea Kasen Bread, Savory Brenda Drake + Chelsea Kasen

Quick Homemade Hamburger Buns

These homemade hamburger (or hotdog) buns will be ready to eat in under one hour.

These homemade hamburger (or hotdog) buns will be ready to eat in under an hour. Homemade hamburger buns have never been so easy!

This is another recipe shared by Brenda’s younger sister, Sheryl - - - you’ll want to try these.


Quick Hamburger Buns

To a large mixing bowl, add:

1 1/8 cup warm water

1 1/2 Tbsp yeast

1/4 cup sugar

Mix together, allowing yeast to bloom*, then stir in:

2 3/4 cups flour

1 tsp salt

1 egg

1/3 cup oil

Dough should be somewhat “shaggy” indicating that it’s thickened enough to knead. Clean spoon and begin to knead, sprinkling in:

1 Tbsp increments flour, totaling 1/4-1/2 cup

Then follow these steps:

  1. Knead for about 10 minutes or until dough is soft and elastic

  2. Let rise 10 minutes

  3. Divide dough into 12 equal pieces

  4. Shape into balls, flatten, and place 3” apart on two greased sheet pans

  5. Proof** 10 minutes

  6. Turn oven to 425F to preheat

  7. Allow to proof ~10 minutes longer

  8. Optional: brush tops with egg whites

  9. Bake at 425F for 8-12 minutes

Remove from oven. Let sit 5 minutes, then serve.


Brenda’s tips:

  • Serving size: 12 standard hamburger buns

  • *Bloom: After combining the water, sugar, and yeast let it sit until the mixture starts to naturally change (indicates yeast is working)

    • Yeast is a living organism. In order for yeast to cause the dough to rise, you must respect the ingredient and not kill the yeast early by:

      • burning it: too hot water

      • smothering it: butter/oil direct on yeast that hasn't yet bloomed will coat the yeast

      • poisoning it: salt added directly to yeast that hasn't bloomed

  • **Proof means to allow the yeast to work (aka let the dough rise)

    • Proof these buns at room temperature for the recommended time

    • Brenda always recommends allowing any and all yeast baked goods to rest five minutes after baking. If you cut into a baked good prior to the five minutes, the baked good will "steam," causing the interior to clump and an inferior crumb to result. Wait five minutes and the baked good will cut cleanly and have a smooth open crumb.

  • This recipe also works great for hotdog buns. All you need to do is adapt the shaping.

  • Great to use with:

Read More
Beef, Main Dish, Savory, Bacon Brenda Drake + Chelsea Kasen Beef, Main Dish, Savory, Bacon Brenda Drake + Chelsea Kasen

Farm-style California Burger

This cheeseburger was a staple in Brenda and Chelsea’s diet during marathon training.

One of Chelsea’s go-to protein-packed favorites. This is a meal to be savored.


Farm-style California Burger

Prepare:

Plate as follows:

1 hamburger patty (freshly cooked)

1 cheddar cheese slice

2 slices bacon

3 avocado slices

1 fried egg

Serve hot.


Brenda’s tips:

  • Serving size: 4. Make as many as needed by multiplying amounts above

  • A staple during marathon training, this is calorie-heavy for a reason!

  • Swap out the fried egg for a poached egg

  • Serve on a bun if desired, Brenda’s homemade-style recommended

Read More
Beef, How To, Main Dish, Savory Brenda Drake + Chelsea Kasen Beef, How To, Main Dish, Savory Brenda Drake + Chelsea Kasen

HOW TO: Hamburger Patties

Learn how to make and shape hamburger patties, and how to cook them to perfection.
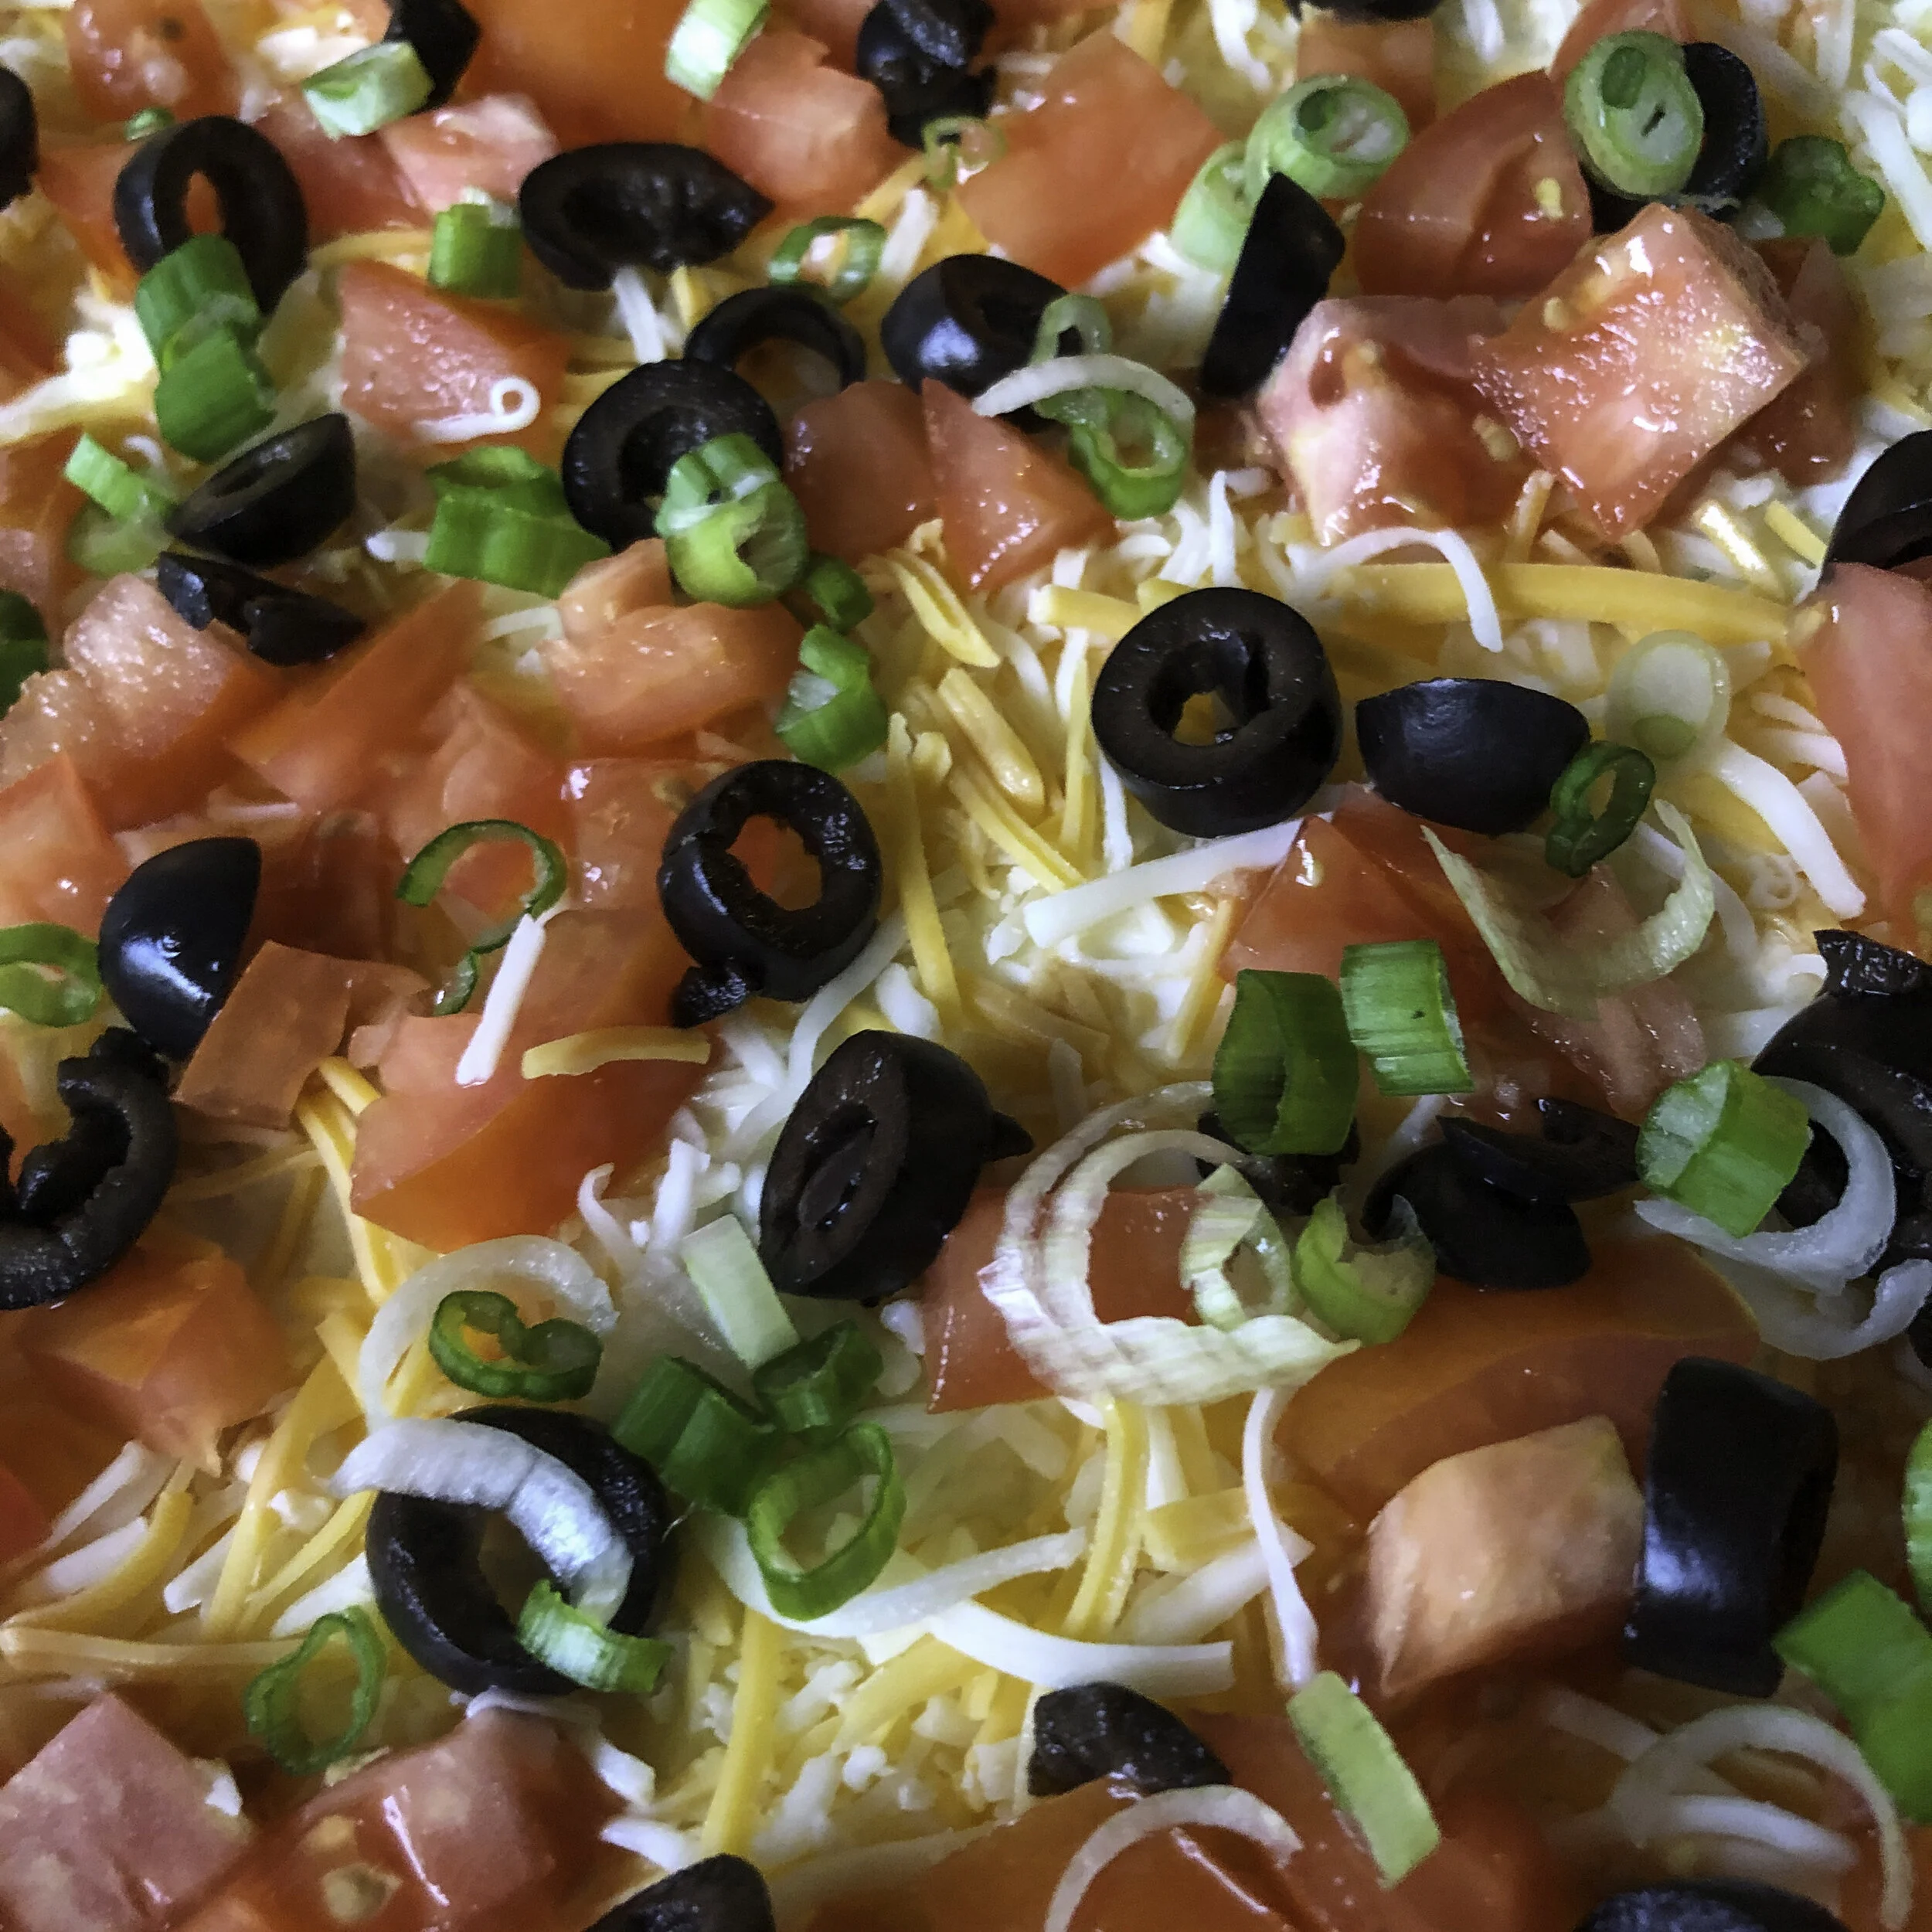
This post is inspired by Chelsea’s obsession with great burgers and Brenda’s love of delicious beef. Once upon a time, back during the NYC days, Chelsea organized a “burger club” with the sole purpose of trying the top burger at as many NYC burger joints as possible. Bacon infused, deep fried, smash burgers . . . all delicious.


HOW TO: Hamburger Patties

Beef burgers are best, great dressed up or simplified, and are incredibly quick too.

Step 1: Select the beef & make sure it’s defrosted

  1. Want a super juicy burger? Go with 70/30 ground chuck - 70% lean beef & 30% fat.

  2. Slightly less fatty but still very delicious? 80/20 ground chuck is recommended. Still enough fat to add delicious flavor, but at least it sounds healthier.

  3. Or, if grinding your own is an option . . .

  • Use 80% lean beef (chuck roast or round steak)

  • and 20% bacon fat

  • Grind together for a truly delectable alternative

Step 2: Select desired style and create your mixture

  1. [Almost] ‘nothing but ground beef’ style:

    To a large mixing bowl, add:

    1 lb hamburger (defrosted)

    1 tsp seasoned salt

    1 tsp garlic powder

    Mix together, working the beef with your hands, to break up any clumps of beef.

  2. Gourmet Burger restaurant style:

    In a large mixing bowl, combine:

    1 lb hamburger (defrosted)

    1 Tbsp Worcestershire sauce

    1 Tbsp crushed saltine crackers

    1 tsp garlic powder

    1 tsp seasoned salt

    1 egg

    1 tsp parsley

    Mix together, working the ingredients together with your hands until everything is evenly incorporated.

Step 3: Form the patties

  1. Divide beef mixture

    • 4 = 1/4 lb patties

    • 3 = 1/3 lb patties

    • 2 = 1/2 lb patties

  2. Select one portion, form into a ball

  3. Place ball on square of parchment paper, press to flatten until it’s about 4" in diameter

  4. Use the back of a spoon to press a small indent in the center (this will keep the center of the patty from bubbling up while cooking)

  5. Set aside and repeat with remaining portions, stacking prepared patties

Step 4: Cook

Select one of the following two ways to cook the patties:

  1. Cast iron skillet (recommended)

    • Preheat skillet at medium heat on stovetop until sizzling

    • Lightly butter hot skillet

    • Place prepared patties in hot pan to sear and allow to cook for 2-4 minutes

    • Flip patties and cook on other side for 2-4 minutes

    • Remove from pan and place in covered dish to retain heat until ready to serve

  2. Grill

    • Preheat grill

    • Place prepared patties on hot grill and allow to cook for 2-4 minutes

    • Flip patties and cook on other side for 2-4 minutes

    • Remove from pan and place in covered dish to retain heat until ready to serve

Step 5: Dress & serve

Keep it simple or go all out, here are some of our favorite combinations:

  1. Hamburger (or cheeseburger) with lettuce, tomatoes, pickles & fry sauce

  2. Bacon cheeseburger

  3. Farm style (fried or poached egg on top) with bacon

  4. Blue cheese & bacon

  5. Sub glazed donuts for the buns


Brenda’s tips:

  • Serving size: four, quarter-pound (1/4 lb) burgers

  • Patties can be pre-formed, wrapped and stored in freezer for ~3 months

  • Recommended to make these fresh hamburger buns

  • Don’t forget to serve with french fries!

Read More
Bread, Savory, Side Dish, Breakfast, Bacon Brenda Drake + Chelsea Kasen Bread, Savory, Side Dish, Breakfast, Bacon Brenda Drake + Chelsea Kasen

Avocado Toast

Brenda’s fresh French Bread makes this Avocado Toast recipe even better!

Brenda’s fresh French Bread makes this Avocado Toast recipe even better!


Avocado Toast

Slice & toast:

2-4 slices of bread (Brenda’s French Bread recommended)

Select a perfectly ripe:

Avocado

  • Cut in half, open, and remove the seed.

  • Using a knife, slice the fruit inside the shell and then scoop out with a spoon.

Place ~1/4 of the avocado on each slice of toasted bread.

Optional: Smash lightly with a fork.

Sprinkle with:

Salt

Pepper

Serve immediately.


Brenda’s tips:

  • Serving size: 2-4

  • Variations:

    • Top with a poached egg

    • Sprinkle with other herbs & spices, such as crushed red pepper

      • Chelsea likes to use Trader Joe’s Everything but the Bagel seasoning

    • Garnish with fresh microgreens

    • Add a slice of smoked gouda cheese

    • Add bacon strips or crumbles


Window to B’s kitchen . . .

Read More
Savory, Side Dish Brenda Drake + Chelsea Kasen Savory, Side Dish Brenda Drake + Chelsea Kasen

Seven Layer Dip

Seven Layer Dip is a perfect contribution to any party, refrigerates well and doubles as a fairly well-balanced snack or even meal.

Seven Layer Dip is a perfect contribution to any party, refrigerates well and doubles as a fairly well-balanced snack or even meal.

This dip can be assembled using prepared refried beans and guacamole, or follow the links to make them from scratch.


Seven Layer Dip

To a small mixing bowl, add:

1 (16 oz) can refried beans

2 Tbsp (1 pkg) taco seasoning

Stir together, spoon into the bottom of a 13” x 9” dish and spread smooth.

Spoon over the surface, evenly distributing:

1 cup guacamole

Use an offset spatula to spread, then dollop with:

1 cup sour cream

Spread evenly, then sprinkle with:

1 cup cheese, shredded

1/2 cup tomatoes, diced

1/2 cup black olives, sliced

1/4 cup green onions, chopped

Serve fresh with tortilla chips.

Refrigerate leftovers.


Brenda’s tips:

  • Serving size: 8-12

  • Assemble dip in any flat-bottomed dish, narrower containers will create thicker layers

  • Substitute salsa for the fresh diced tomatoes if desired


Window to B’s kitchen . . .

Read More
Side Dish, Savory Brenda Drake + Chelsea Kasen Side Dish, Savory Brenda Drake + Chelsea Kasen

Fresh Guacamole

A simple fresh guacamole recipe for everyone to enjoy!

Fresh Guacamole

To the bowl of a mixing bowl, add:

2 avocados, pitted & scooped from peel

2 tsp lime juice

Using a fork, lightly mash together. Sprinkle with:

1/4 tsp salt

Then add:

2 Tbsp onions, finely minced

2 Tbsp cilantro, chopped

2 tsp jalapeño pepper, finely minced

1/2 tsp garlic, finely minced

Fold together. Serve immediately.


Brenda’s tips:

  • Serving size: 4

  • Adjust any of the ingredients to taste.

  • Prefer mild? Remove the seeds & veins from the jalapeño. Leave out jalapeño completely if extra mild is preferred.

  • Refrigerating? Cover with plastic wrap, pressing the plastic wrap directly on the surface of the prepared guacamole.


Window to B’s kitchen . . .

Read More
Chicken, Main Dish, Savory Brenda Drake + Chelsea Kasen Chicken, Main Dish, Savory Brenda Drake + Chelsea Kasen

Buffalo Chicken Quesadillas

These quesadillas can be prepared completely from scratch OR sub in Mission Flour Tortillas and Frank’s Buffalo Sauce if you’re in a hurry.

These quesadillas can be prepared completely from scratch OR sub in Mission Flour Tortillas and Frank’s Buffalo Sauce if you’re in a hurry.


Buffalo Chicken Quesadillas

If making completely from scratch, 3-8 hours before dinnertime:

About 1 hour before dinnertime:

  • Prepare one batch of tortillas, recommended to make 8 - 8”

About 15 minutes before dinnertime:

Now you’re ready . . .

Prep

Set a cast iron (or non-stick) skillet over medium-low heat.

In a mixing bowl, combine:

1 lb shredded chicken

1/4 cup buffalo sauce (double if desired)

Stir together, then fold in:

1 cup shredded cheese

Set aside.

Cook

  • Place tortilla on heated skillet, warm for ~10 seconds

  • While warming, lightly butter the top surface completely

  • Flip tortilla. Buttered side will now be against skillet

  • Spoon 1/4 of the chicken mixture on half of tortilla, folding other half over filling

  • Stove heat should be medium-low, adjust as necessary:

    • too hot and it’ll burn the tortillas

    • too cold and it won’t crisp the tortillas

  • Allow to cook for 1-2 minutes then flip

  • Heat on second side for an additional 1-2 minutes

  • Remove from pan

Serve hot.


Brenda’s Tips:

  • Serving size: 4 quesadillas

  • Best served with carrot & celery sticks . . . don’t forget the Ranch Dressing


Window to B’s kitchen…

Read More